Art Party - Let's Make Some Happy Little Accidents!
If you have a budding artist (like I do), you might want to suggest an art party theme for your child’s next birthday.
As you can see by the photos, my daughter had a great time creating and sharing her “happy little accidents” with friends and family. Not only is this party theme easy to set up, but it encourages your child to express themselves and can even introduce new art concepts or media (if you do your homework).
Please note this page contains affiliate links. Any purchases made through these links will not incur additional fees on your part. Thank you for your support!
Decorations & Activities
It's All in the Details
Invitations & Party Favors
DIY Your Own
Party Food
Themed Snacks
DetailsPartyDesigns is your one stop shop for all things party-planning!
Click on the links below for a list of supplies needed to create the decorations, activities, and party favors/bags I describe in this post.
Check Out These Party Decorations!
Art Party Decorations
Easy DIY Art Party Decorations
The decorations below are from my daughter’s 10th birthday party. Art is her favorite subject in school and has been for a number of years. Luckily, there’s a plethora of art party ideas on Pinterest; in fact, there were so many fun ideas, it was hard to narrow it down to my favorites. Be sure to download the artist template to make your own “wall decal” and matching invitation.
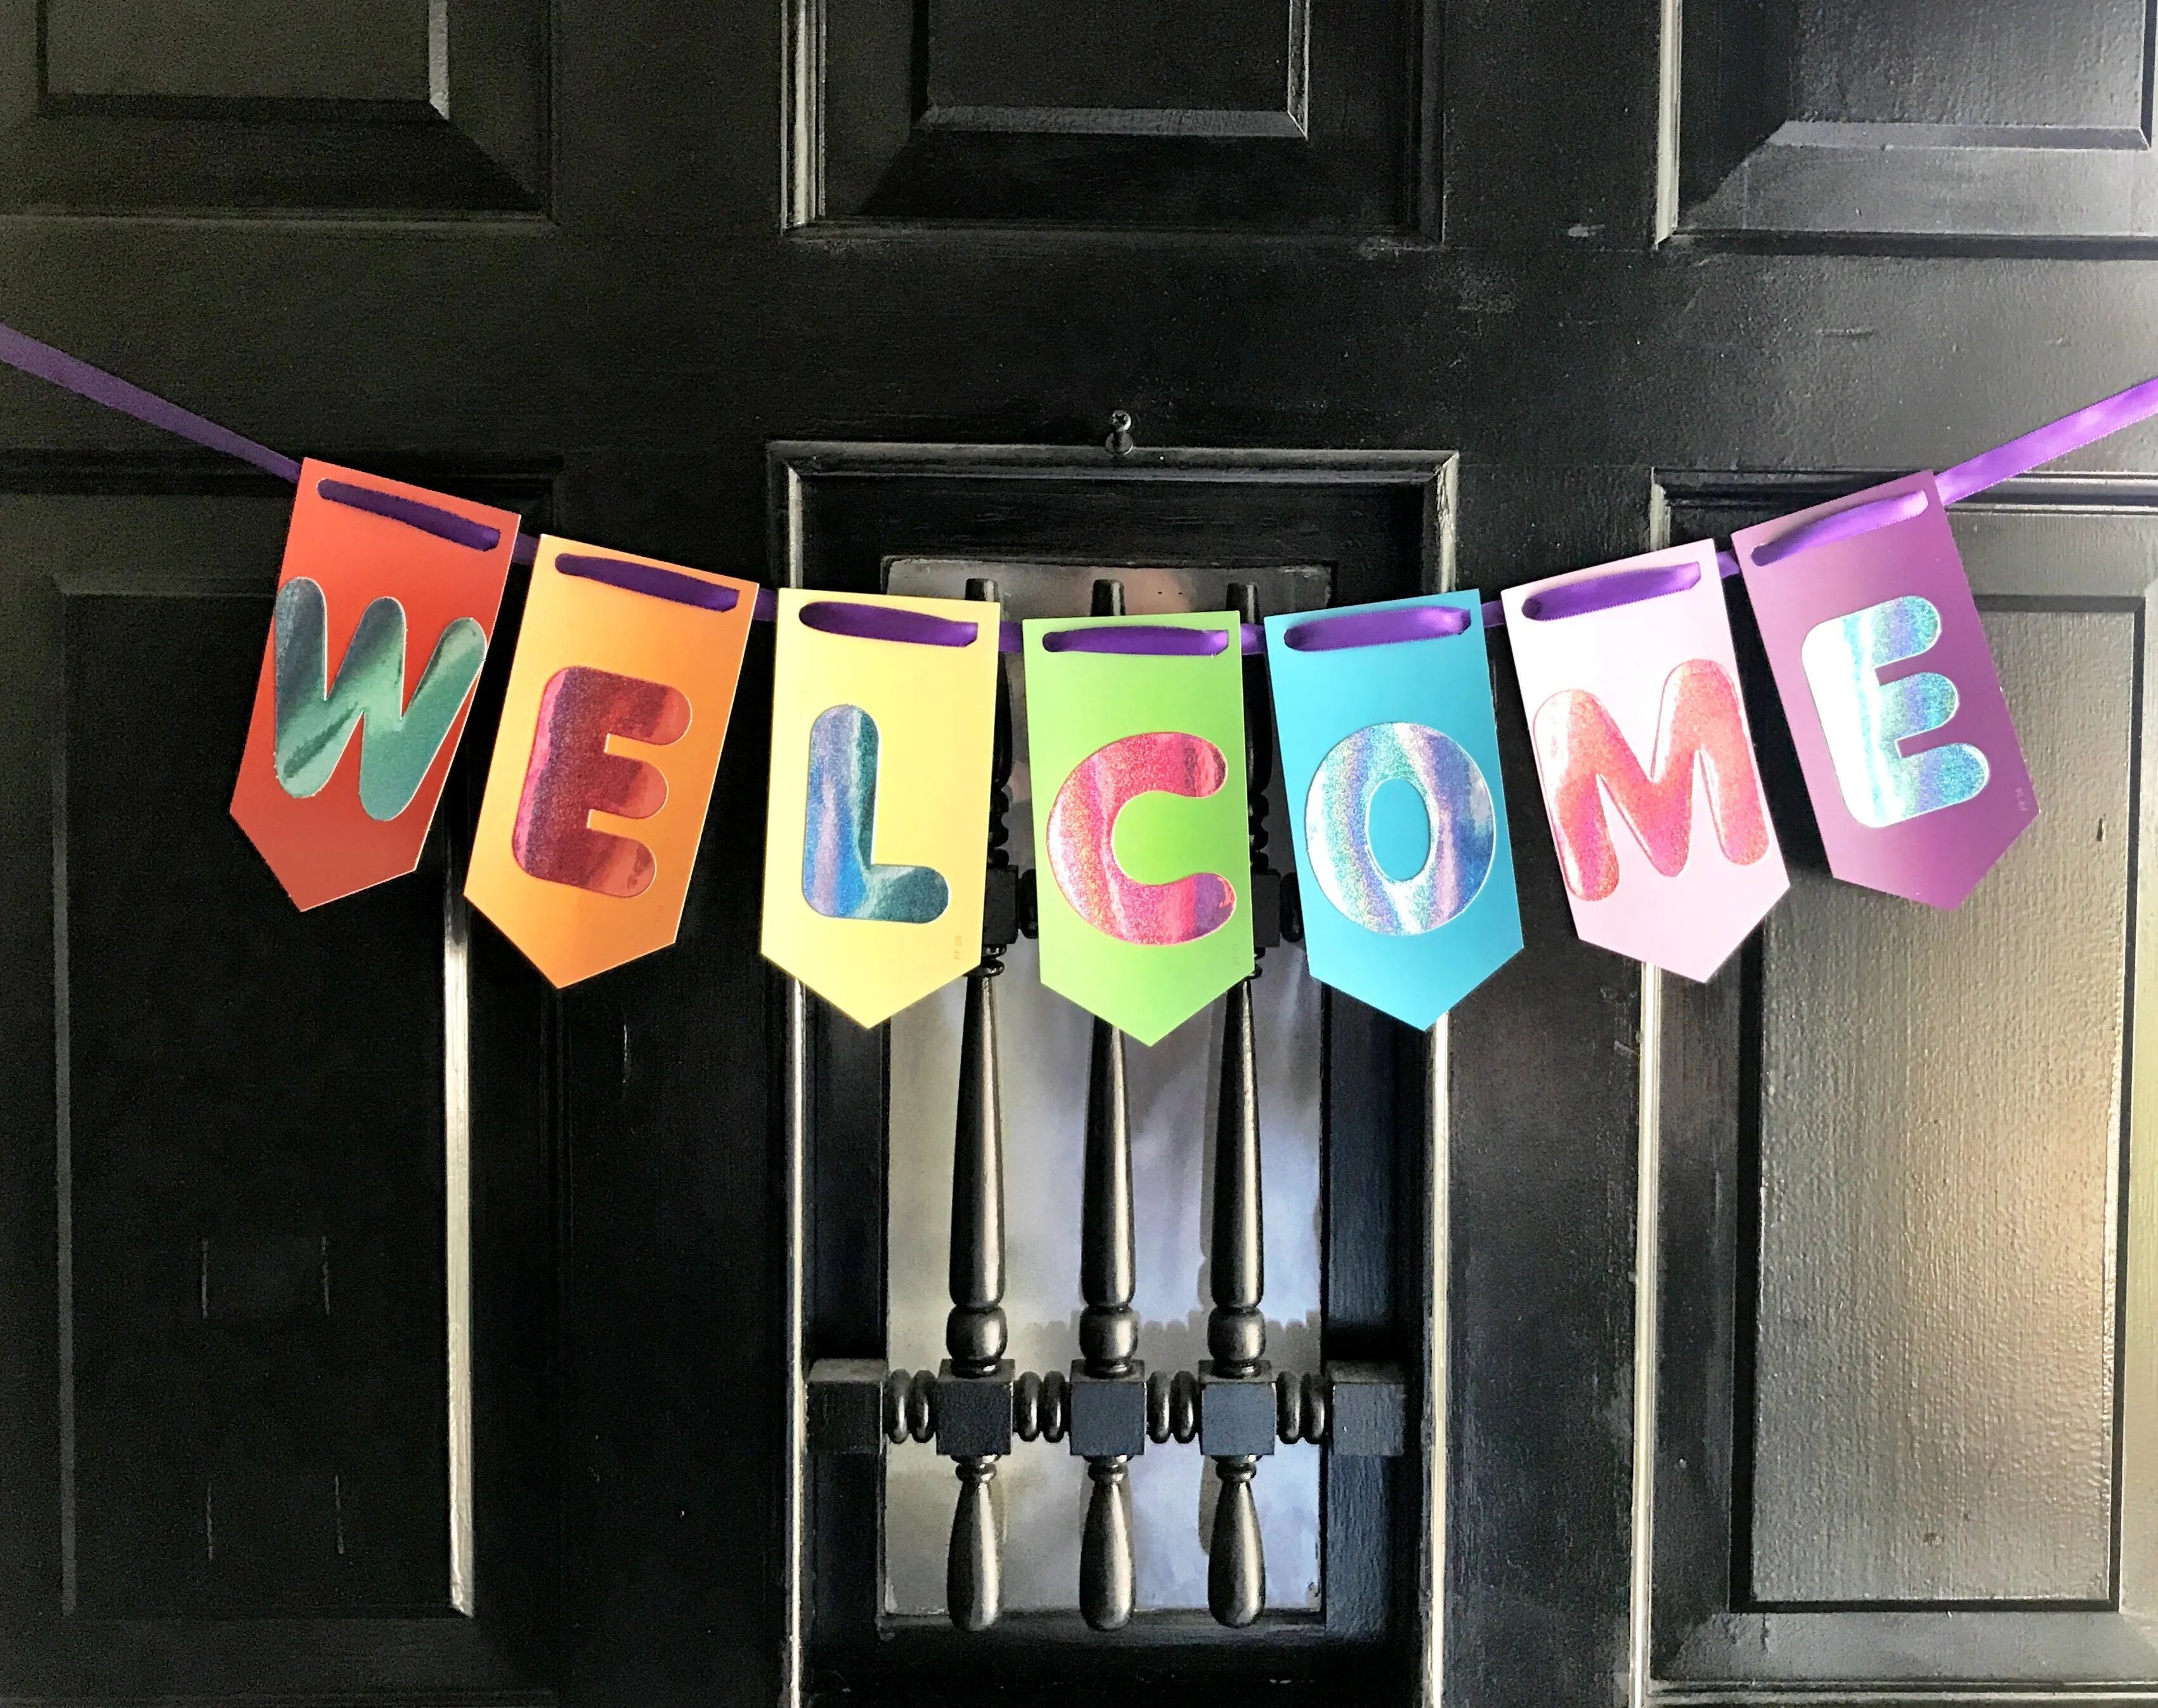
Welcome to the Party
This welcome sign was super-simple to put together. My first objective was to “borrow” a handful of colorful paint chips from a local hardware store. I let my kids do the actual “borrowing” part, as the store staff tend to be more forgiving when a child grabs a handful of paint swatches (versus an adult) and runs for the exit. Punch holes in the top of each paint chip and use satin ribbon to connect the different colored cards. I purchased small shiny letters from a craft store in town and glued them to each card to spell out “Welcome,” but you might also want to use your handy-dandy Cricut machine to cut out your own letters.
Image credit: DetailsPartyDesigns
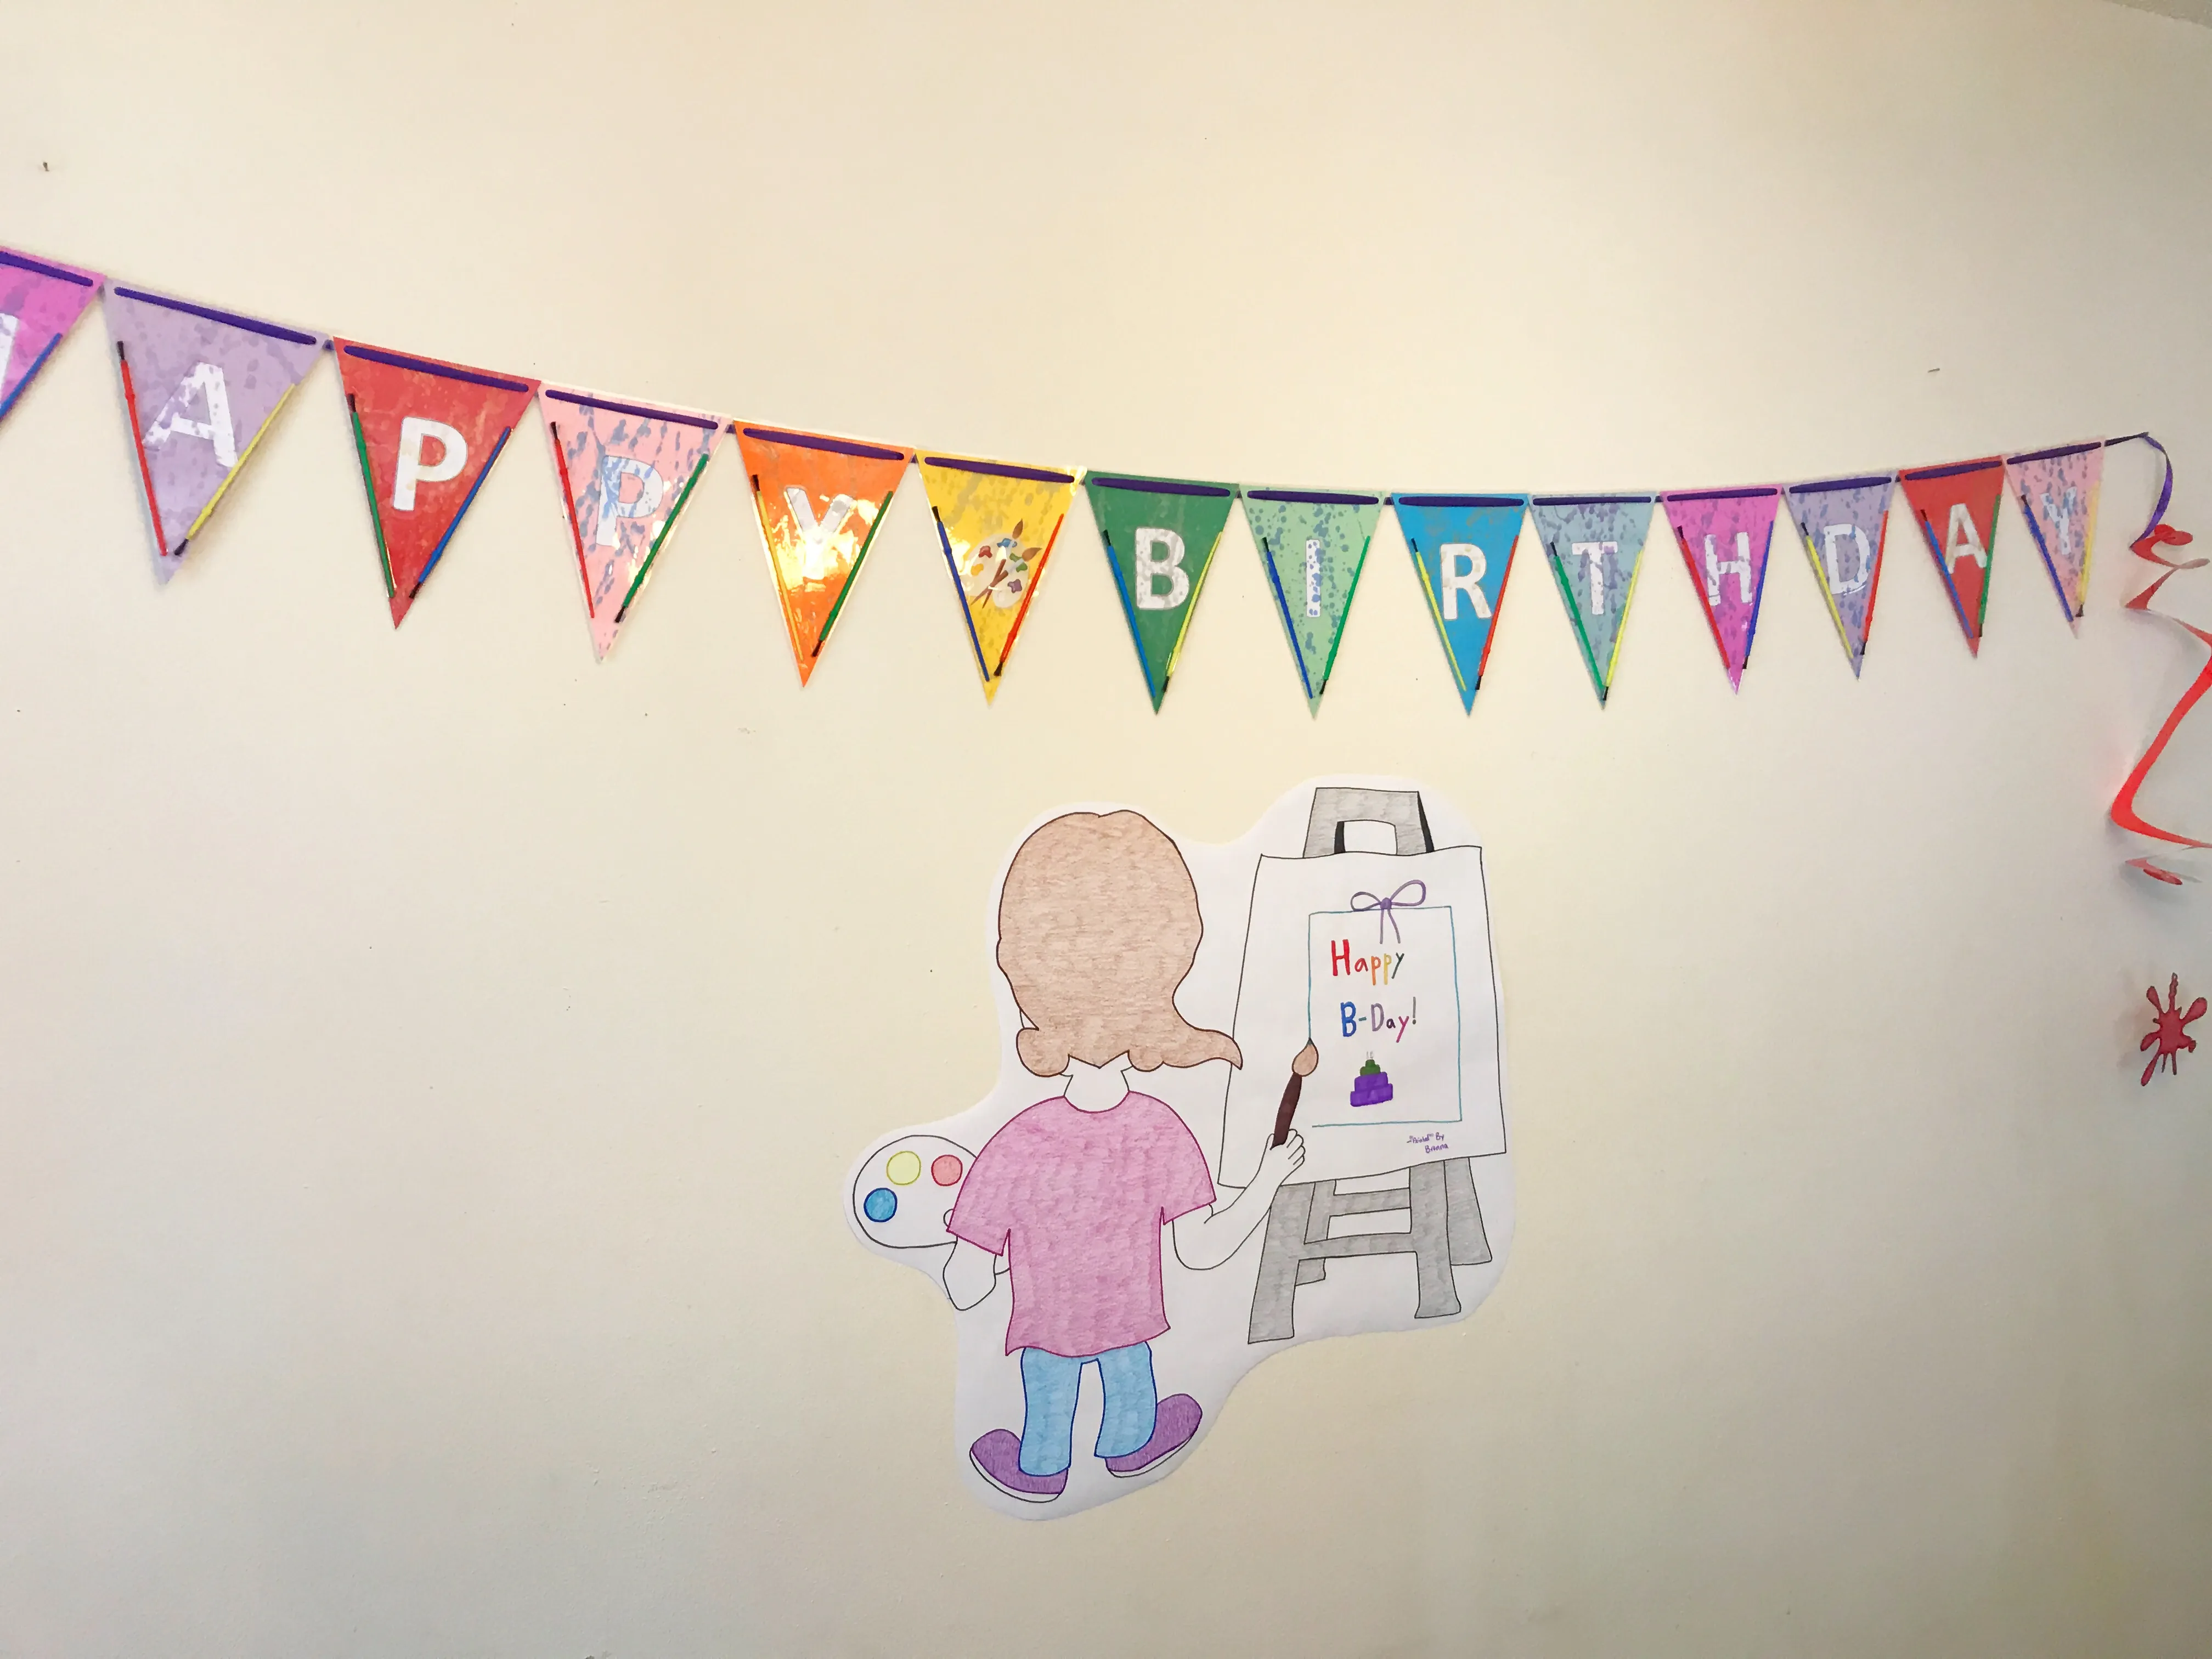
Happy Birthday Art Banner
This birthday bunting was a labor of love…or frustration…but either way, it turned out pretty good in the end. I started with a packet of cardstock pennants in multiple colors and added pre-cut letters to spell out “Happy Birthday.” To give it a bit more “flare,” I decided to splatter paint in different colors across each pennant. It’s hard to see that effect in the photo because I also laminated the pennants (I wouldn’t recommend that – the glare made it difficult to read). I then used super glue to attach colorful plastic paintbrushes to the sides of the pennants. Lastly, I punched holes in the top of the pennants and strung the banner up with satin ribbon.
You can get your own copy of the “young artist” by clicking on the pink “Download Template” button above. I used my trusty art projector to blow up the image and trace it onto a piece of white butcher paper. My daughter helped me color the little girl and added her own “Happy B-Day!” message on the canvas.
Image credit: DetailsPartyDesigns

Geometric Rainbow Backdrop
This was a great find on Amazon (there’s a link above) that really brightened up the room during my daughter’s party. It’s a standard-sized shower curtain that worked perfectly for our double window. We all liked it so much that it’s still hanging in our dining room. I wrapped some purple tulle around the curtain rod at the top for an additional decorative touch.
Image credit: DetailsPartyDesigns
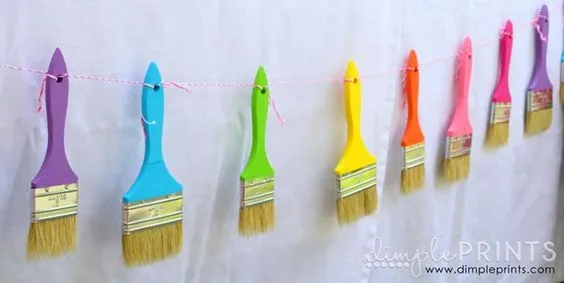
Paint the Town
Yep, you guessed it…another trip to the hardware store! However, I don’t suggest “borrowing” these paintbrushes. You should just buy them instead. I purchased eight 2-inch brushes and painted them rainbow colors (red, pink, orange, yellow, green, light blue, dark blue, and purple). I then used satin ribbon to string them together. You’ll have to play around with the ribbon to make the brushes hang like the photo above. Once complete, I hung my rainbow paintbrushes across the geometric rainbow backdrop (see above).
Image credit: dimpleprints.com
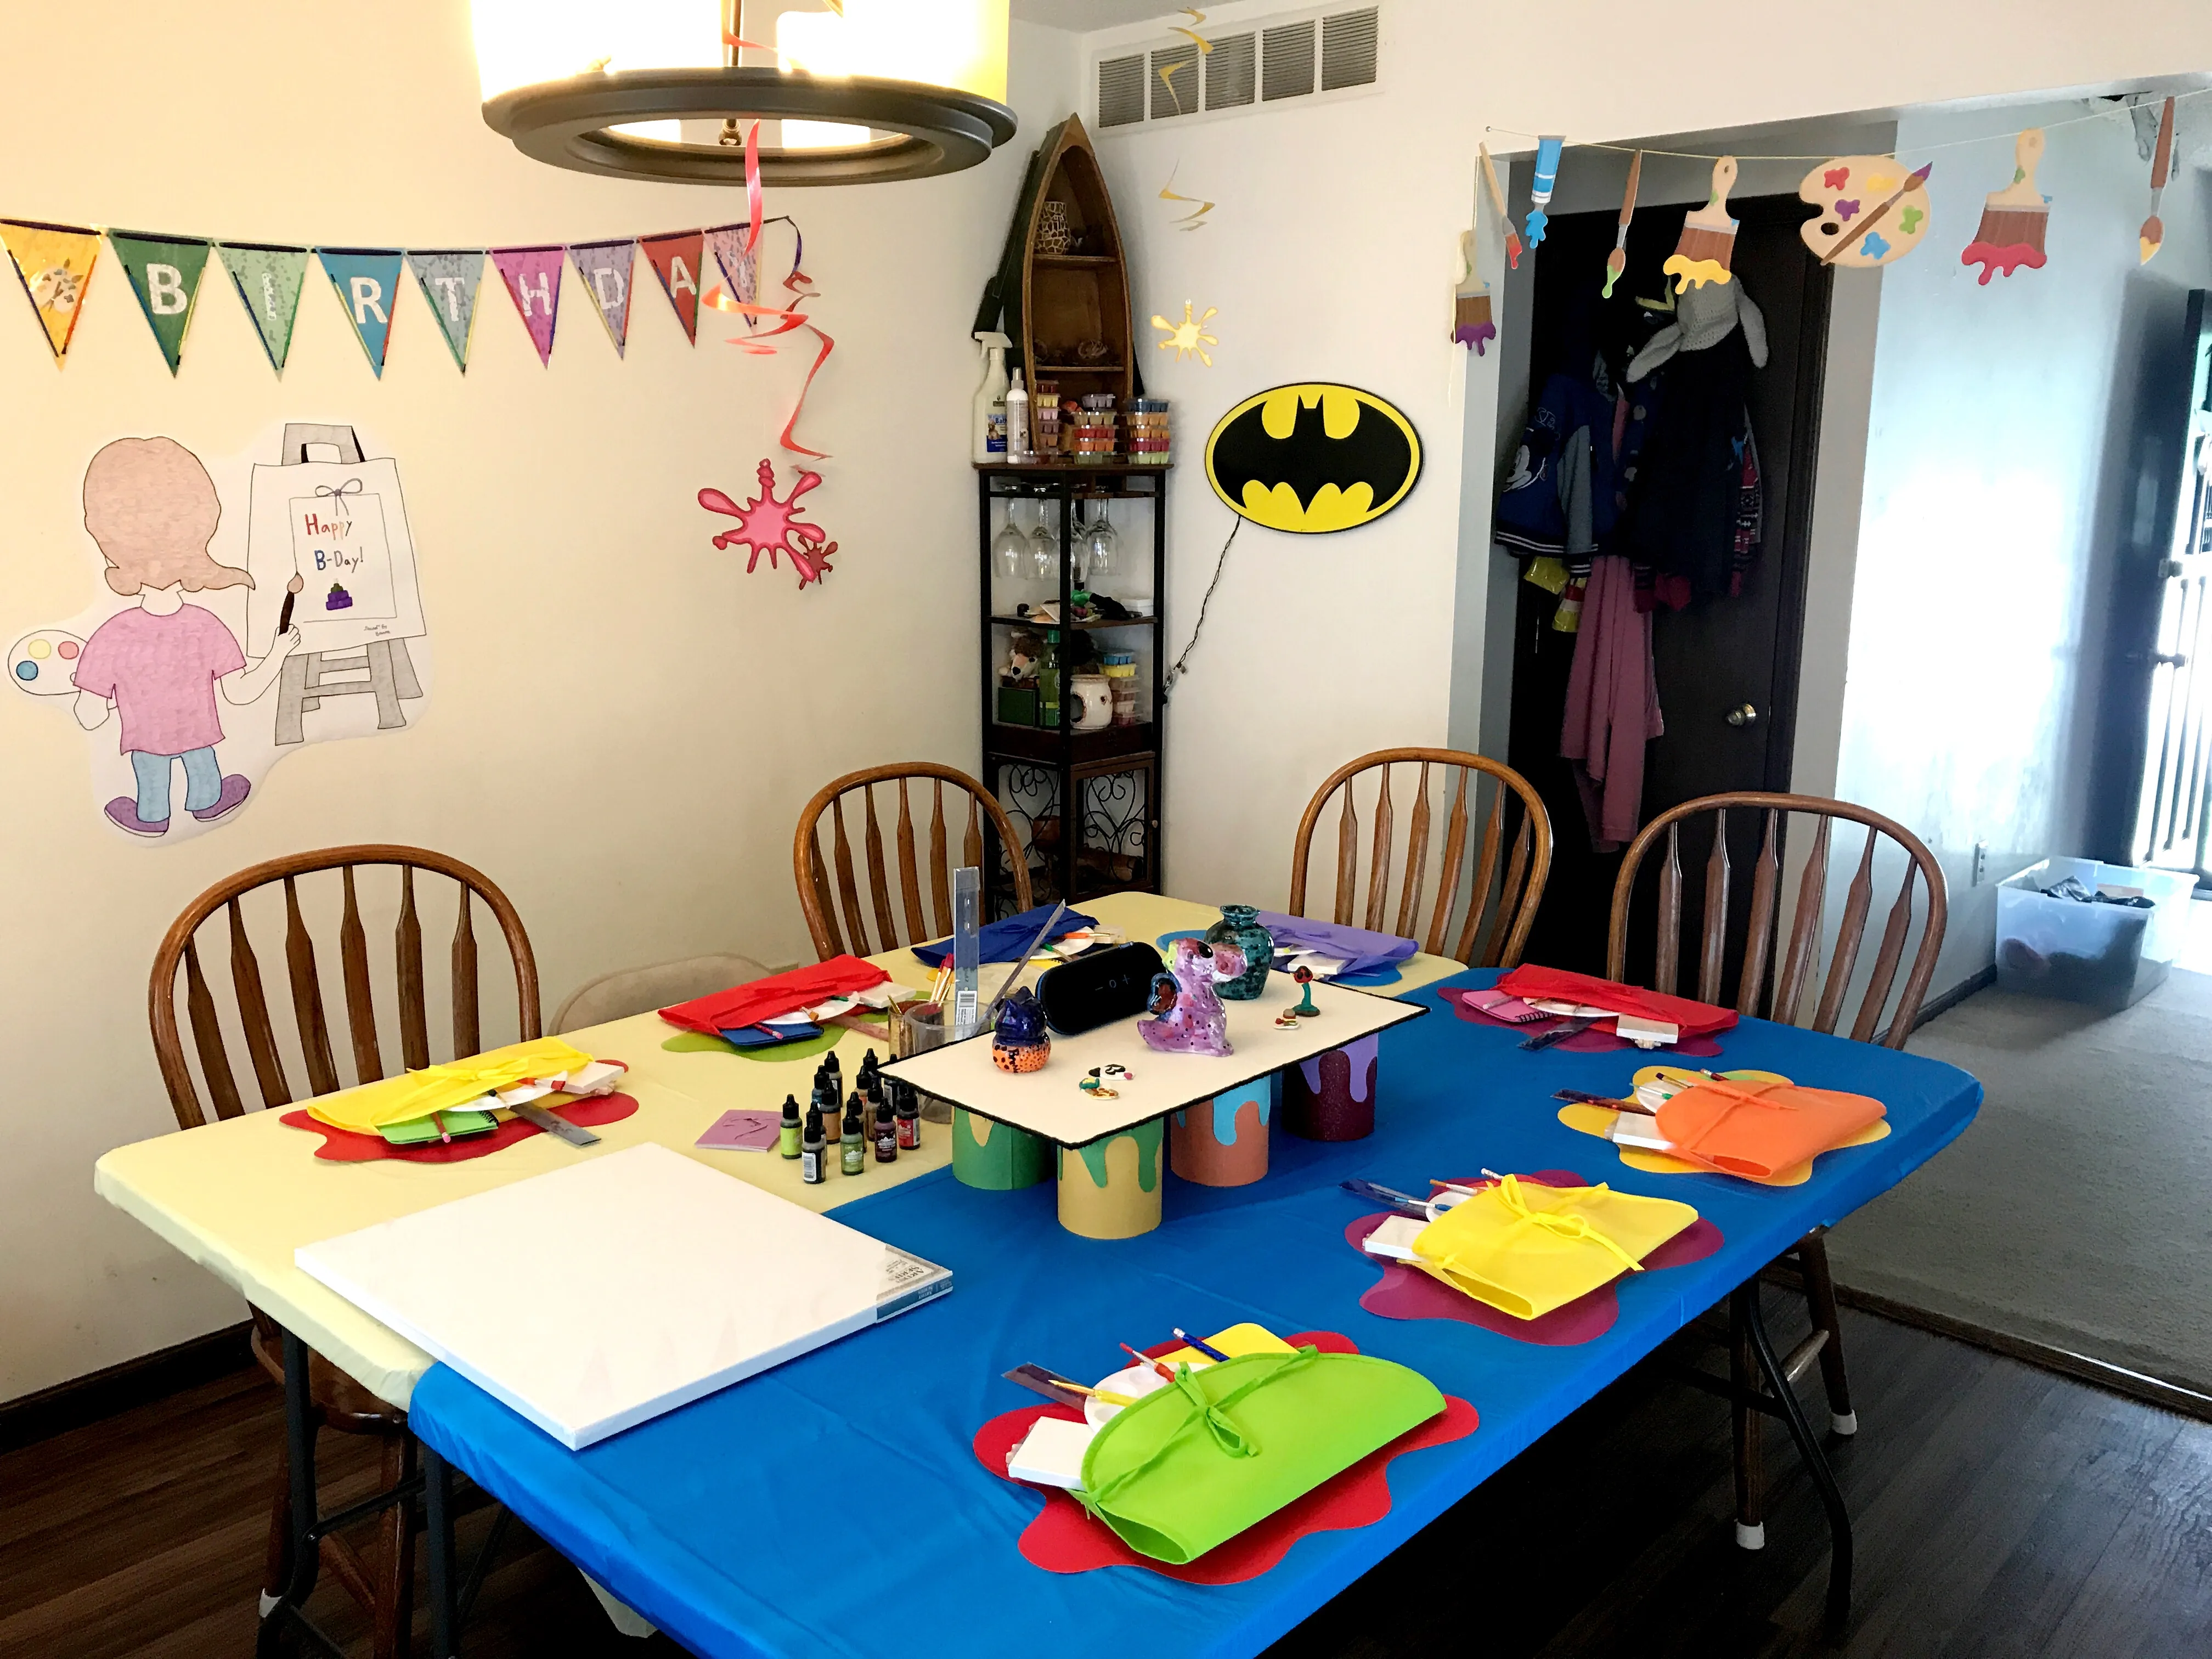
The Artists' Table
The purpose of this art party theme was to let my daughter spend time with her friends and cousins in a creative and fun way. I wanted to provide the party guests with a comfortable, yet intimate, setting for the creative part of the party. The artists’ table was two 6-foot tables pushed together to provide more space than our normal dining table. I covered them with plastic table cloths that I taped to the underside of each table so they wouldn’t slip while everyone worked.
The centerpiece was a raised platform with several pieces of my daughter’s artwork from school and summer camps on display for her guests to admire. The platform itself is a piece of cardboard sitting on top of 6 quart-sized paint cans I covered in colorful (and sparkly, but you can’t tell from the photo) cardstock.
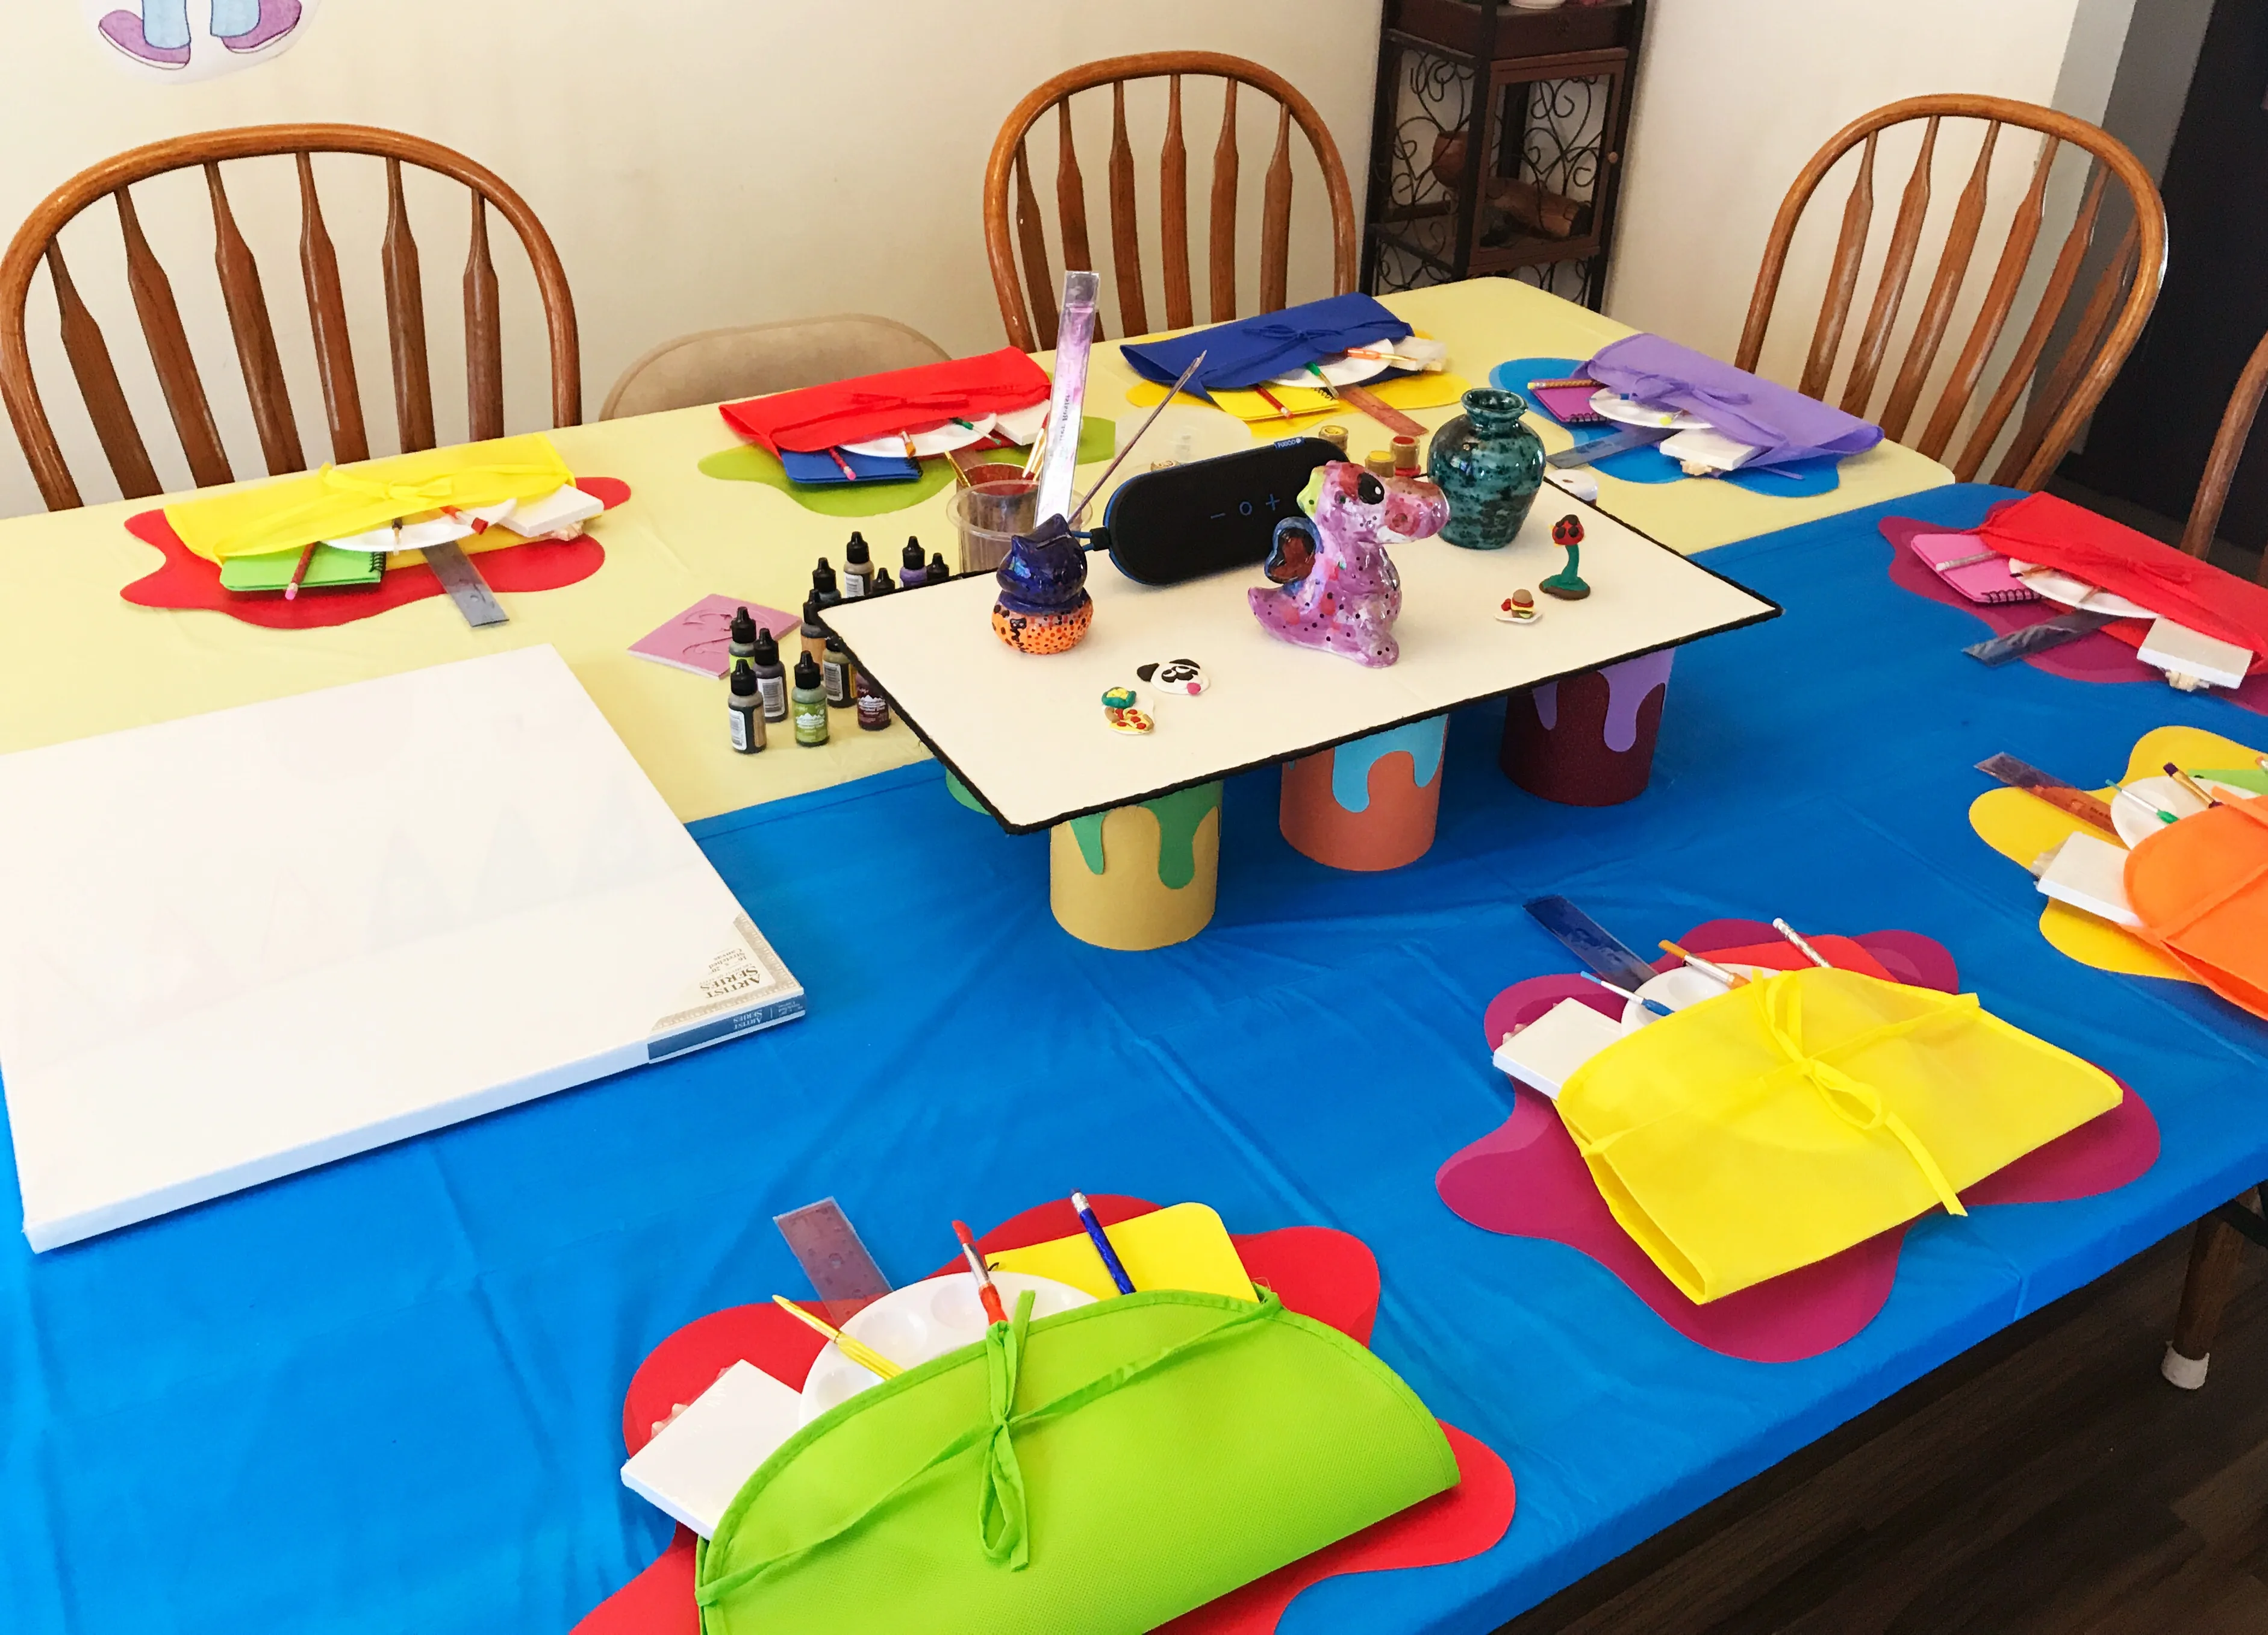
Image credit: DetailsPartyDesigns
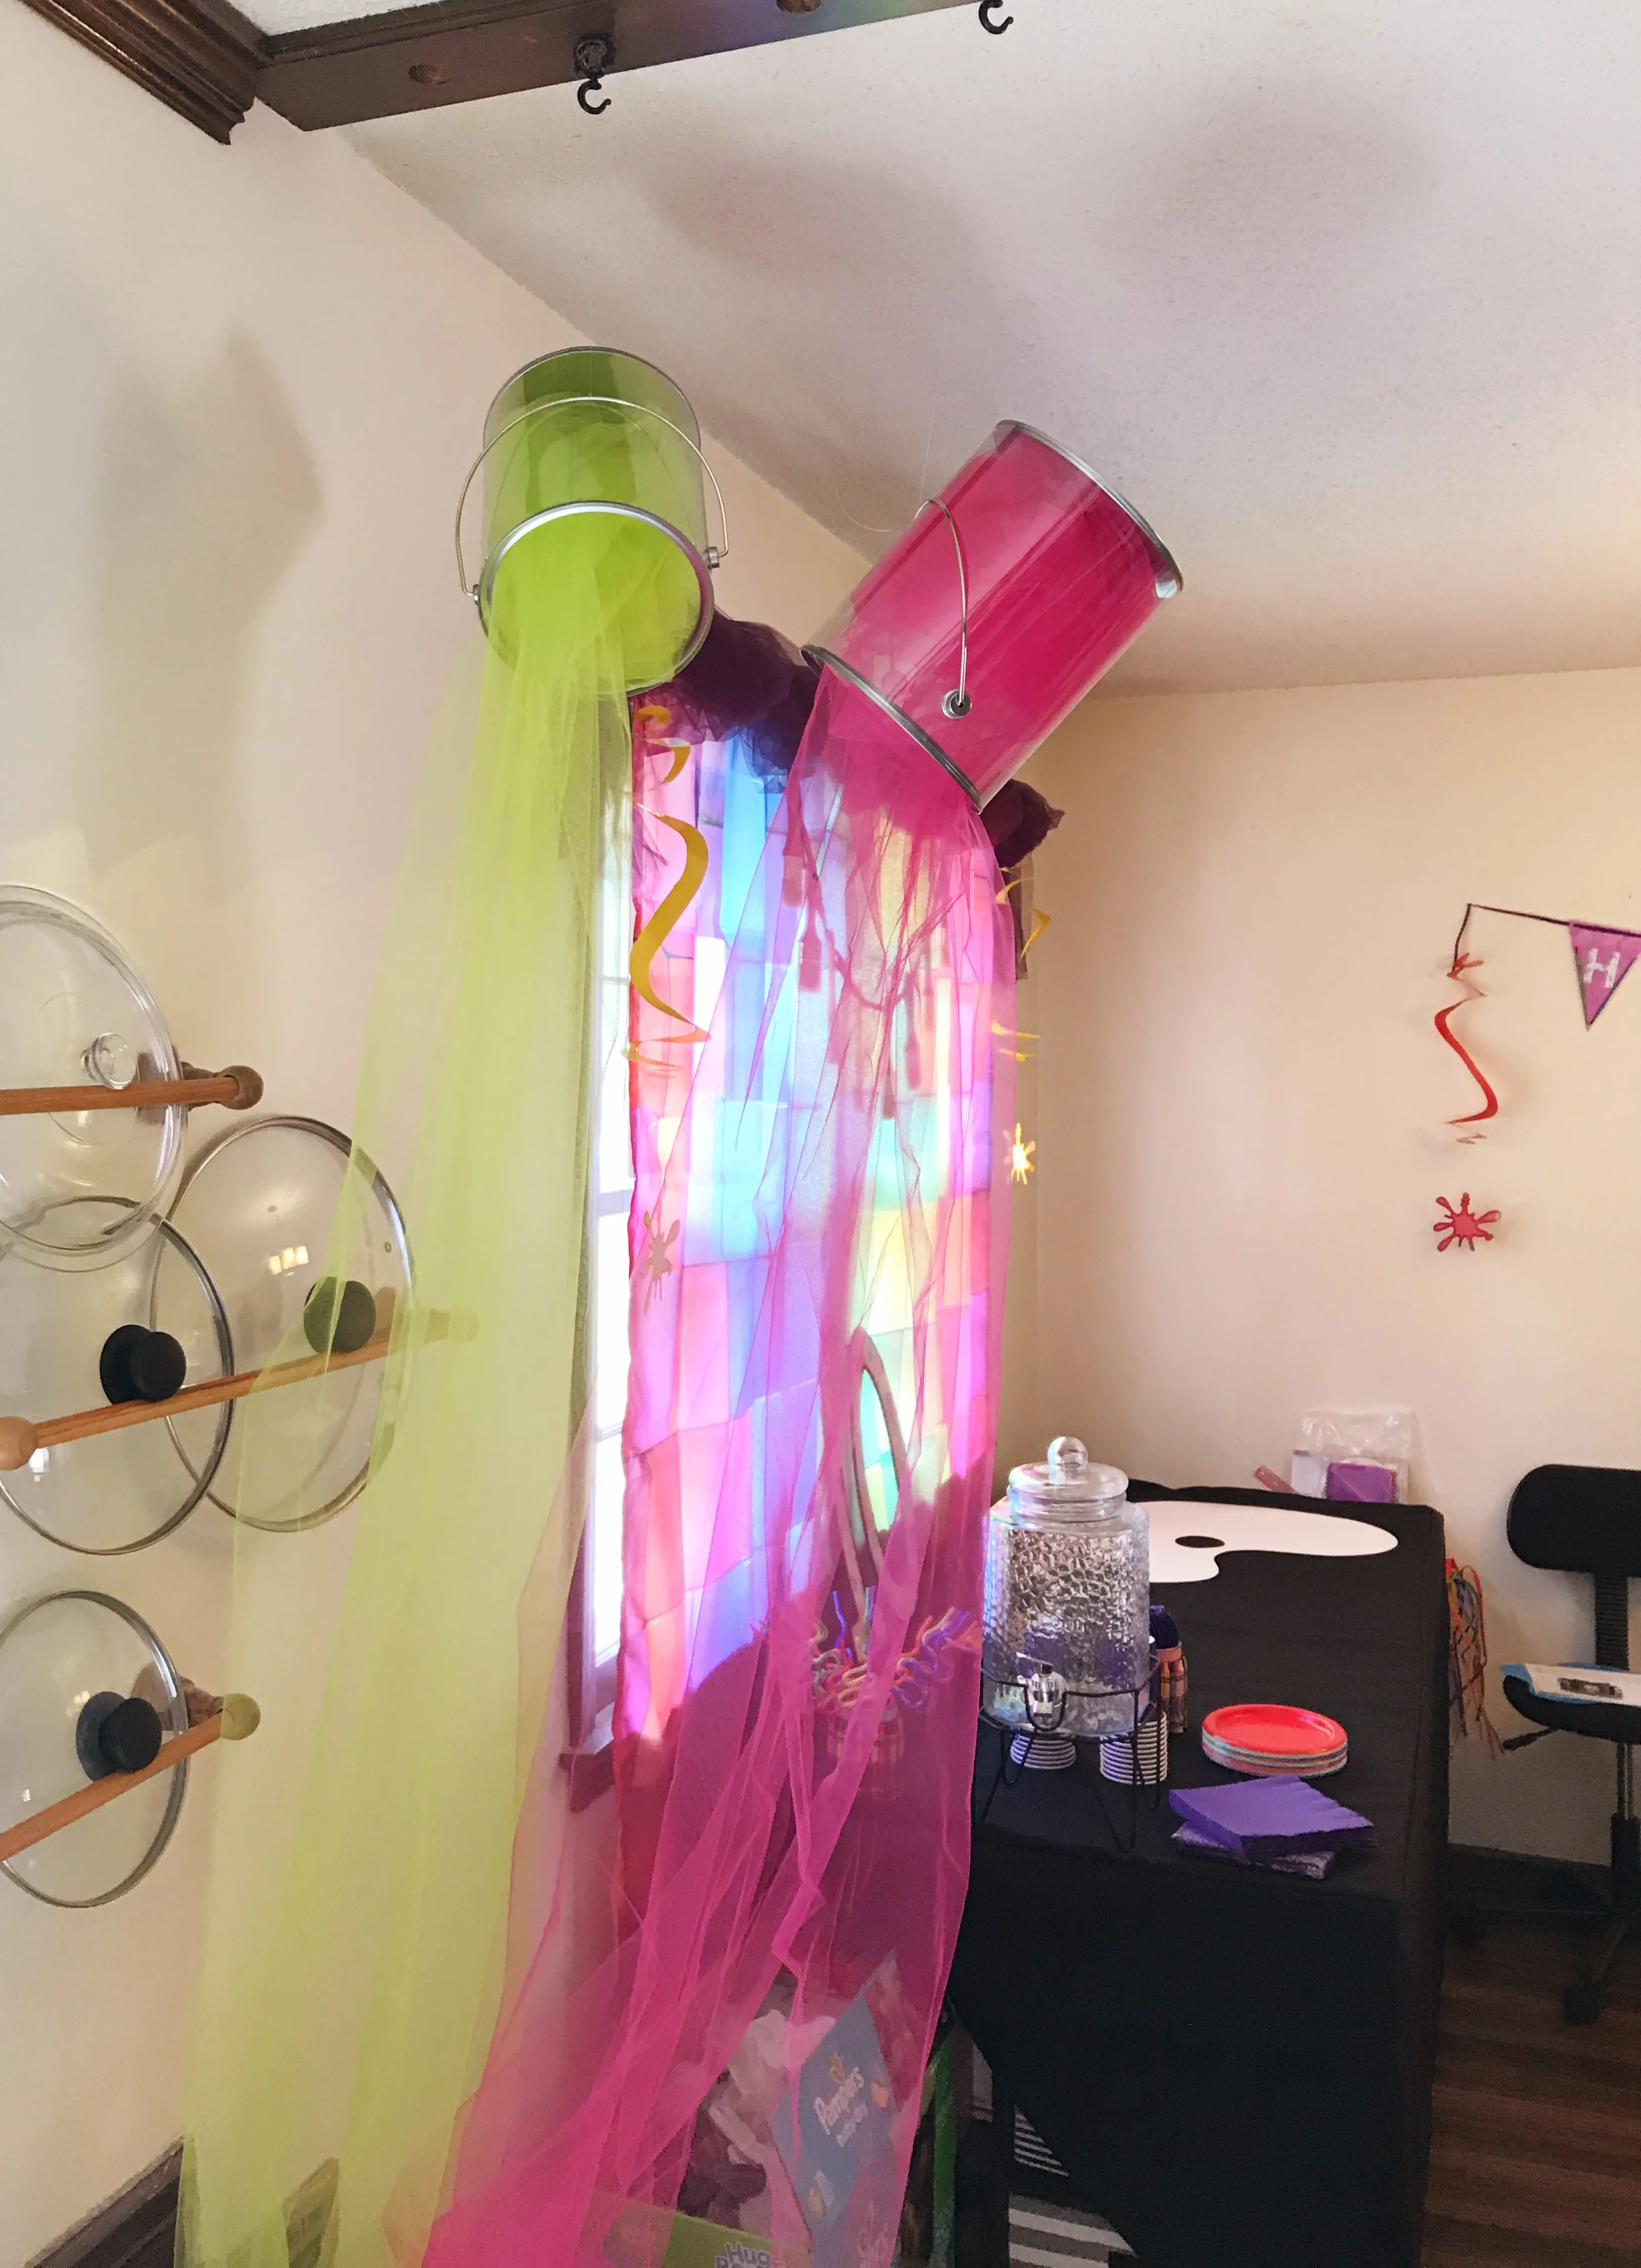
Don't Spill the Paint!
I’ve seen several versions of these clear paint cans spilling out colored fabric. You can purchase the paint cans on Amazon (there’s a link above). I used extra tulle I had in my craft room to create the spilling paint, but any light fabric will do. It does require a small feat of engineering to hang the cans so they angle downward, and you’ll want to stuff quite a bit of fabric into the cans to anchor your “paint” so it doesn’t spill all the way to the floor halfway through your party. I suggest allowing yourself a little extra time to hang these. Use thin fishing line to produce the cool floating effect.
Image credit: DetailsPartyDesigns
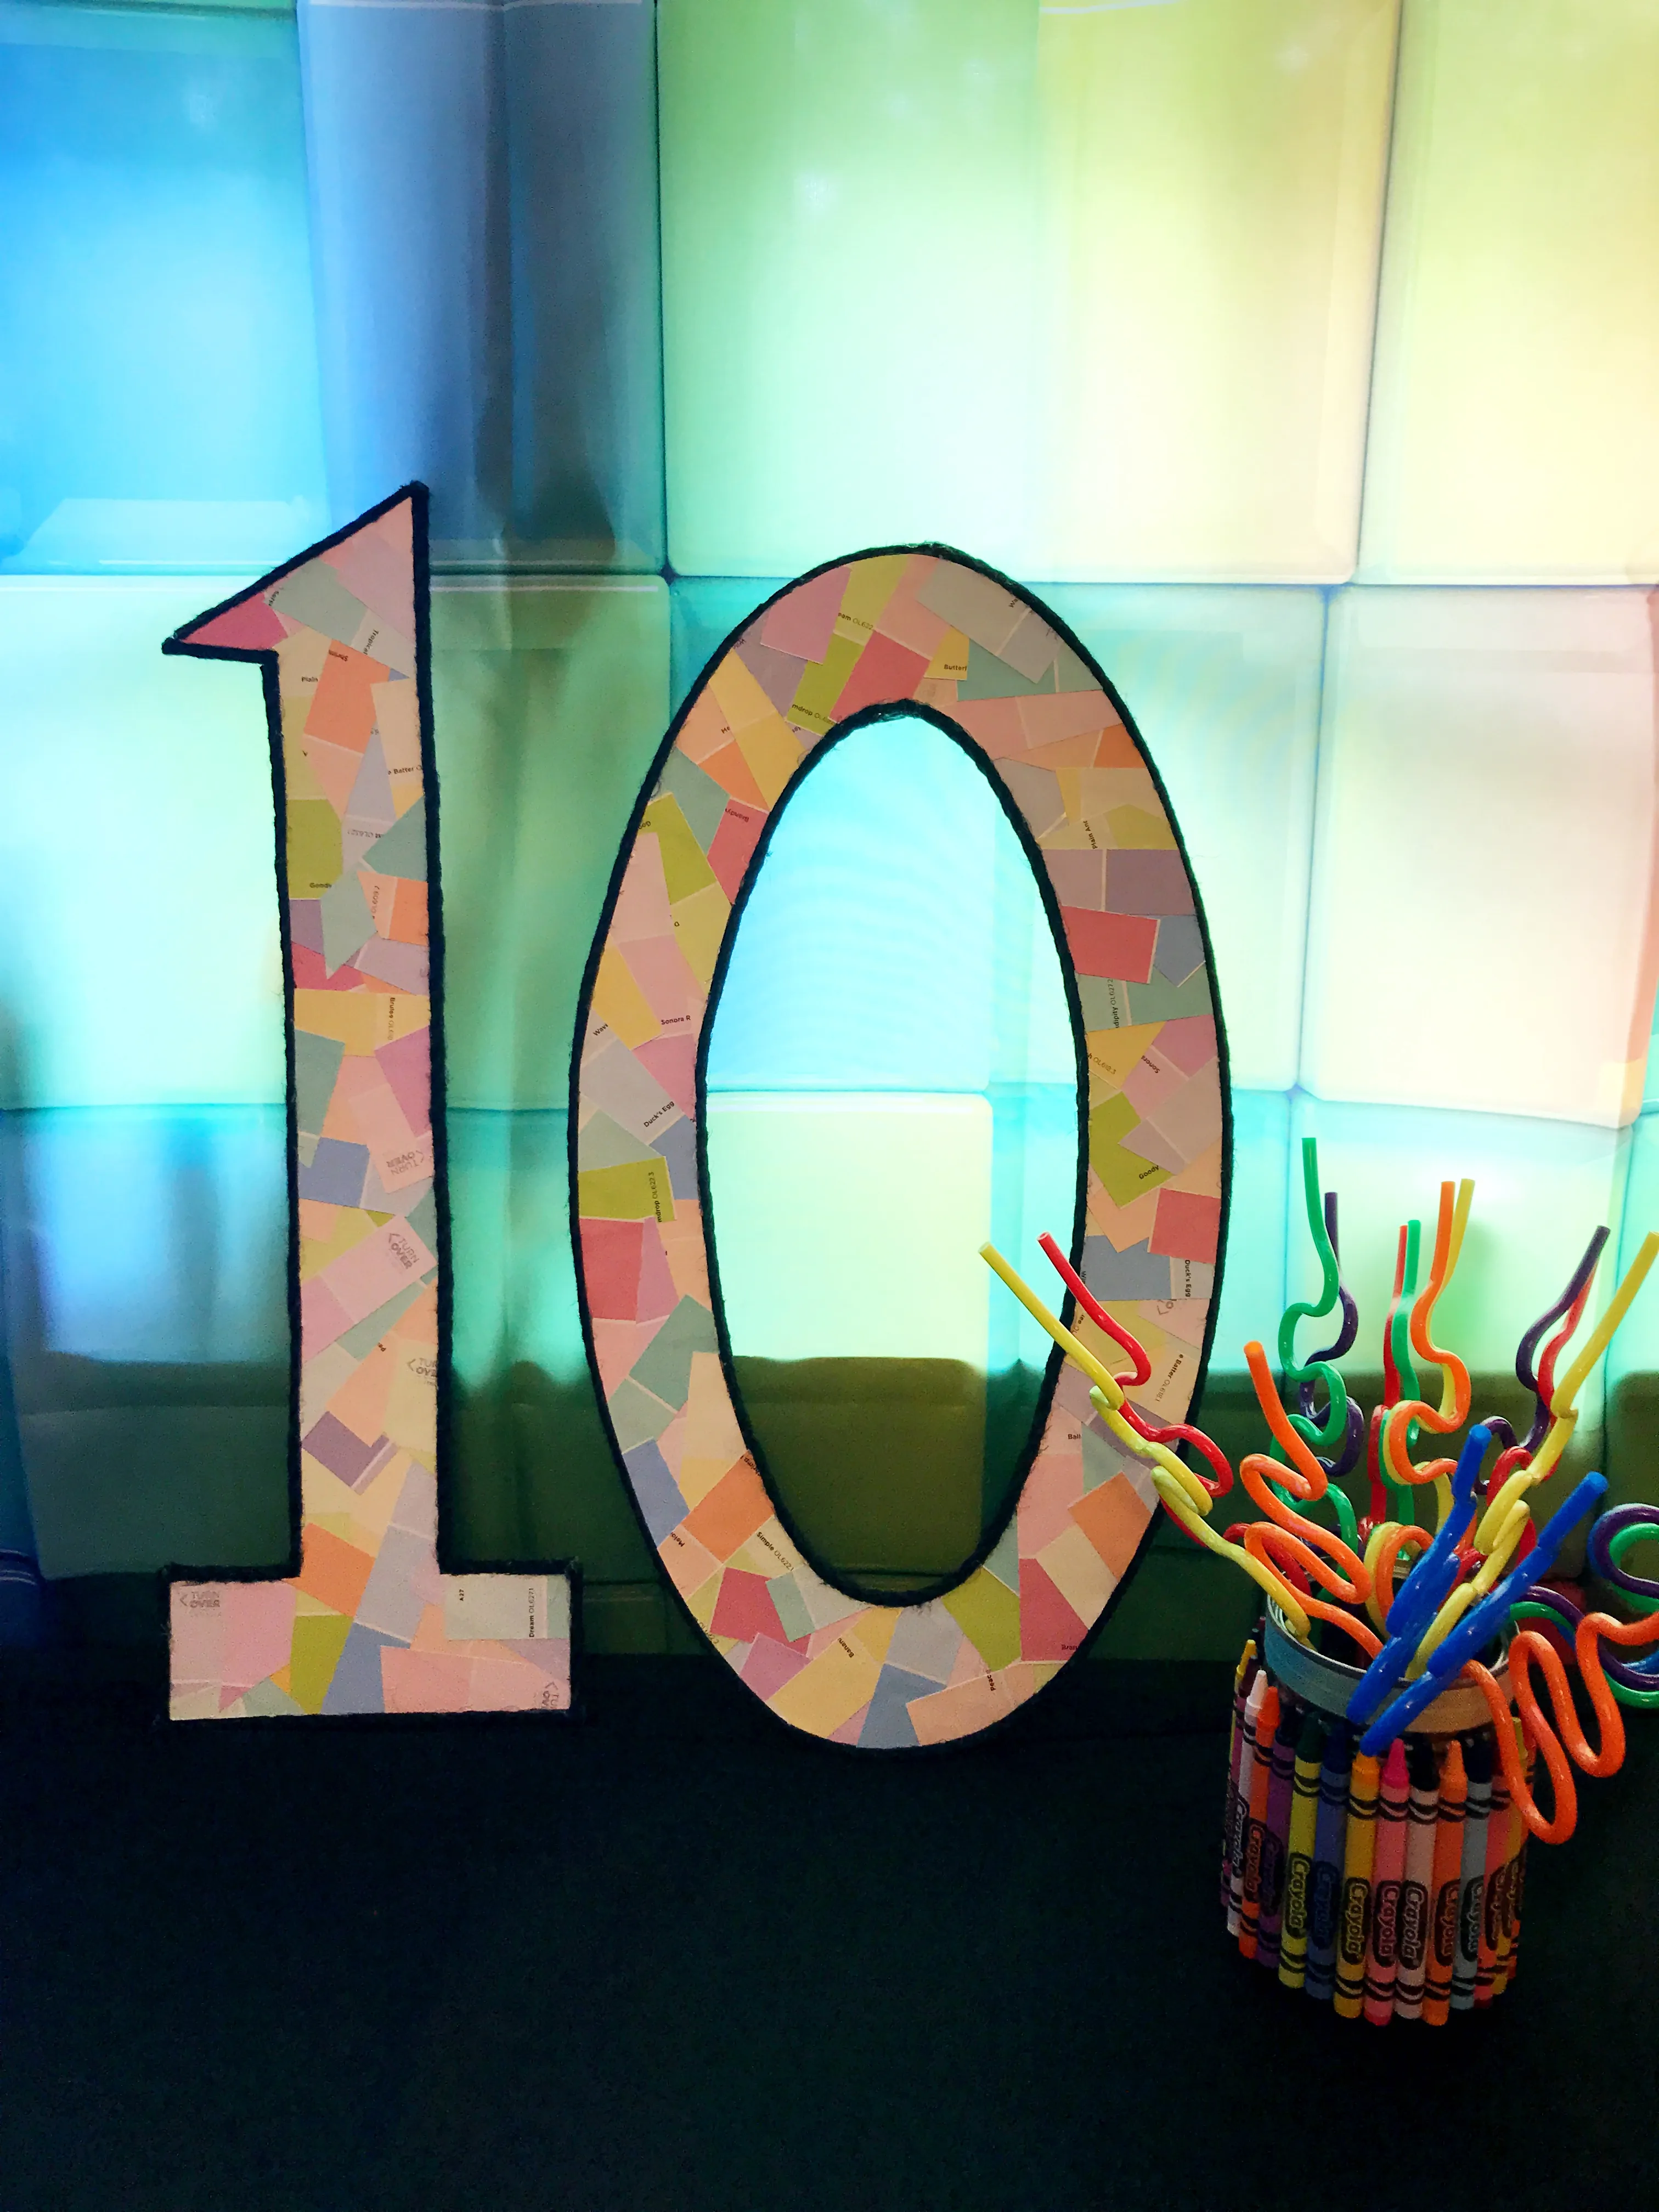
Guess Who's Turning 10!
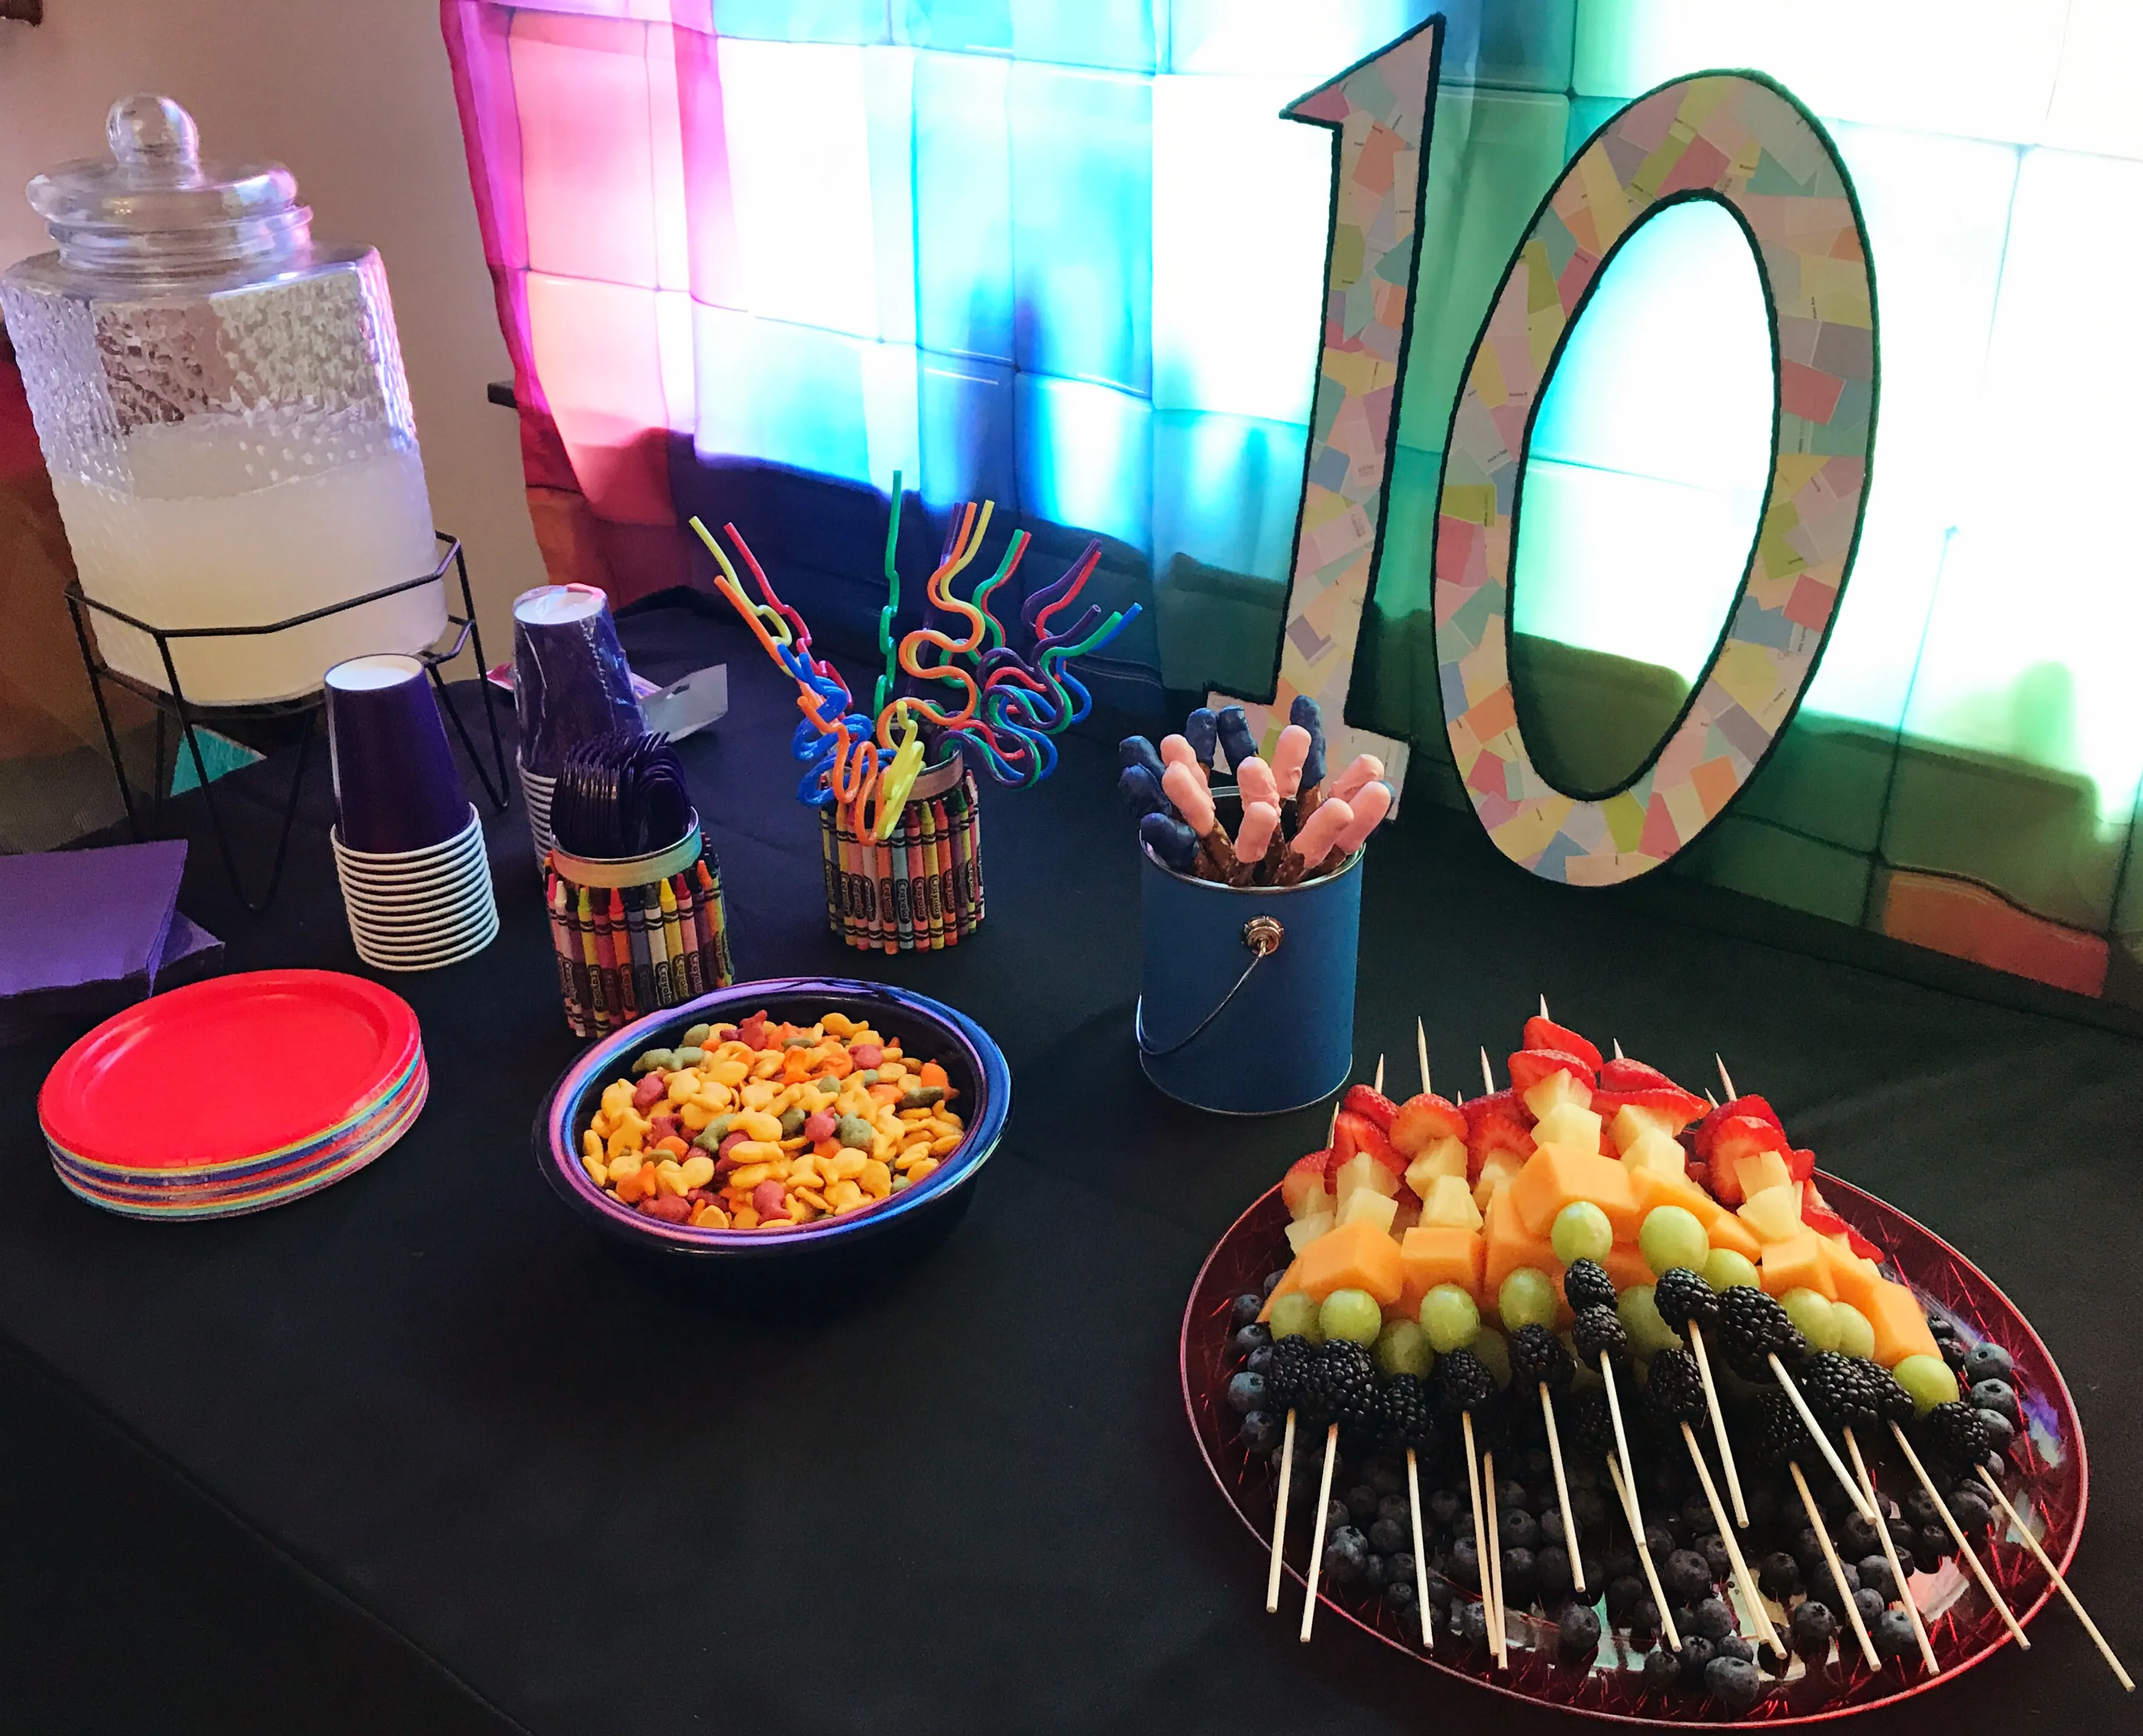
If you like puzzles, this project will be more like a hobby than work. You can see that I used quite a few paint chip cards to create this mosaic number 10. That meant more trips to the hardware store and lots of “borrowing.” The kids loved it! The numbers are cardboard, and I cut the paint chip cards up into odd shapes and sizes before gluing them on. When I finished gluing and trimming, it seemed to be missing something. I was finished, but it didn’t look “finished,” if that makes sense. I played around with different trim and decided black yarn would make the numbers stand out a bit more against the geometric rainbow backdrop. It also hid the cardboard “innards.”
Image credit: DetailsPartyDesigns
Cool Party Activity Supplies!
Art Party Projects
Fun and Creative Art Party Projects
I wanted my daughter and her friends to have the chance to experiment with art projects they might not have seen before. I searched Pinterest and the internet for ideas and settled on the 4 projects below. These worked out great time-wise for the two hours we had allotted for the party.

CD Scratch Art
The first project our party guests tackled was CD Scratch Art. I started with this one because we needed time for the paint to dry on the CD’s before the scratching began. The kids used acrylic paint in various colors to cover an old CD and then set it aside to dry. We completed the other two projects before coming back to this one. Brenna and her friends used coins, silverware, and other various metal objects to scratch patterns in the paint. This is a very simple and easy project to start things off.
Image credit: DetailsPartyDesigns
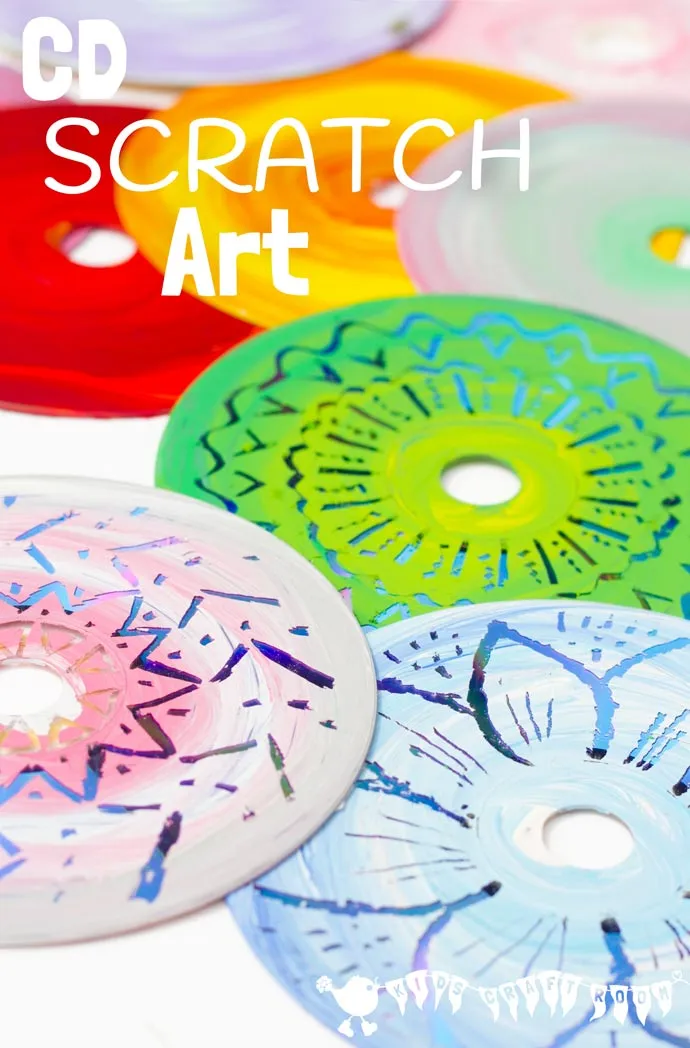
Image credit: kidscraftroom.com
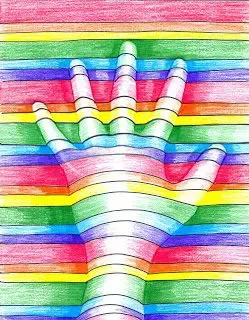
Image credit: tabithaannthelostsock.blogspot.com
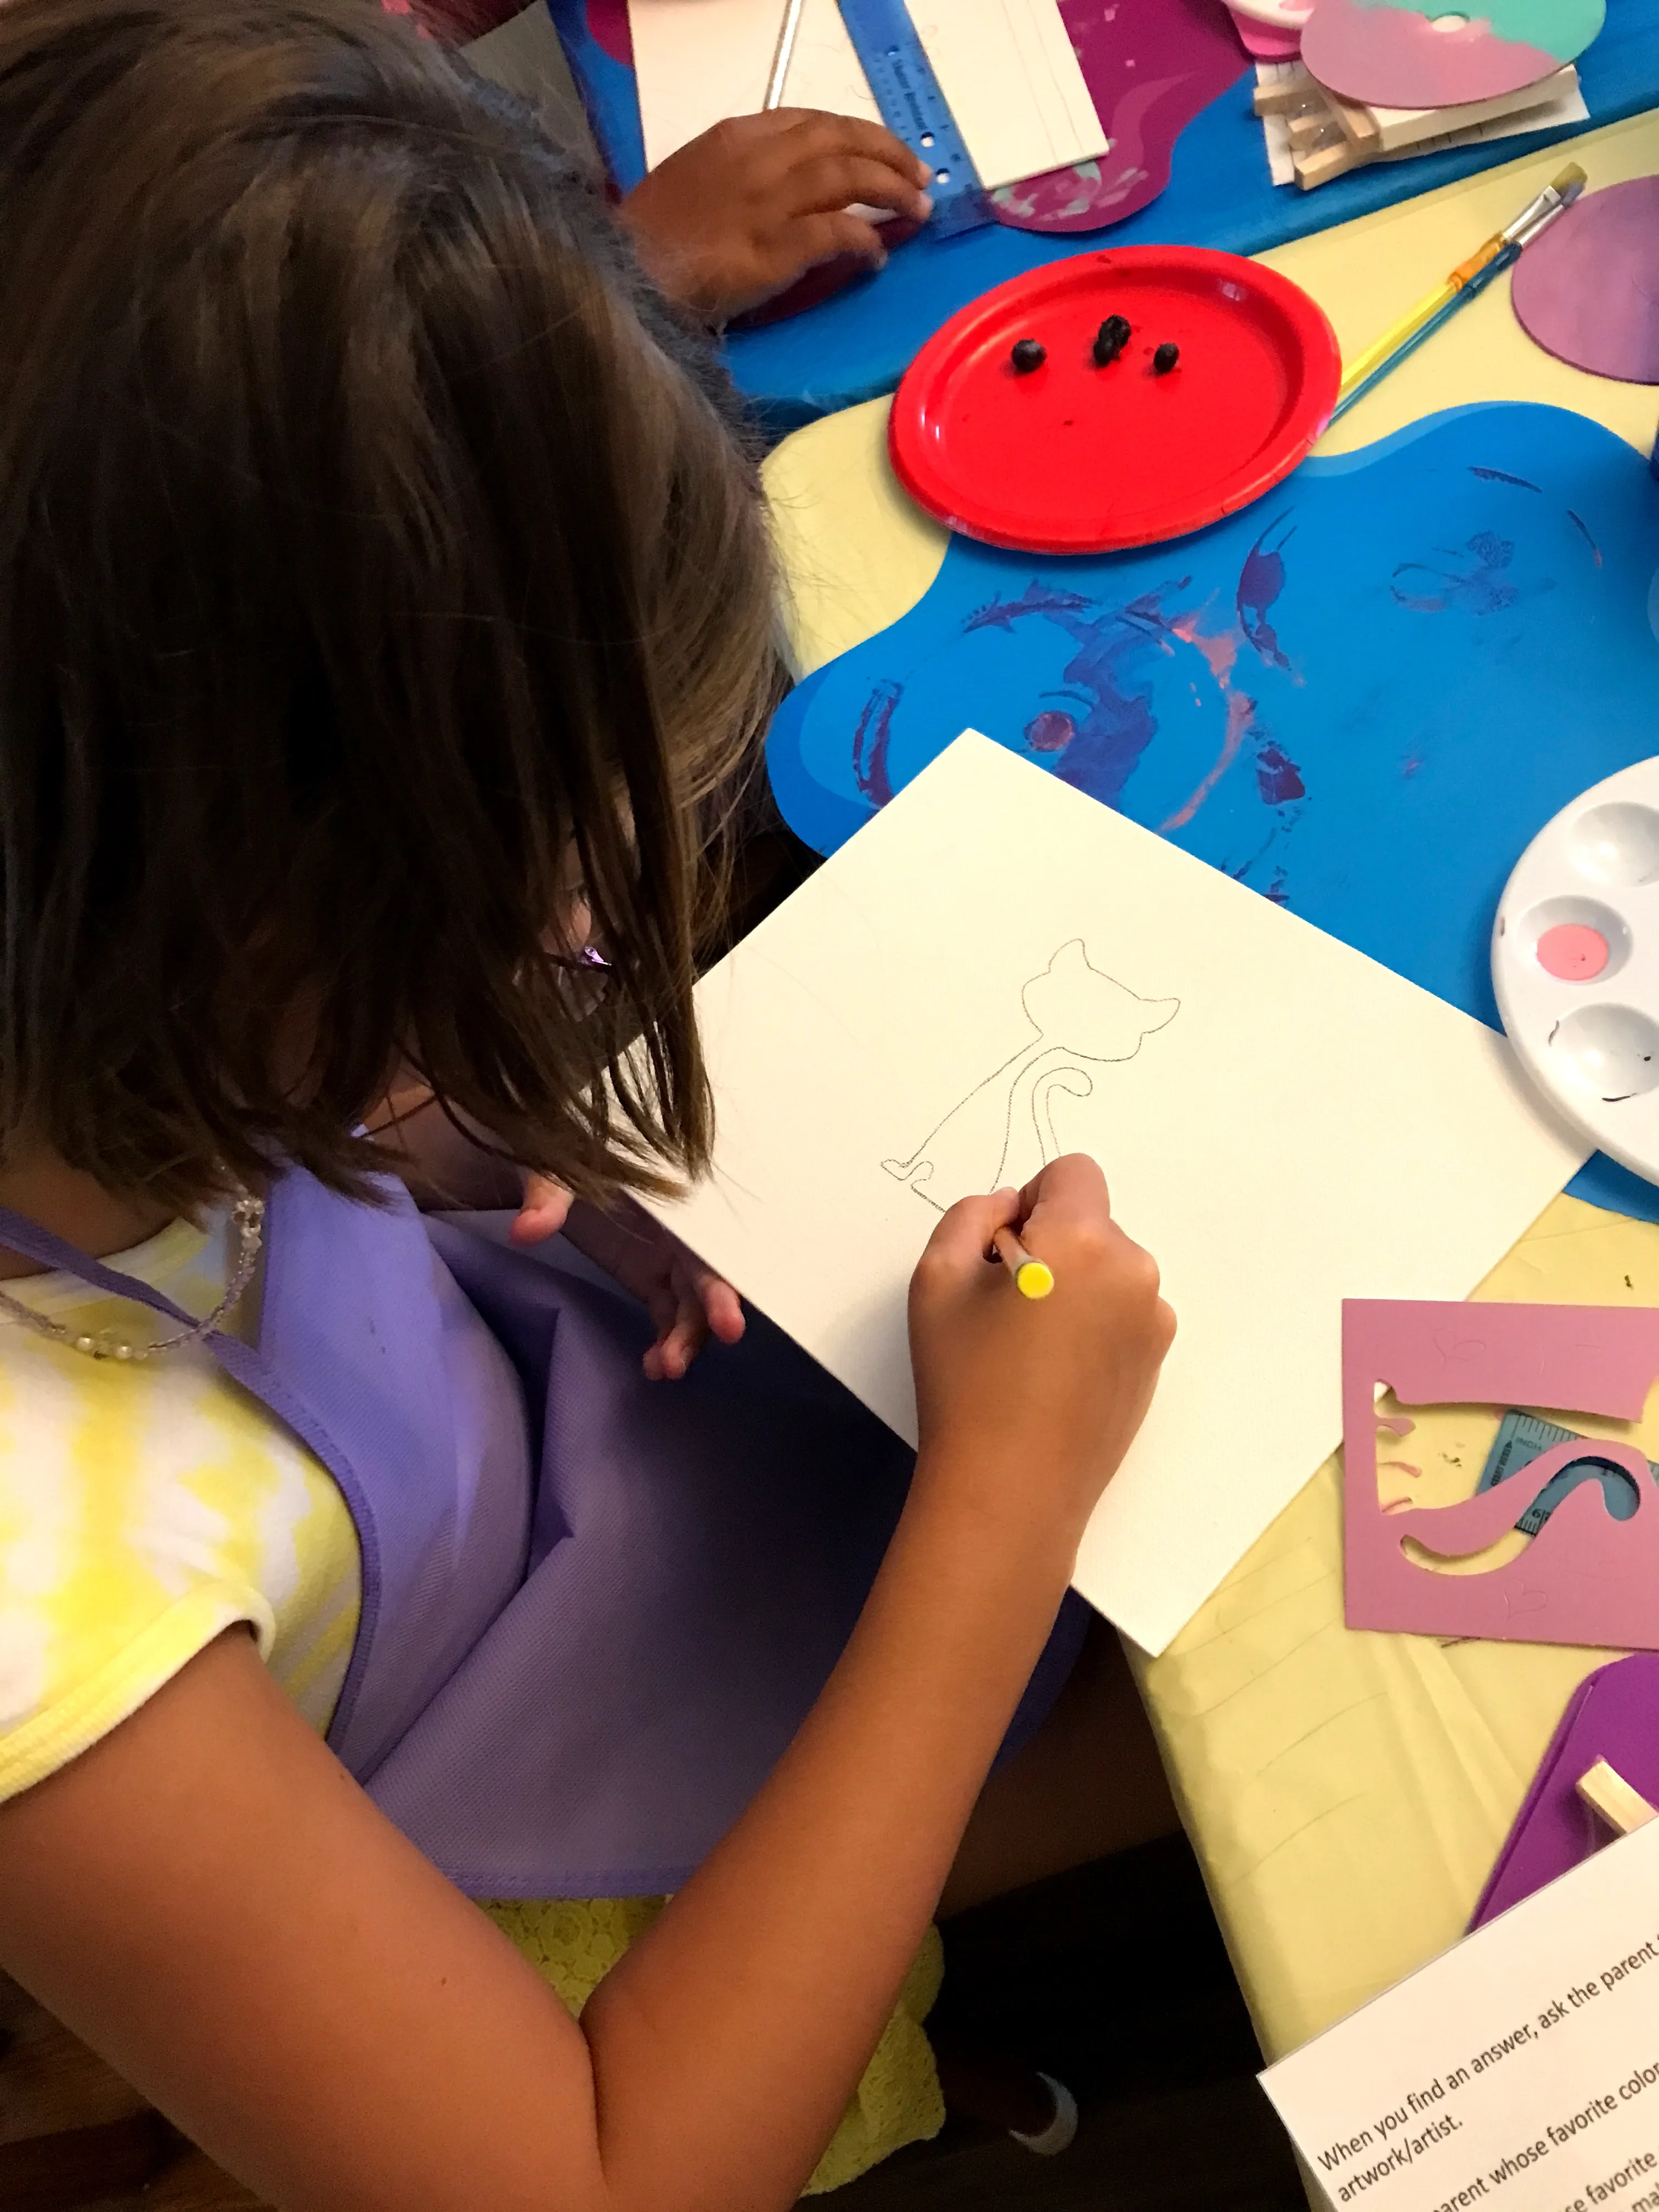
3-D Illusion Art
This was the final project we attempted, and if I could do it again, I would make a couple changes. I provided the party guests with a selection of stencils like the one you see Brenna using in the photo above. Unfortunately, the stencils I had were either too complex for this project or too small. On the left is an image from one of the sites I visited to learn more about 3-D illusion art. Tracing your hand works really well, but that’s because it’s a fairly simple design and a good size. Large, basic shapes work best.
Once our guests traced their chosen shape onto heavy cardstock paper (or an 8X10 canvas), the real work began. They used rulers from their “artist goodies” to draw straight lines across the paper. The lines can be placed at varying widths like you see in the photo below. Whenever they encountered part of the stencil design, they jumped over it and continued drawing the straight line on the other side. This initial stage left a void where the design was traced onto the page.
The next stage involved connecting the lines on either side of the shape with slightly arched lines in the middle. This is what produces the 3-dimensional look.
The drawing on the left also includes shading and highlights to further aid in the effect, but we focused on getting the lines right and coloring everything in. Because we used smaller stencils, our artwork didn’t look quite as good as the example pictured here, but the kids were still amazed at the 3-D effect and how easy it was to achieve it.
Image credit: DetailsPartyDesigns
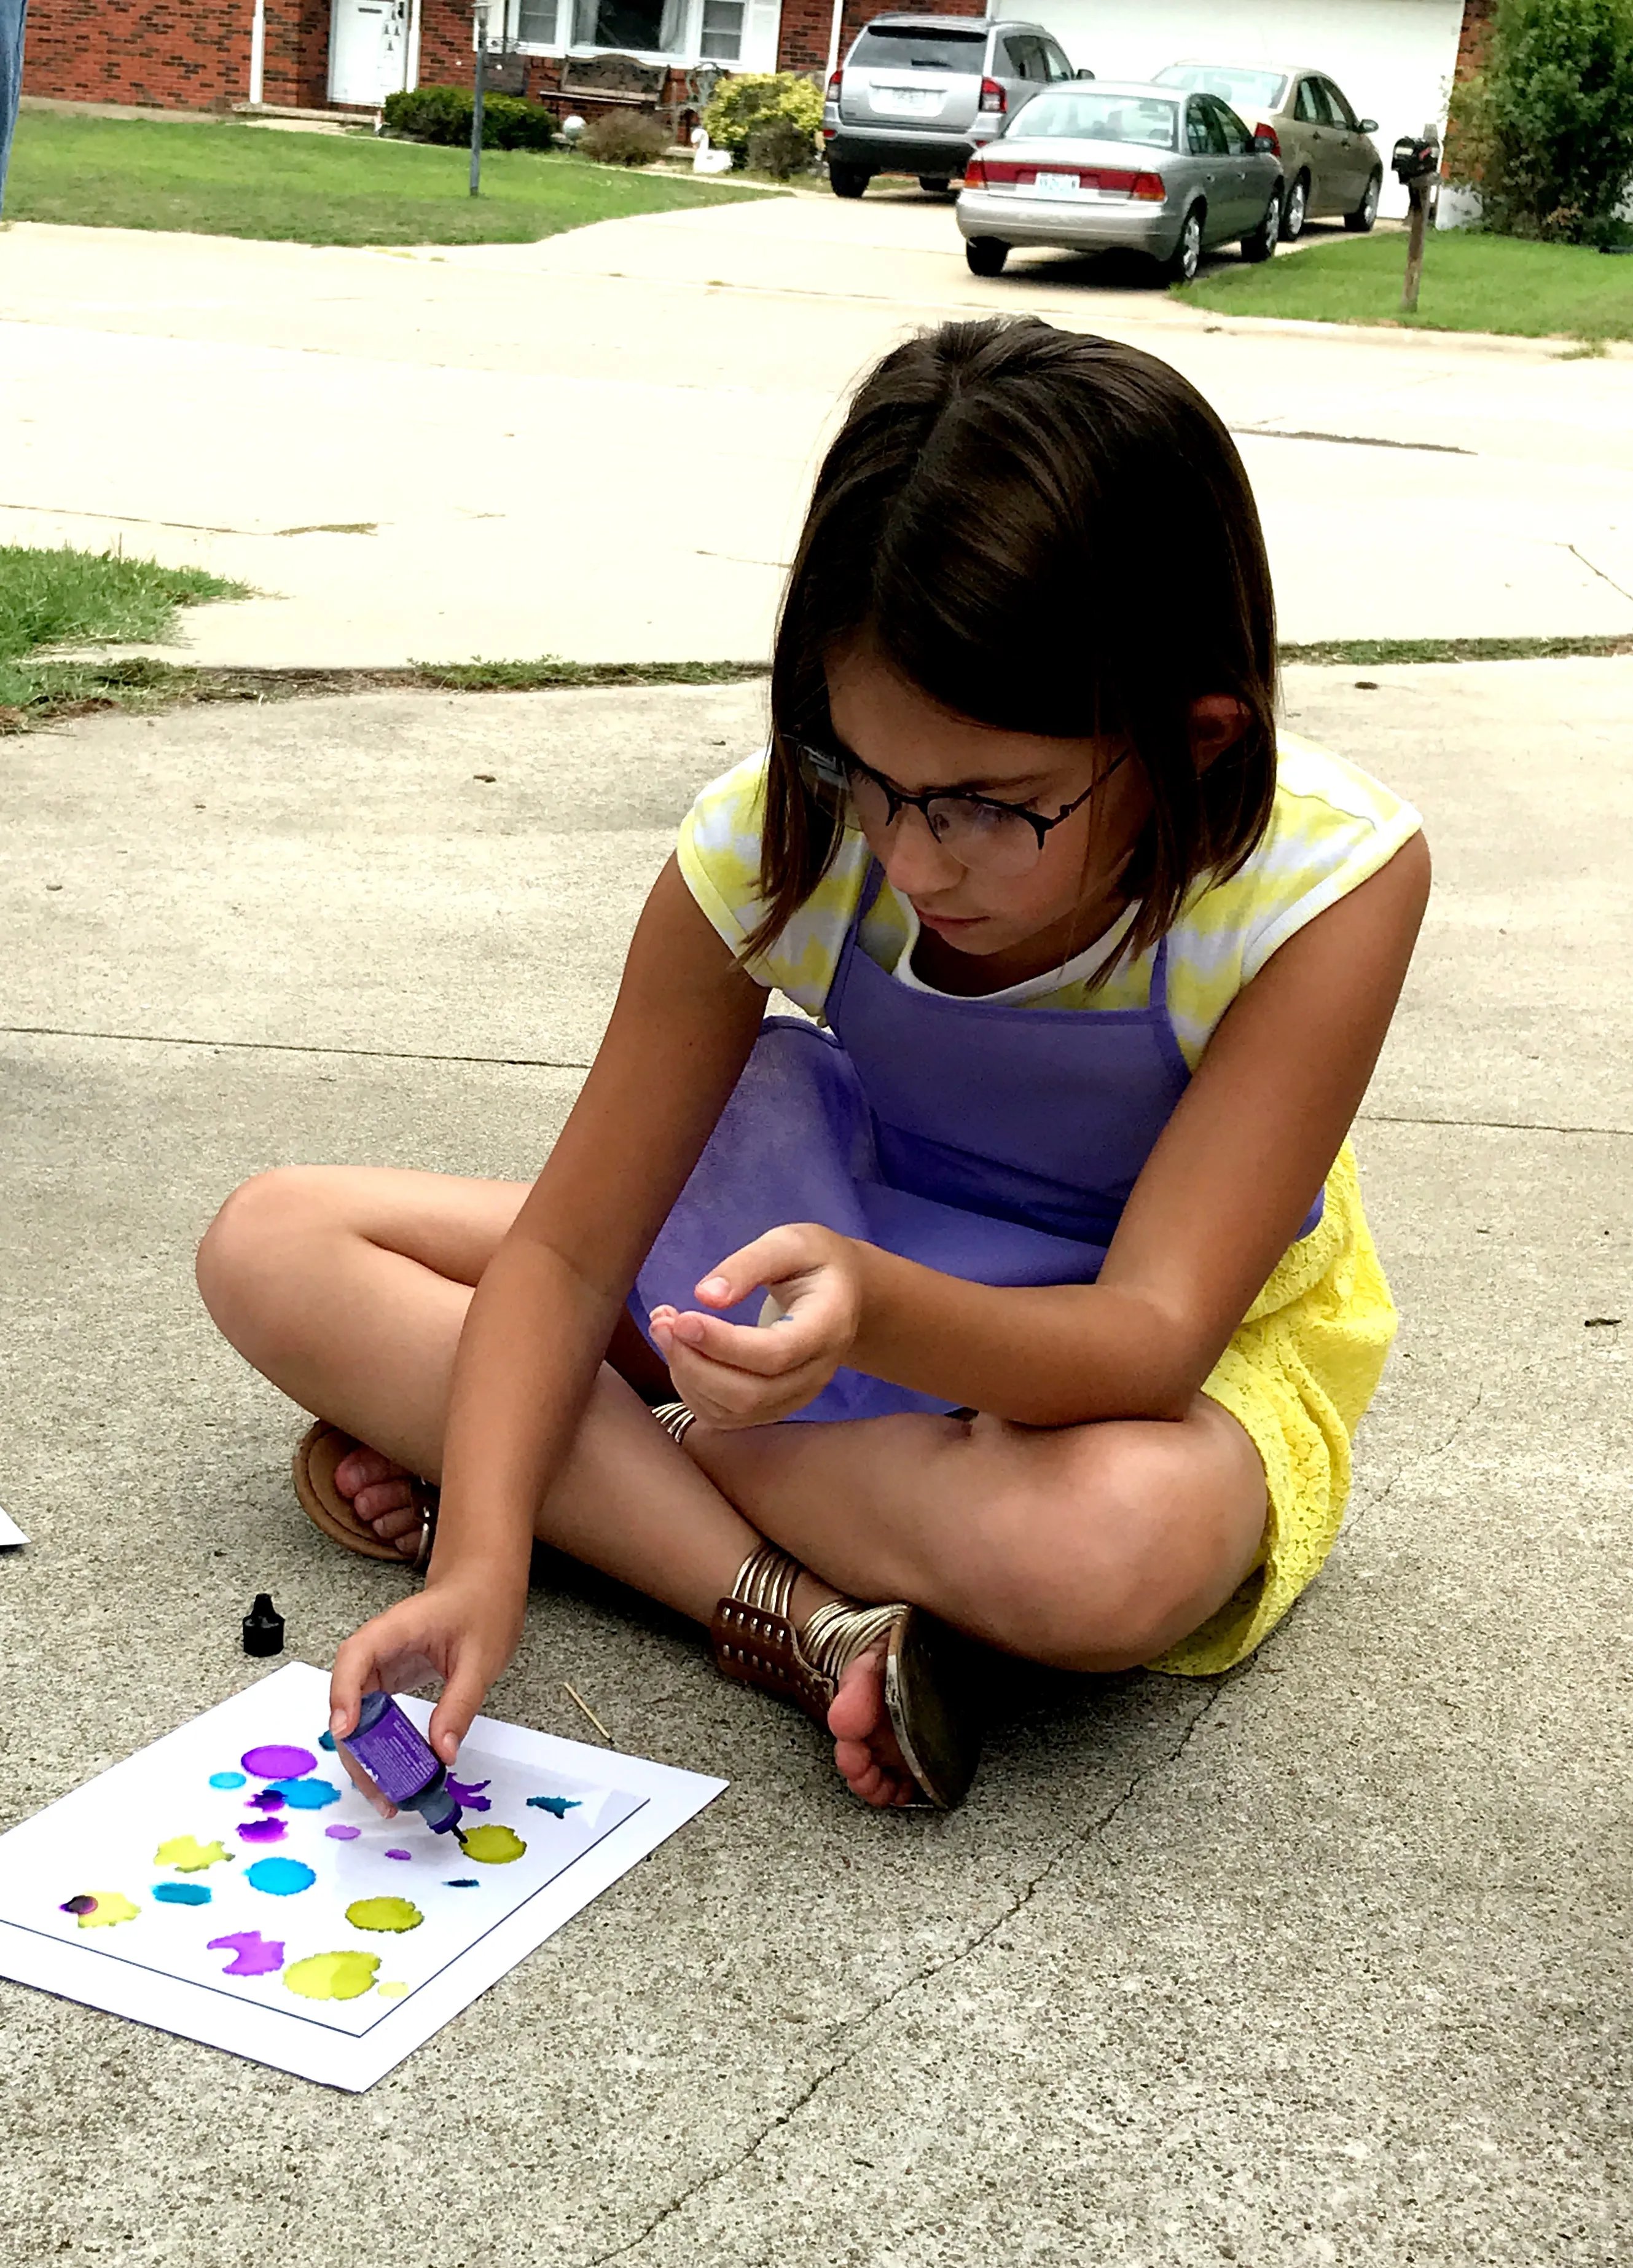
Fired Alcohol Ink Art
Fired alcohol ink art was the crowd favorite for our party. To produce an image similar to the one on the easel below, you need to purchase inexpensive 8X10 frames with glass (not plastic). I found mine at the dollar store. Add a few bottles of colorful alcohol ink, 90% isopropyl alcohol, and a lighter, and you’ve got everything you need to make some happy little accidents! I highly suggest doing this project outside – it’s much safer that way.
Creating fired alcohol ink art is much easier than it looks. Each guest dropped different colors of alcohol ink onto the glass (from the frames) and then used a toothpick to swirl the ink around. Once they were happy with their design (which won’t necessarily be the same once the glass has been “fired” – just an FYI), we sprayed 90% isopropyl alcohol onto the glass (90% works much better than the standard 70%) and lit it on fire. We let the fire burn out on its own and then allowed the glass to cool before placing it back into the frame with a piece of white paper behind it. This is such a fun project you might want to buy some extra frames so you can make one yourself!
Image credit: DetailsPartyDesigns
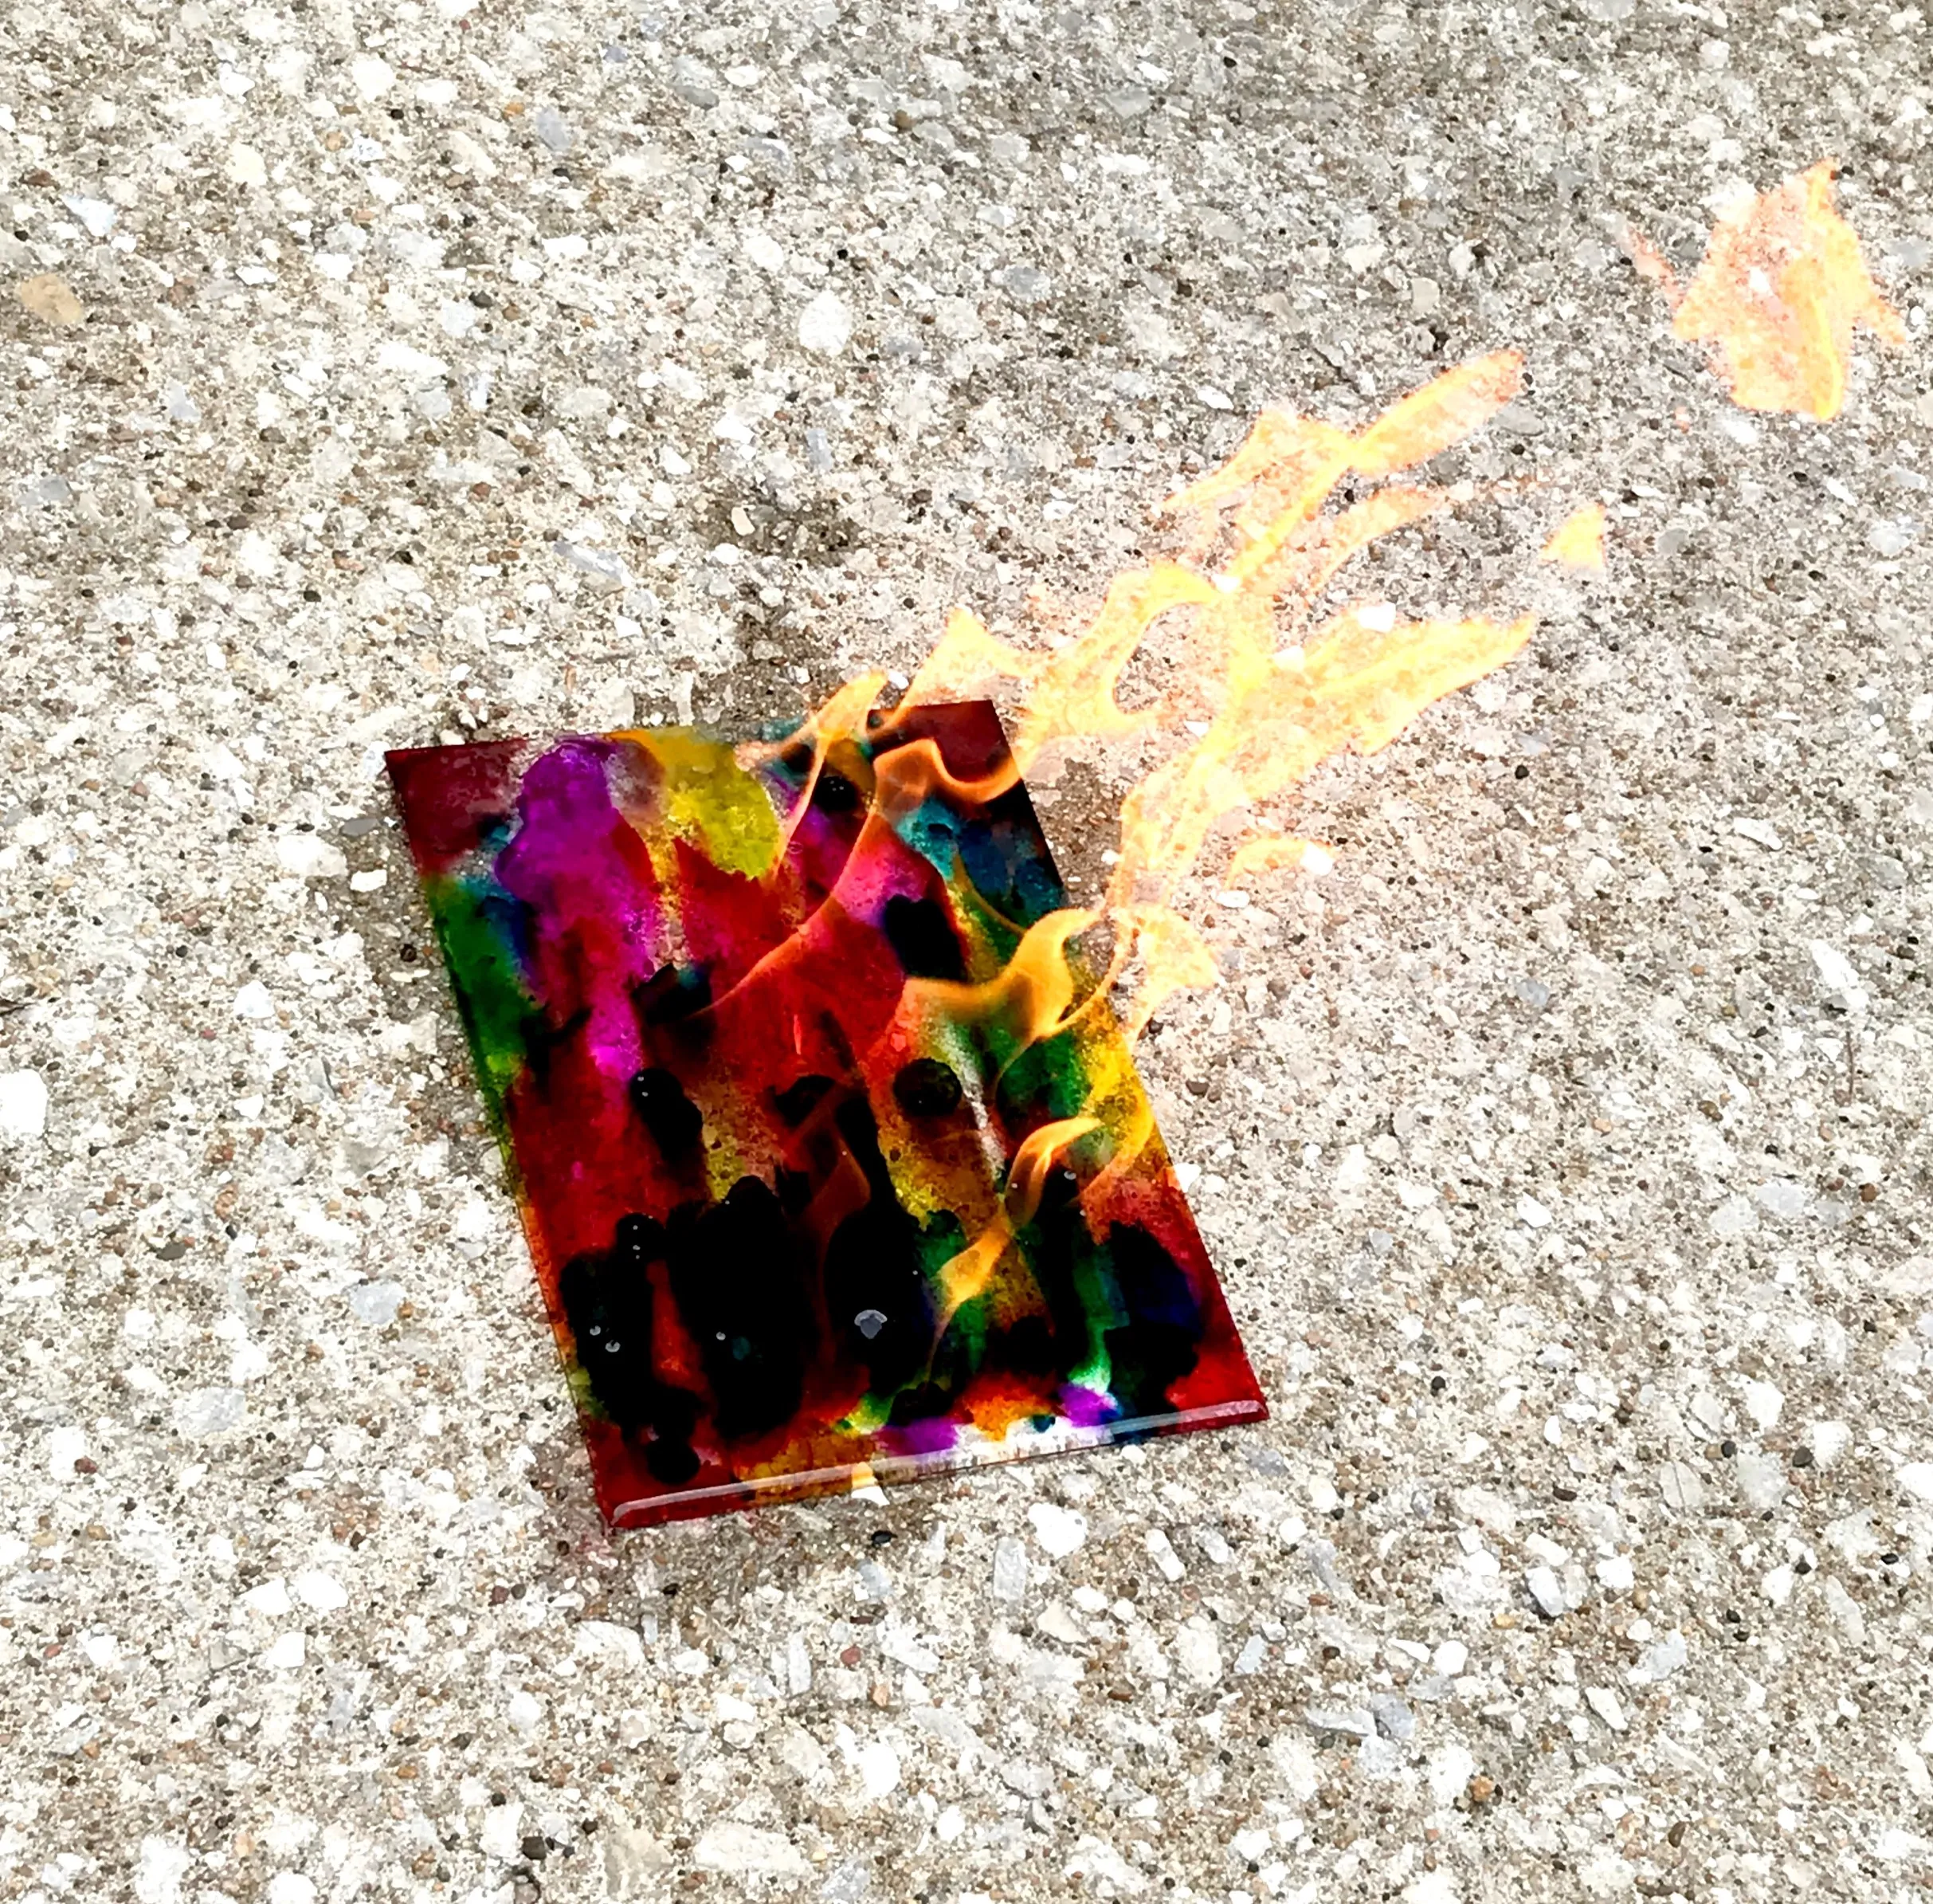
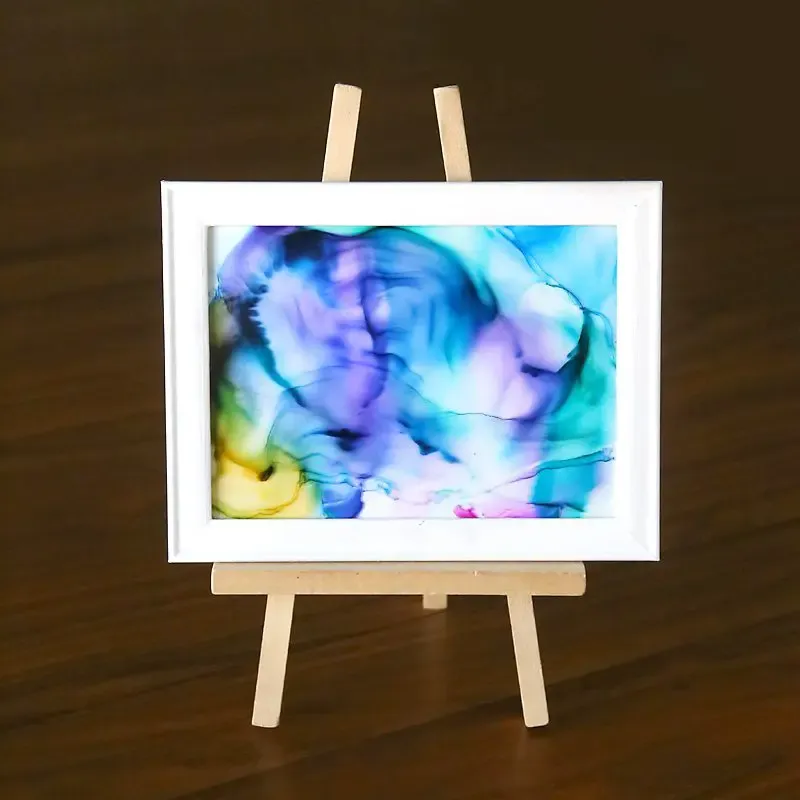
Image credit: itsalwaysautumn.com
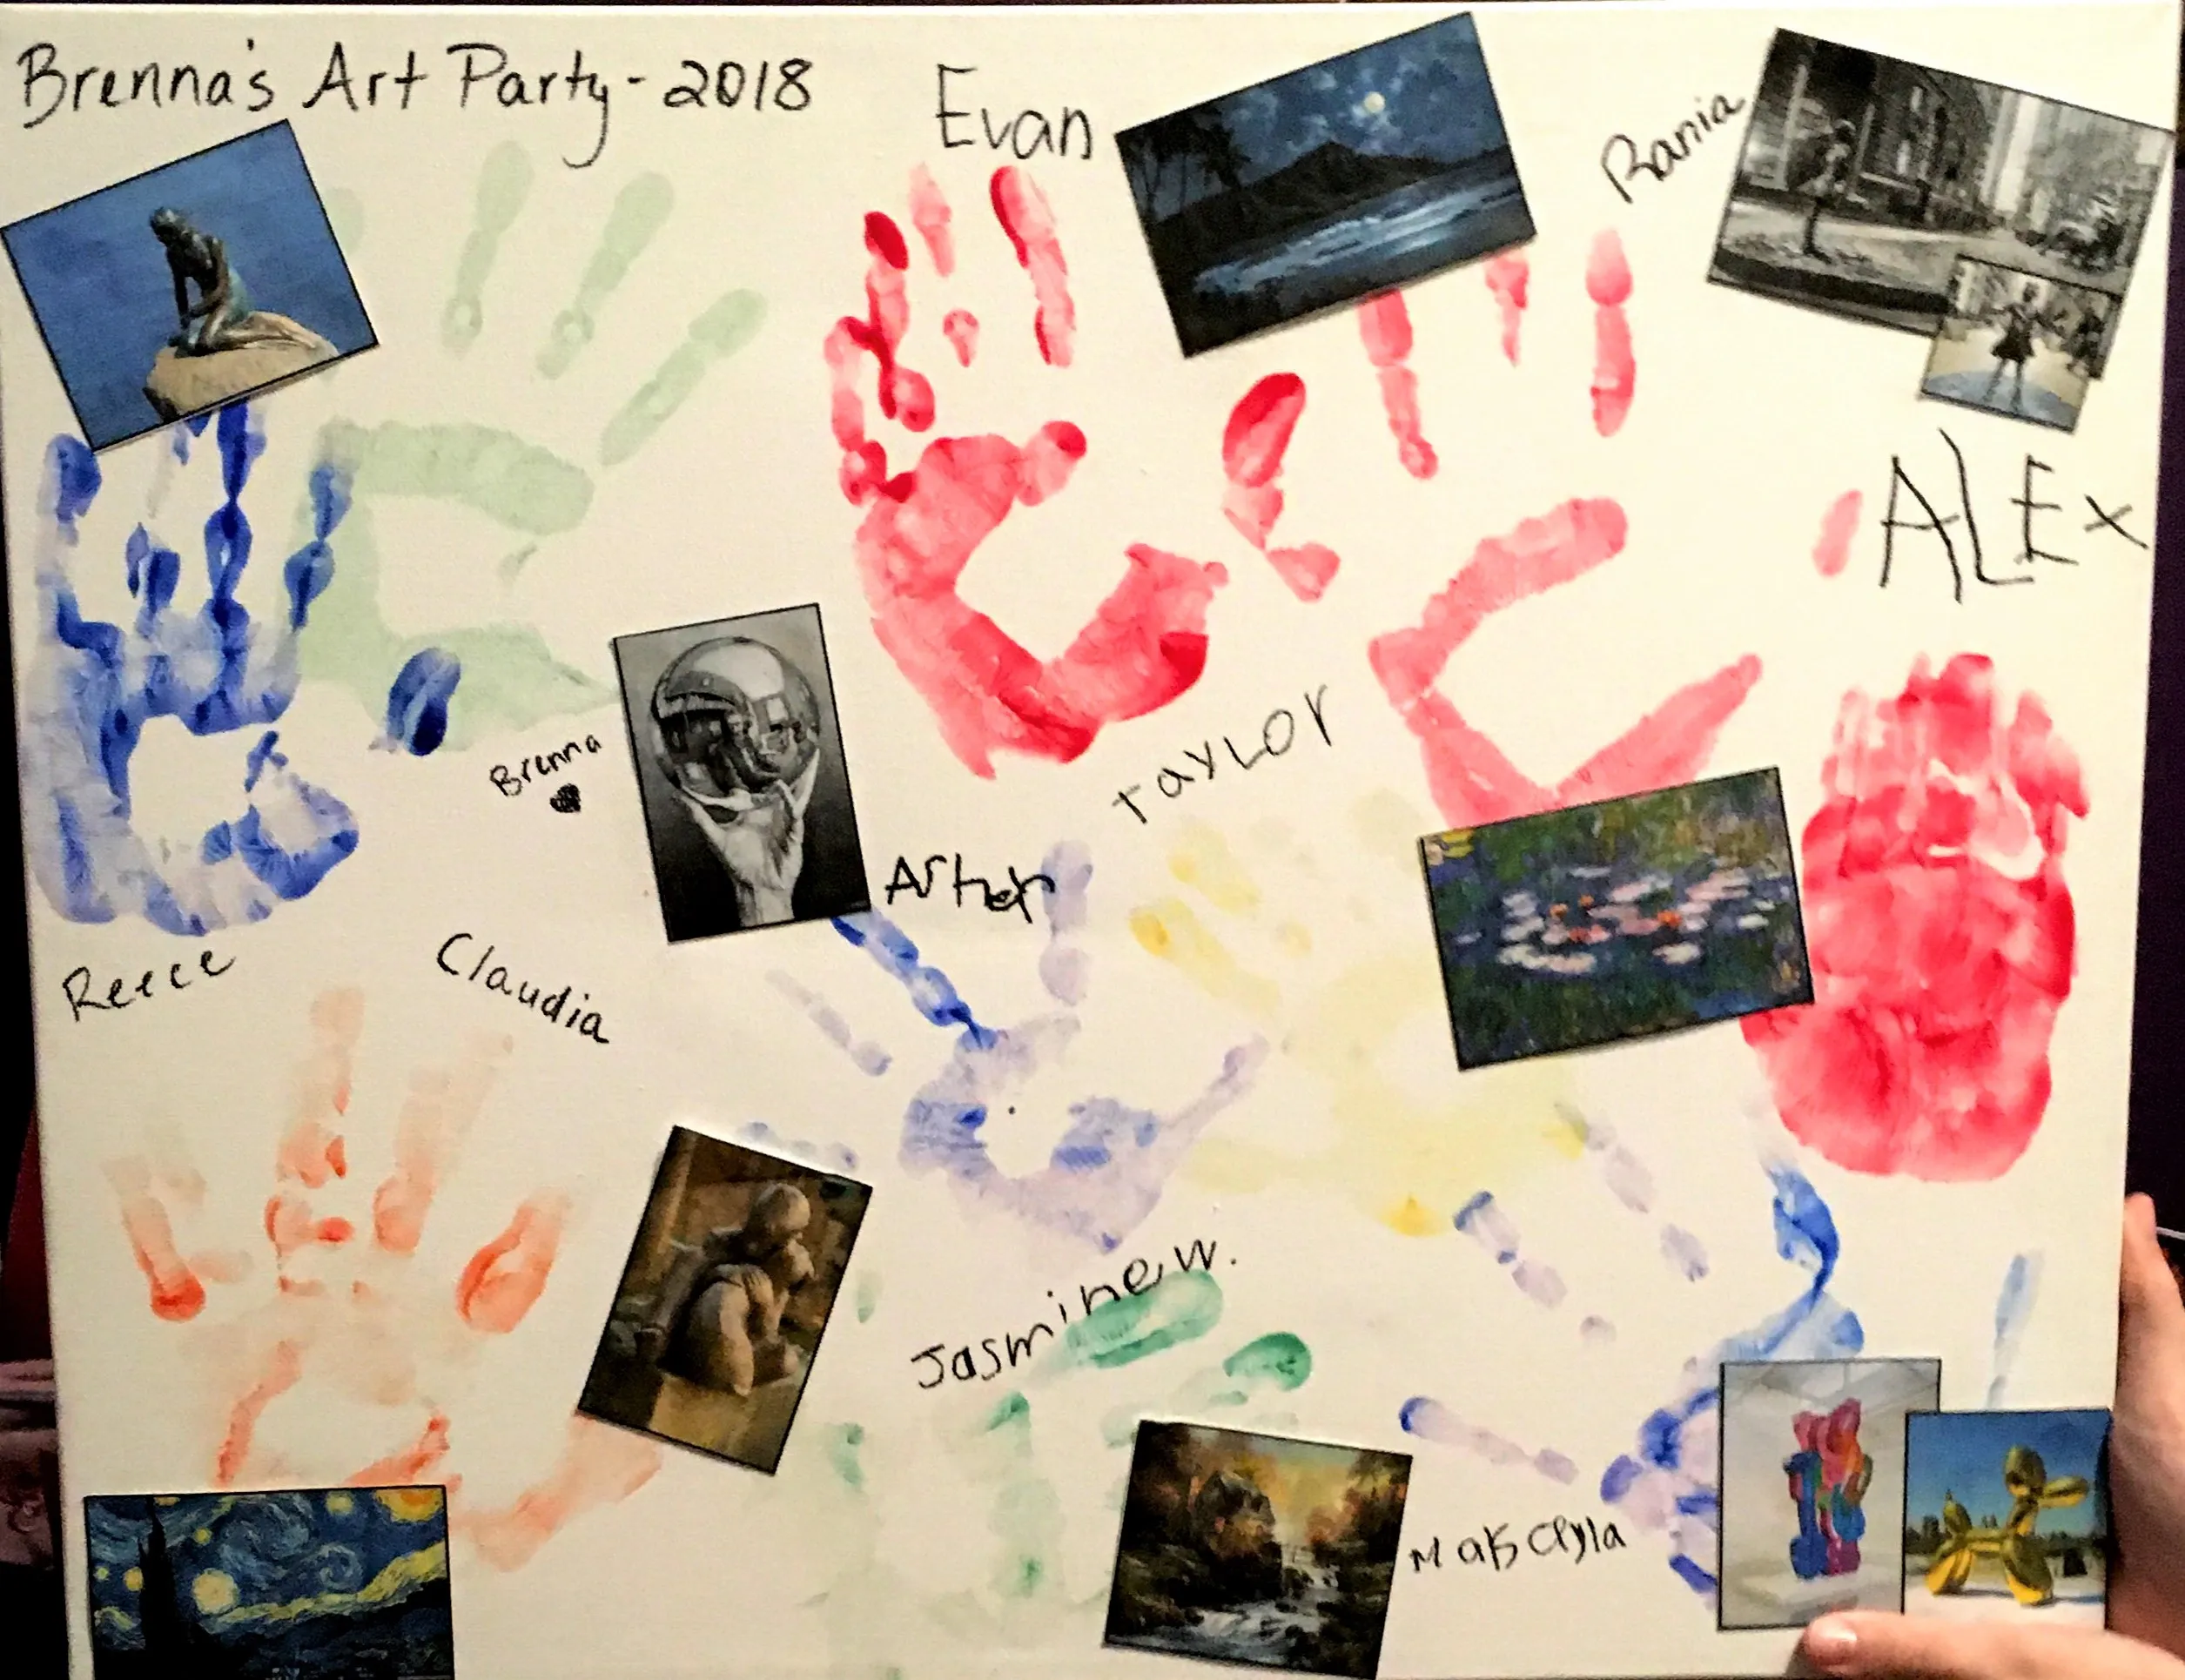
Something to Remember Her Special Day By...
In order to help my daughter remember this day, I asked all of the party guests to paint one hand (I recommend finger paints), and then place their handprint on a large white canvas. They signed their names, and I added photos of famous artwork and sculptures from around the world.
Image credit: DetailsPartyDesigns
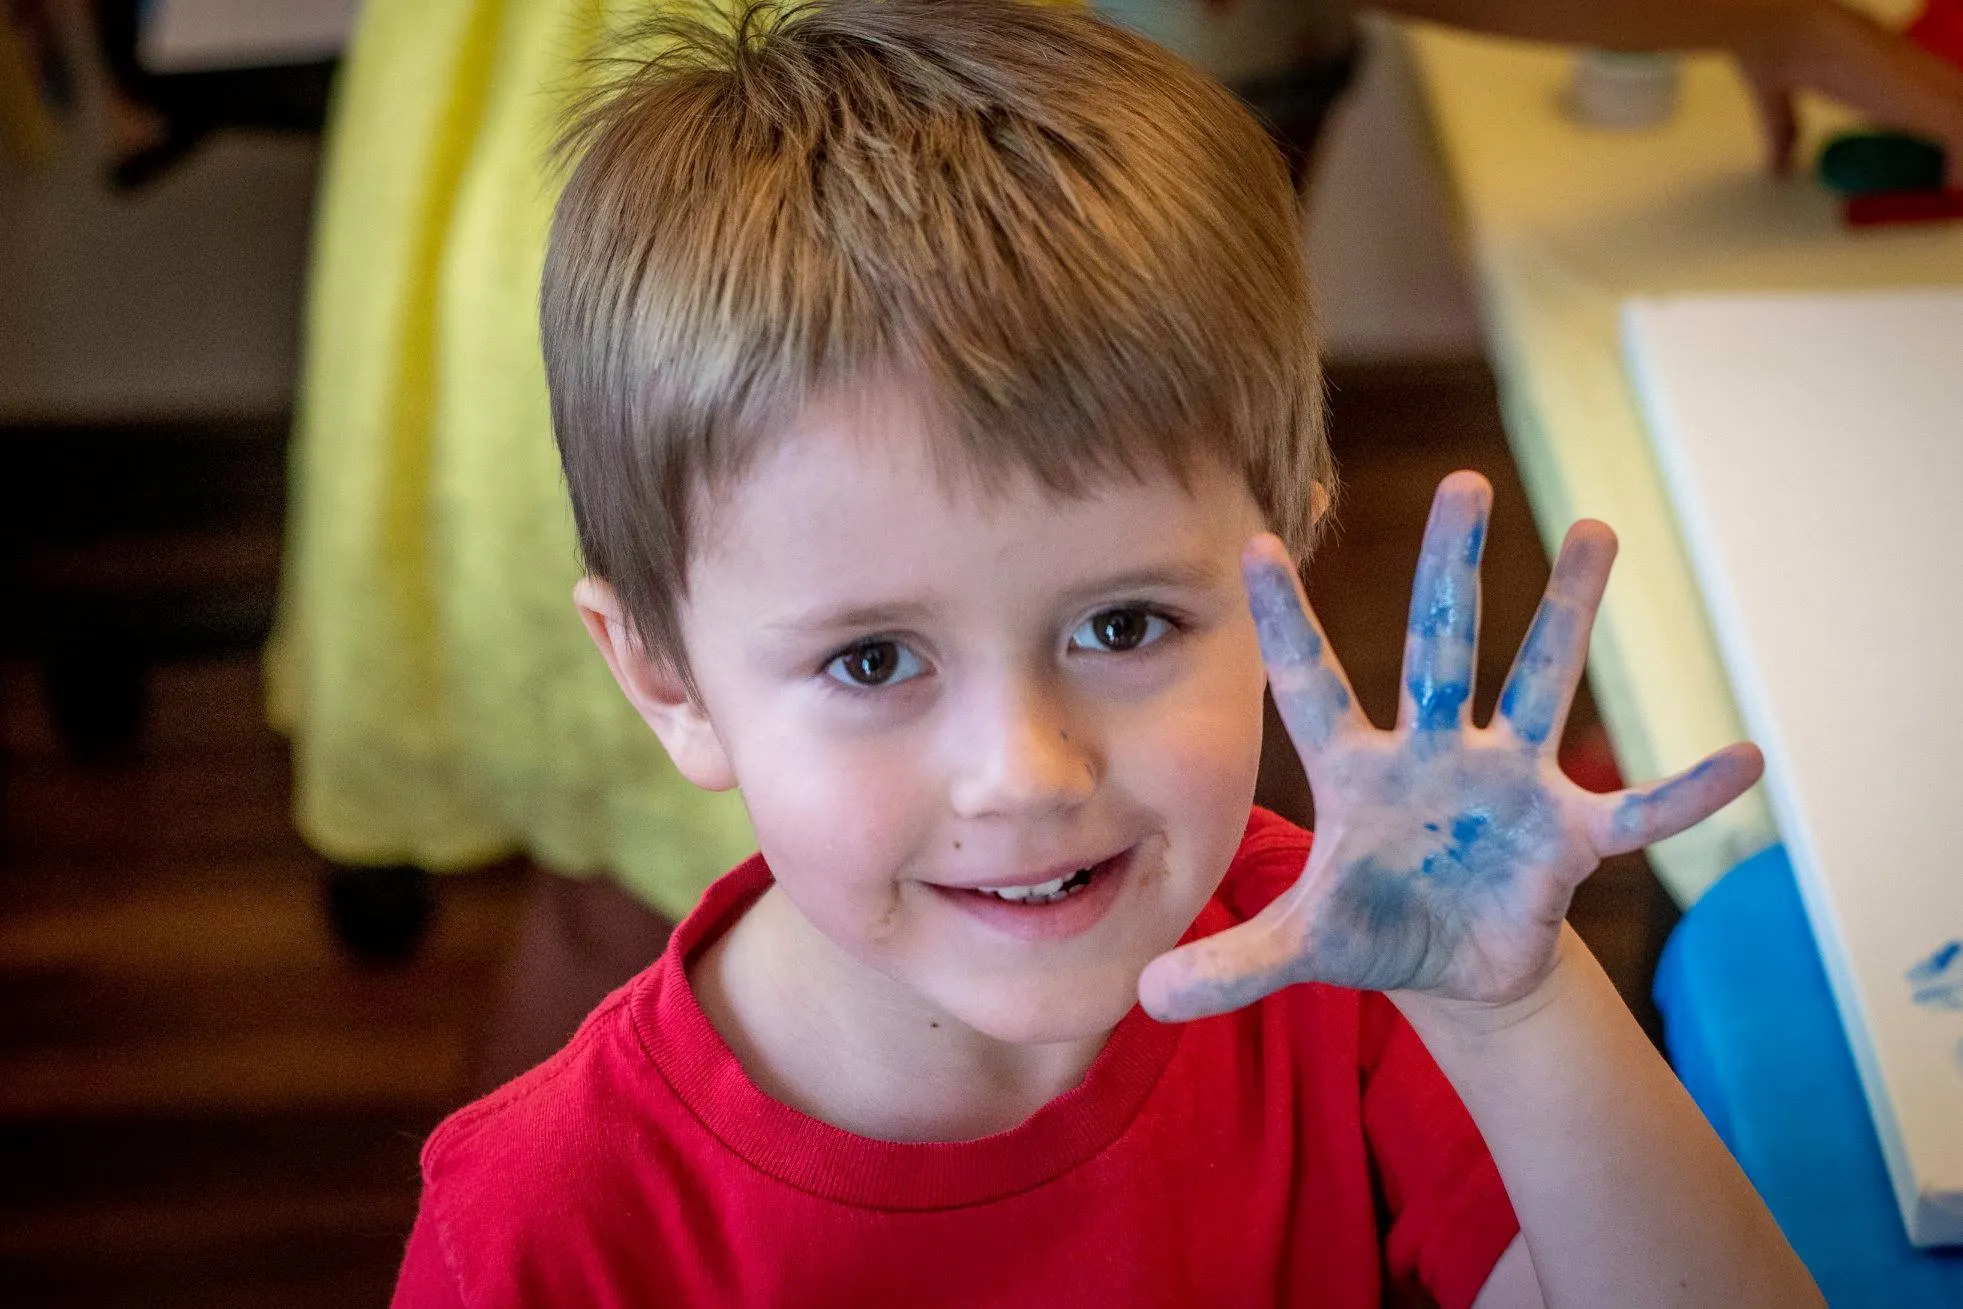
Image credit: Ron Jones
Must-Have's for the Snack Table!
Art Party Food
Art Party Food -Rainbows Everywhere!
I don’t think I’ve ever used so many colors for a party theme before! It looks great, but having all the colors of the rainbow present in the decorations meant I’d have to do something similar for the snacks. So, that’s what I did! Check out the snacks I offered our party guests as well as a sampling of other ideas from Pinterest!
Snacks to Feed Our Starving Artists
There are several things I want to point out in this image. To start with, I purchased several colors of dessert plates and painstakingly layered them to produce a rainbow effect. The blue paint can was actually a vase for a flower arrangement I received earlier in the year. I dipped pretzel sticks into pink and blue candy melts to make pretzel paint brushes, and poured some rainbow goldfish crackers into a bowl. Finally, I purchased fresh strawberries, pineapple, cantaloupe, green grapes, and blackberries from the market so we could each enjoy a “rainbow on a skewer.” These were a big hit with the kids and adults.
Image credit: DetailsPartyDesigns
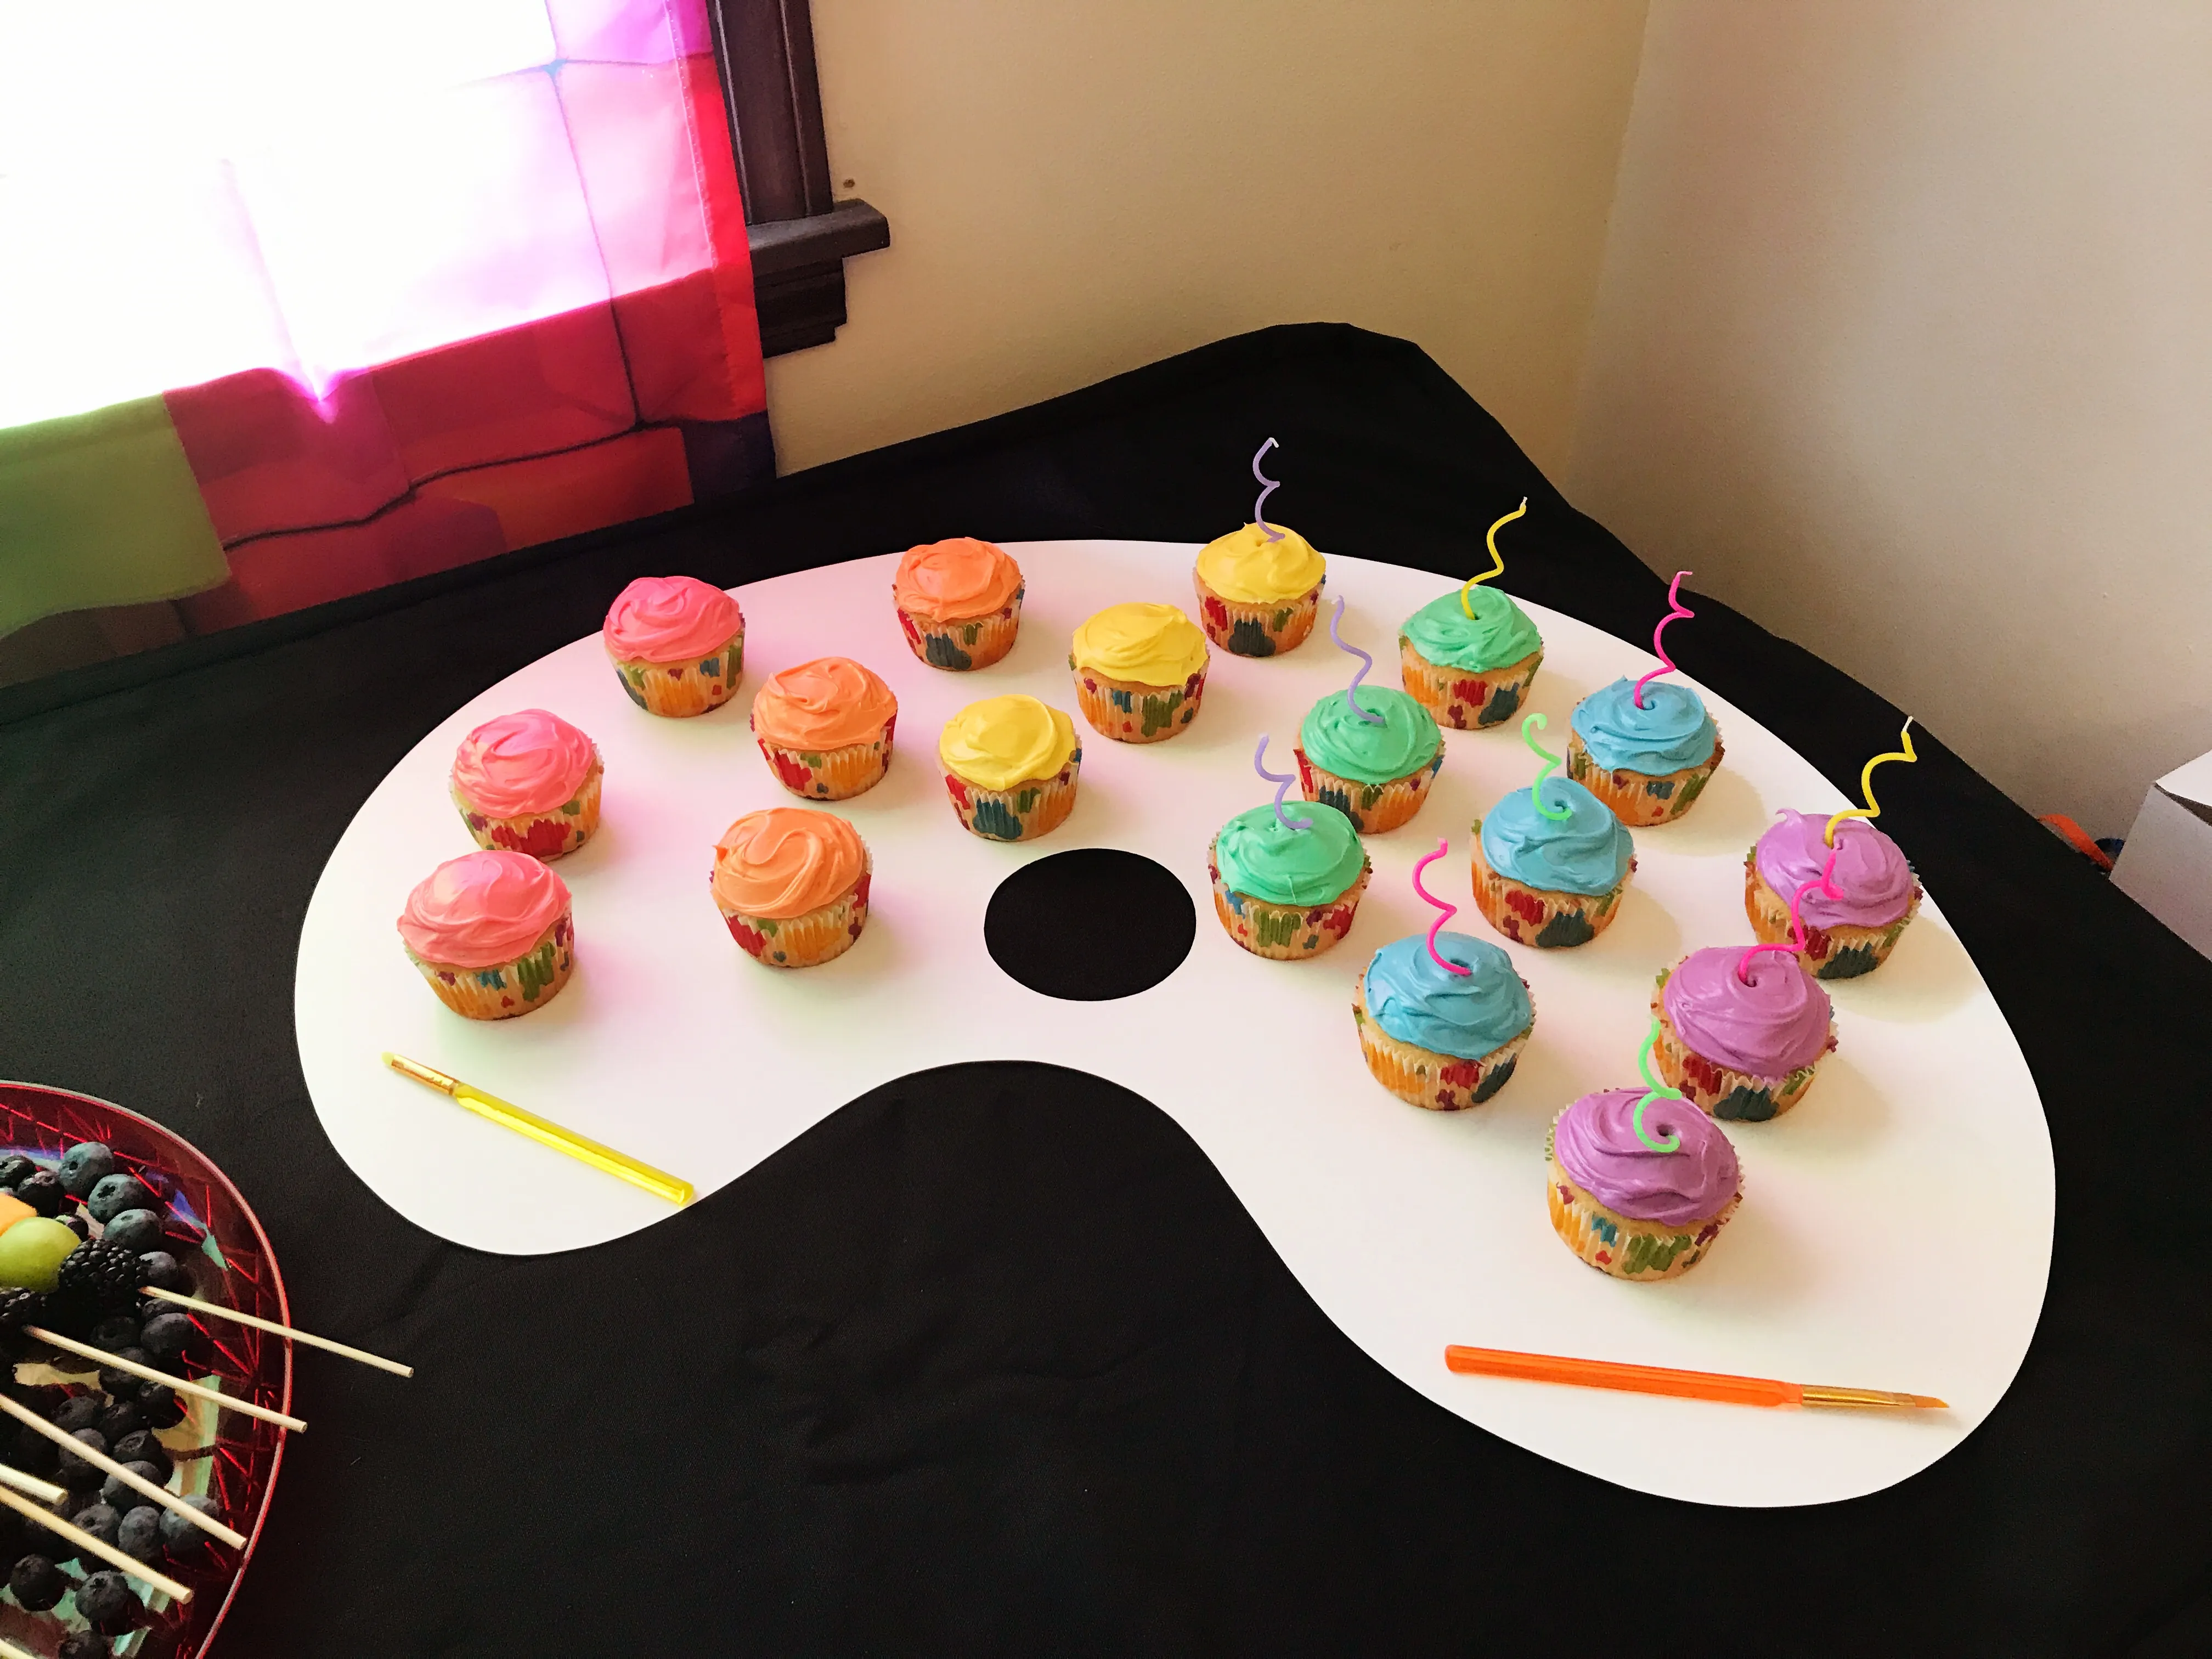
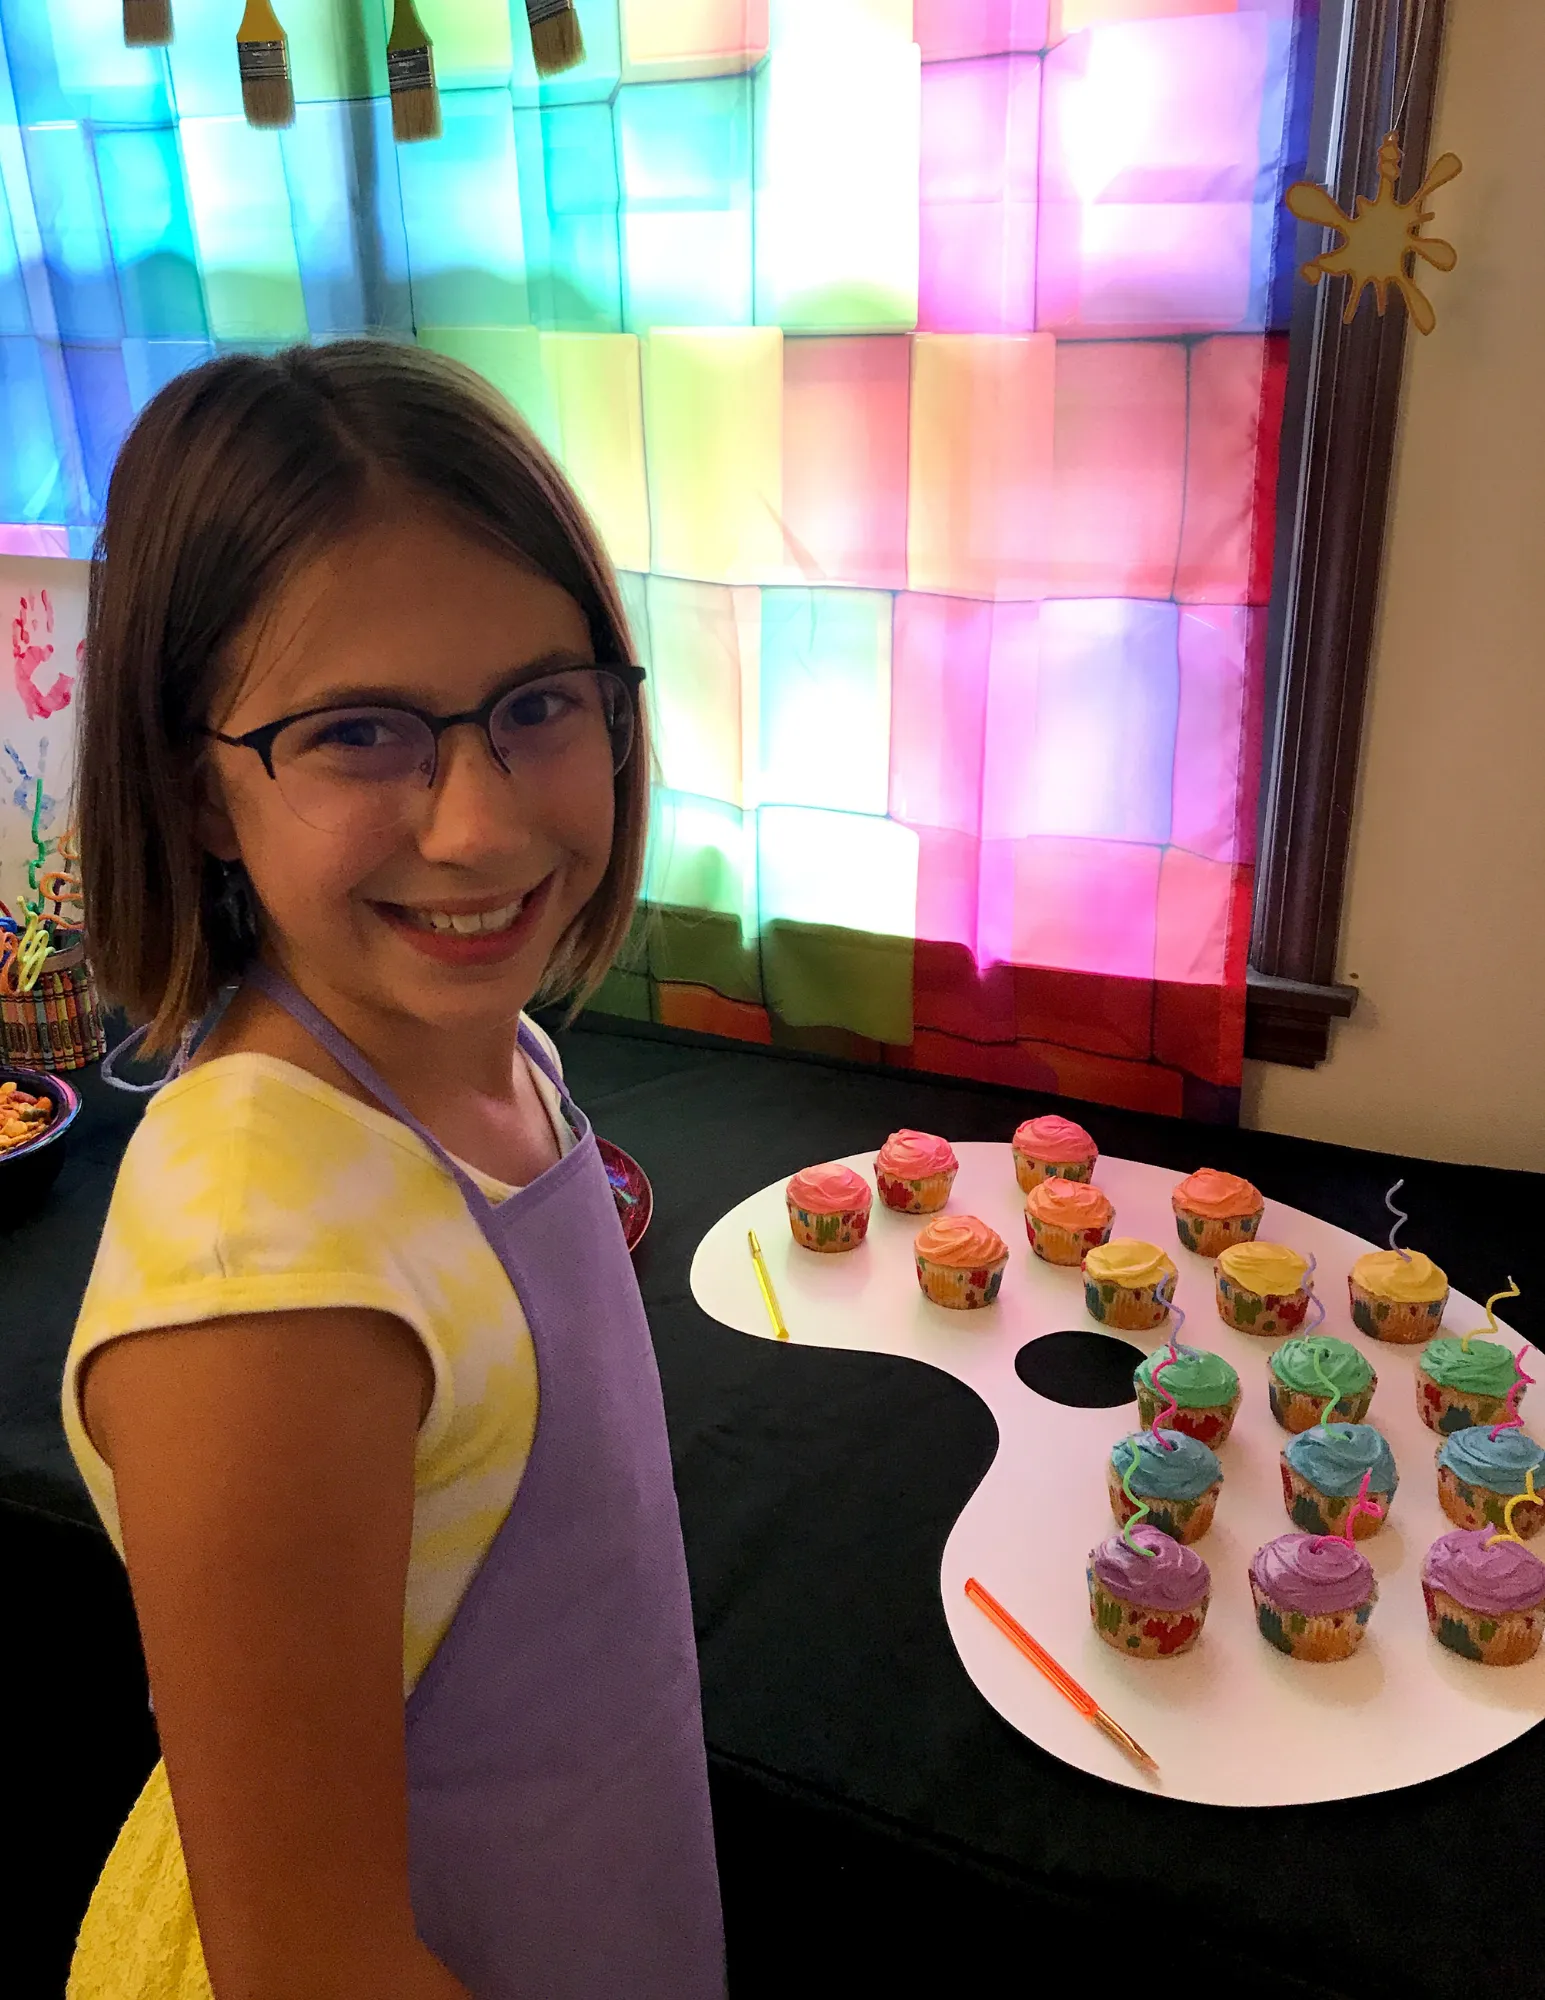
Painter's Palette of Cupcakes
So, this palette turned out to be much bigger than I needed, but it was a nice touch for the snack table. You can use cardboard, but I went with posterboard because it was easier to cut. Just don’t place the cupcakes on the palette and then move them to the snack table. That will result in an artsy, sweet mess on your kitchen floor!
The cupcakes are simple enough. I used white frosting as a base and mixed in food coloring to produce 6 different colors. To complete the look of this painter’s palette of cupcakes, just add some colorful candles and a couple of paintbrushes.
Image credit: DetailsPartyDesigns
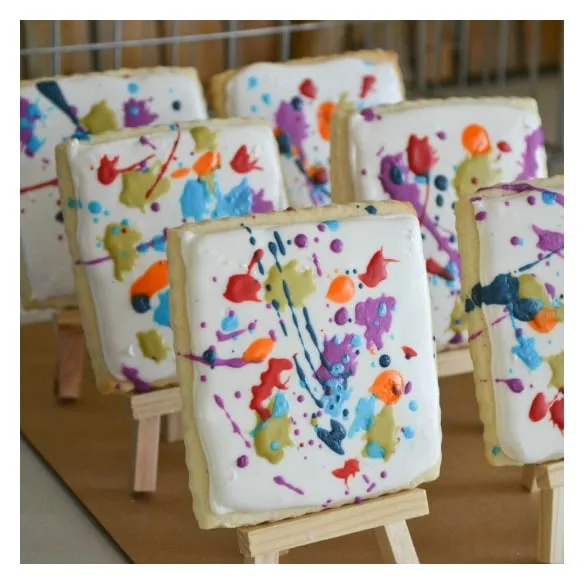
Splattered Canvas Cookies
These canvas cookies are creative and tasty! If you want to save some time, I suggest purchasing pre-made shortbread cookies and decorating them at home. Use a frosting that hardens (like this one from Julie’s Eats and Treats) and layer the splatters, one color at a time. You can find the tiny easels on Amazon (link above in the party favors section).
Image credit: jacksandkate.com

Rainbow Jello
I didn’t make this for my daughter’s party, but I wish I had. However, given the amount of time it takes for the entire thing to set up, I probably wouldn’t have let anyone eat it anyway. It’s just too pretty! You can find the recipe by clicking on the image credit link below.
Image credit: glitterandgoulash.com
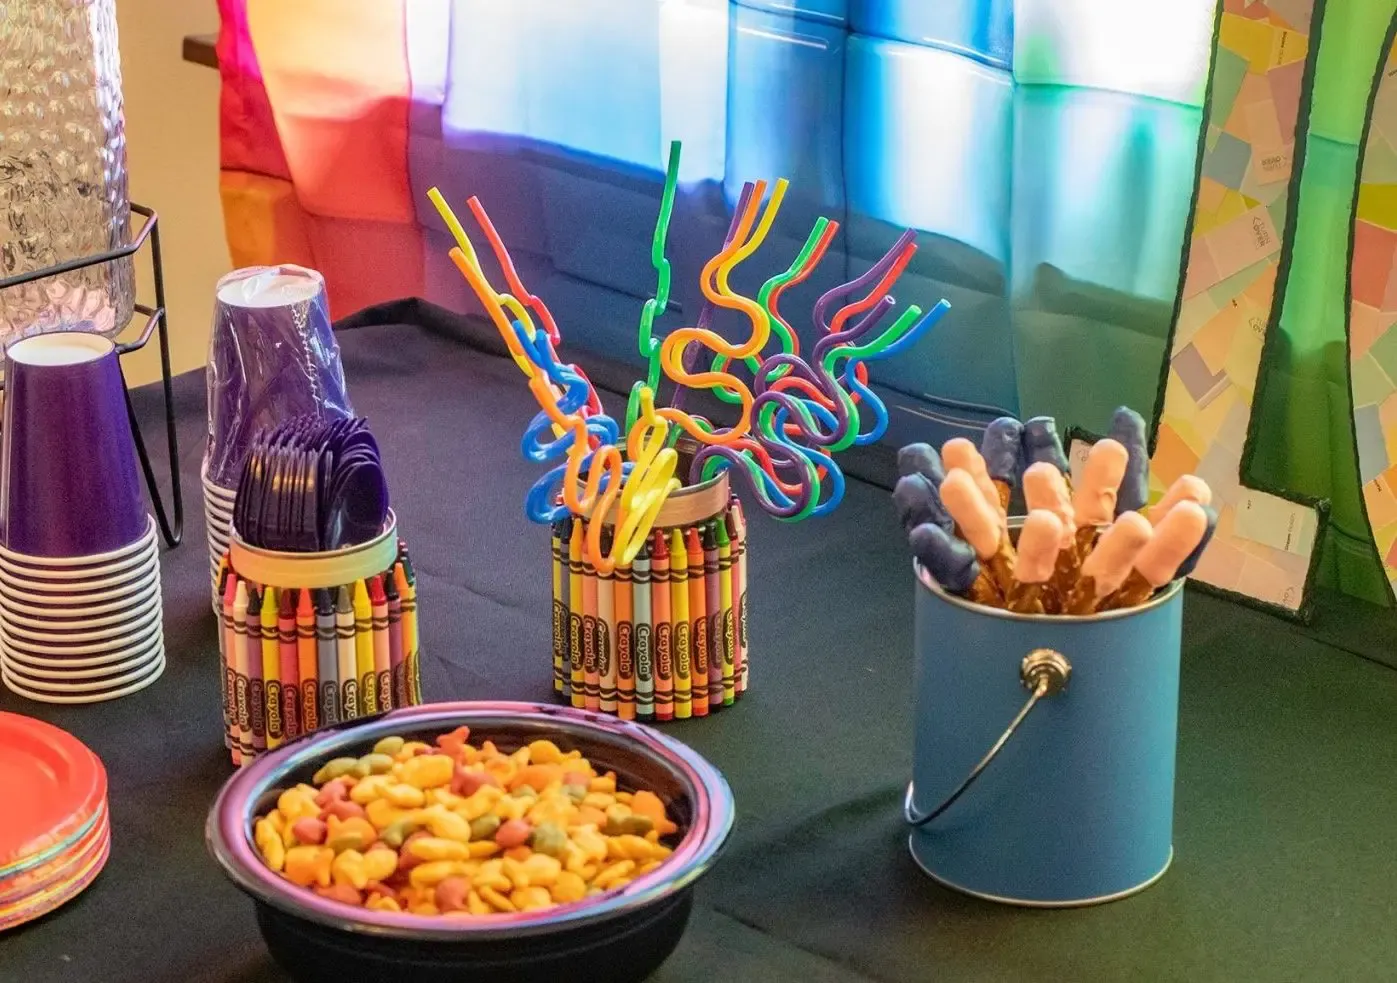
Crayon Utensil Holders
You can see two different versions of this handcrafted utensil holder (images above and below). I used standard-sized tin cans and crayons, but still had some empty space at the top above the crayons (which you don’t see in the image below). So, instead of wrapping a ribbon around the middle of the can when I was finished gluing the crayons in place, I added the ribbon above the crayons to cover the exposed part of the can. A glue gun works best and dries quickly.
Image credit: sensiblysara.com
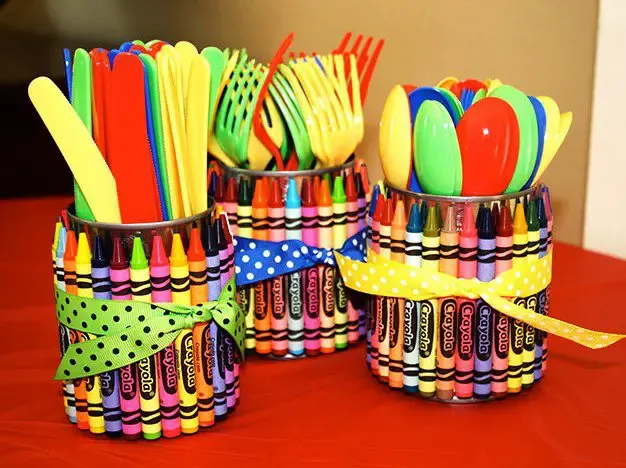
Image credit: blog.chickabug.com
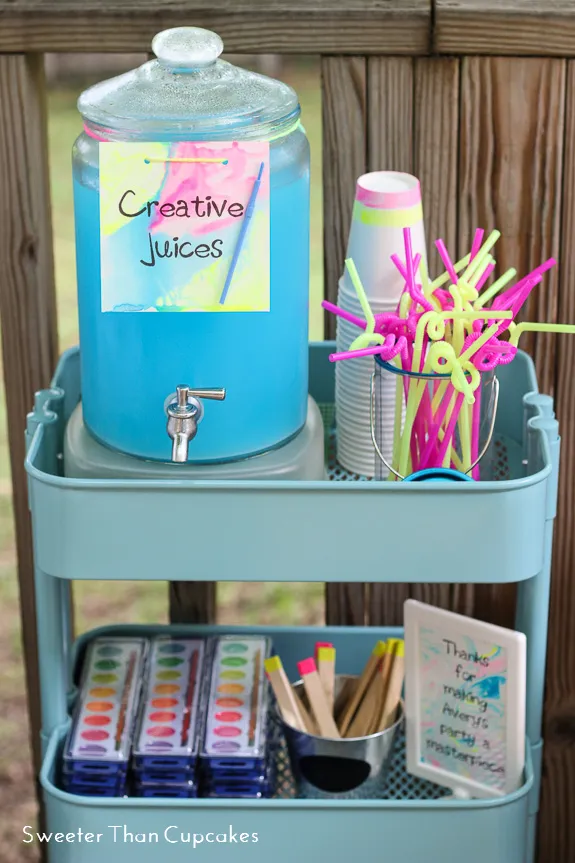
Get Those Creative Juices Flowing!
You can go with any color of juice you want for an art party, so this is a no-brainer. We served lemonade and labeled the dispenser in a similar manner.
Image credit: sweeterthancupcakes.com
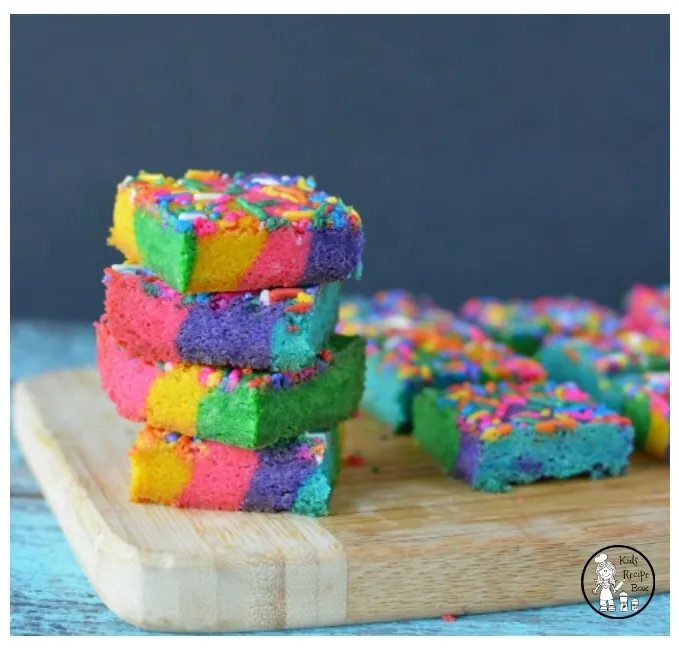
Rainbow Cookie Bars
These cookie bars are soft, colorful, and full of flavor! You’ll need to mix up several batches of dough and add different food coloring to each, but once that’s done, it doesn’t take long to produce this rainbow delight. If you want to go all out on the art theme, these would be a good alternative to cupcakes.
Image credit: kidsrecipebox.com
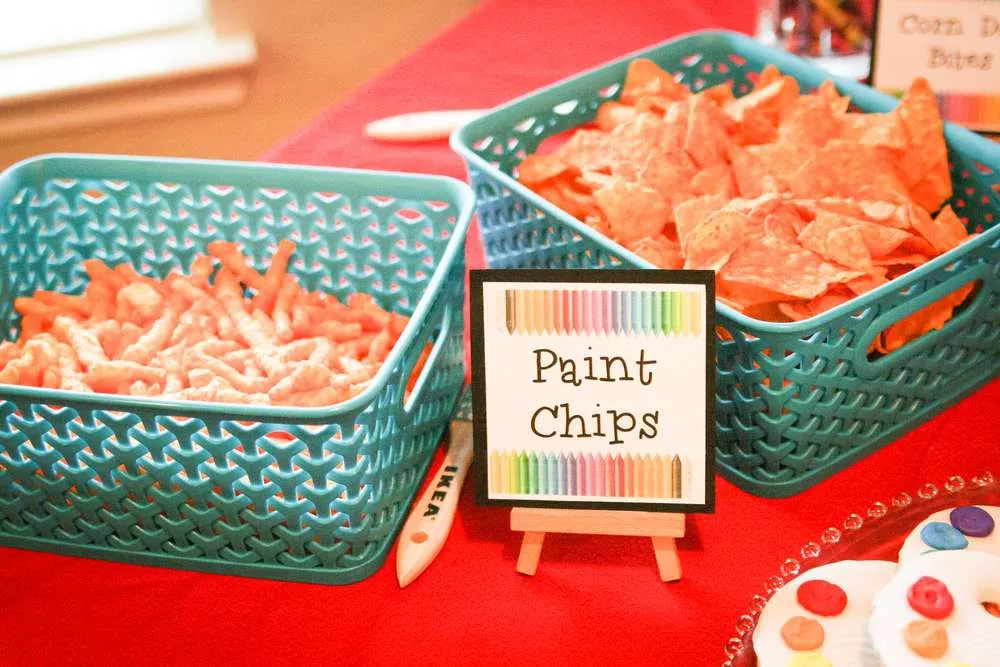
Paint Chips
I can’t believe I didn’t think of this myself. Of course you need paint chips at an art party! I might have even decorated the bowls with paint chip cards just for fun.
Image credit: catchmyparty.com

Have Your Colorful Fruit...and Eat It Too!
If you happen to have leftover candy melts, this is a pretty simple way to get the most bang for your buck. Simply dip fresh strawberries in melted candy (or melted white chocolate) and then again in a bowl of rainbow sprinkles. Place the candied strawberries on some wax paper to harden, and soon your guests will have their colorful fruit and eat it too!
Image credit: alittletipsy.com
Party Favor Bags & Goodies!
Art Party Invitations and Favors
One-of-a-Kind Art Party Invitations and Favors
No art party would be complete without an awesome invitation to start things off! My daughter helped design and craft the invitations (that’s a great way to share some mother/daughter time together). I usually give out favor bags to our party guests, but I chose a different route for this event. The guests created 3 new works of art, so those became part of their “artist goodies” to take home.
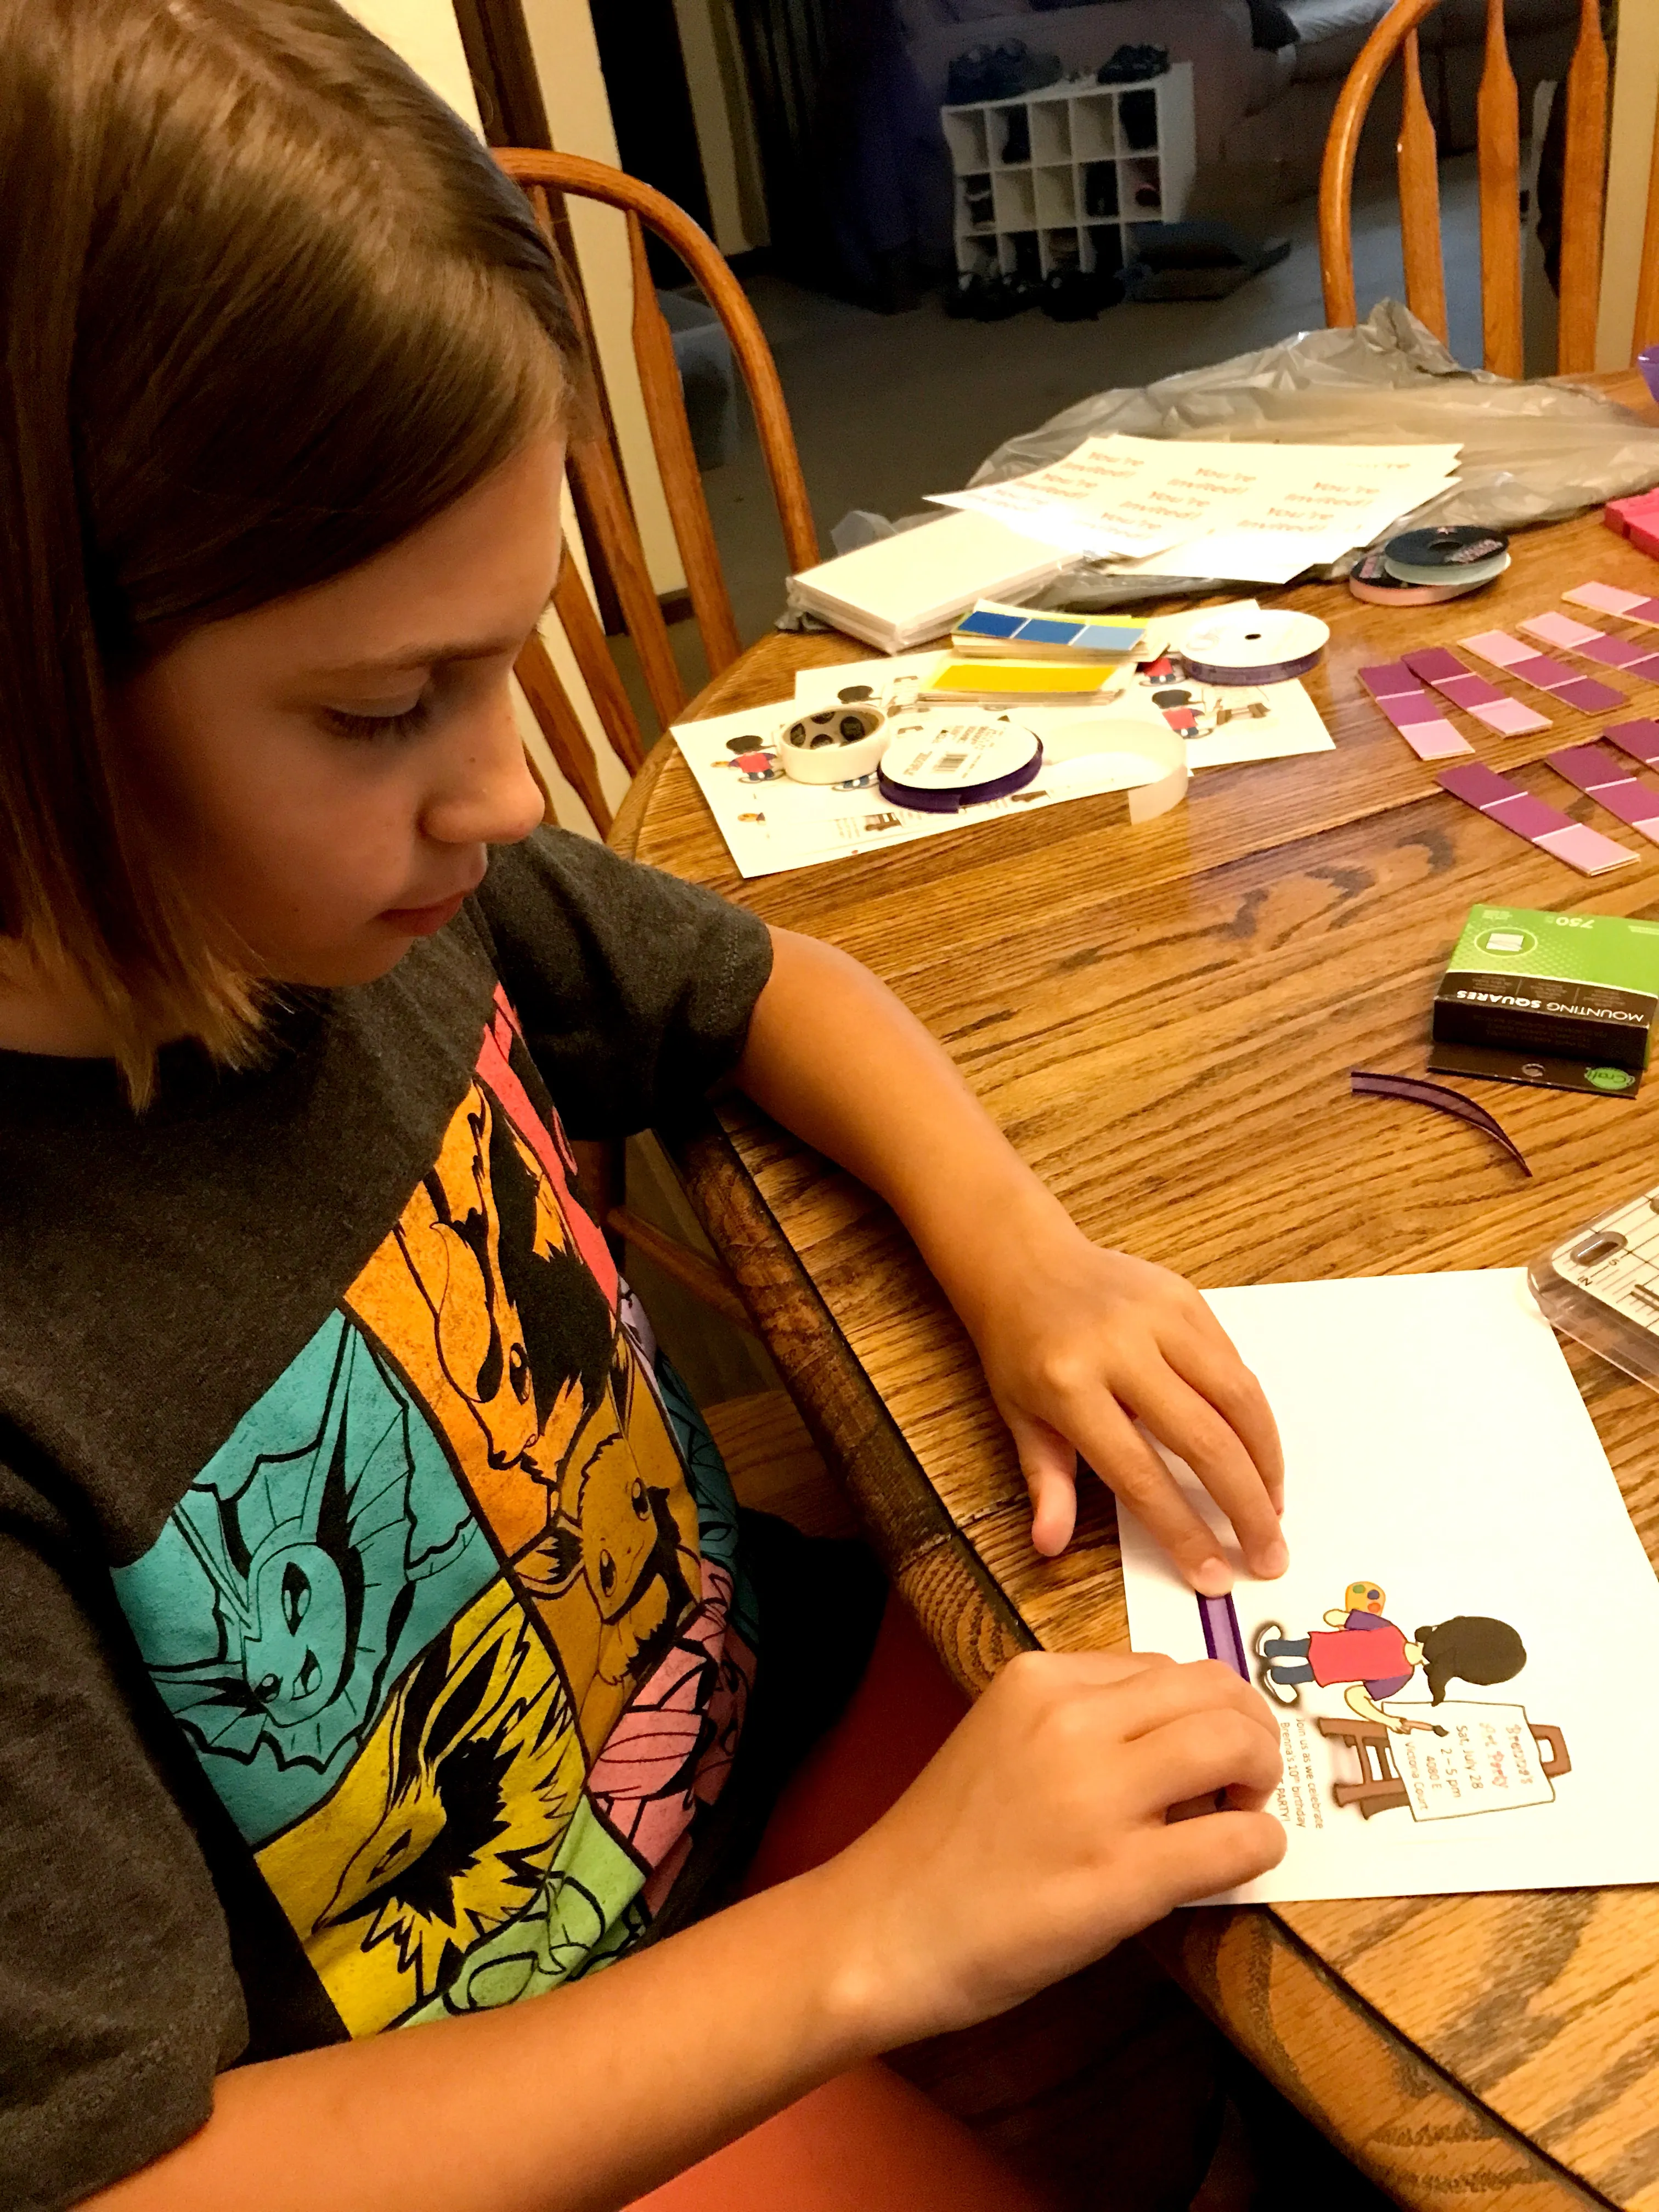
Handmade Art Party Invitation
As I mentioned in the intro above, my daughter helped me design and put these invitations together. I used the same “young artist” image on the inside of the invitations that I hung under the Happy Birthday banner in our dining room. If you have PowerPoint or KeyNote, you can insert the image onto a blank slide and then add text on the canvas (who, where, when, etc.). I printed about a dozen of these and glued them to the inside of a blank card.
For the outside of the card, we cut up different colors of paint chip cards (more paint chip thievery!) and placed strips next to each other like you see in the example below that I found on Pinterest. Instead of buttons, I added a dark purple ribbon across the bottom of the strips for decoration.
Image credit: DetailsPartyDesigns
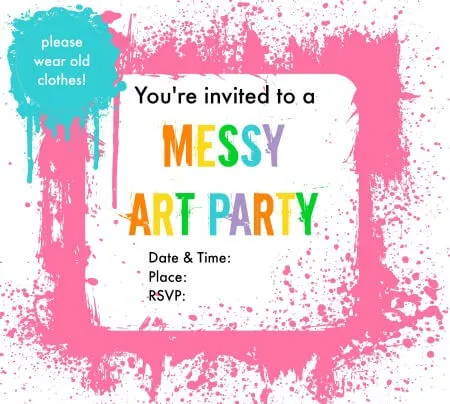
Messy Art Invitations
This design would be tons of fun to create, especially with the help of your children. Simply choose some acrylic paint in bright colors and cut out a shape (square, circle, or even a paint palette) to use as a stencil. Place the stencil in the center of your card and splatter paint all around it. Remove the stencil, add pertinent information in the center (or do this before you splatter the paint), and you’re done! If you’re looking for a simple, yet creative invitation (it’s a bit messy as well, so I recommend working outside), this is about as good as it gets.
Image credit: merryabouttown.com
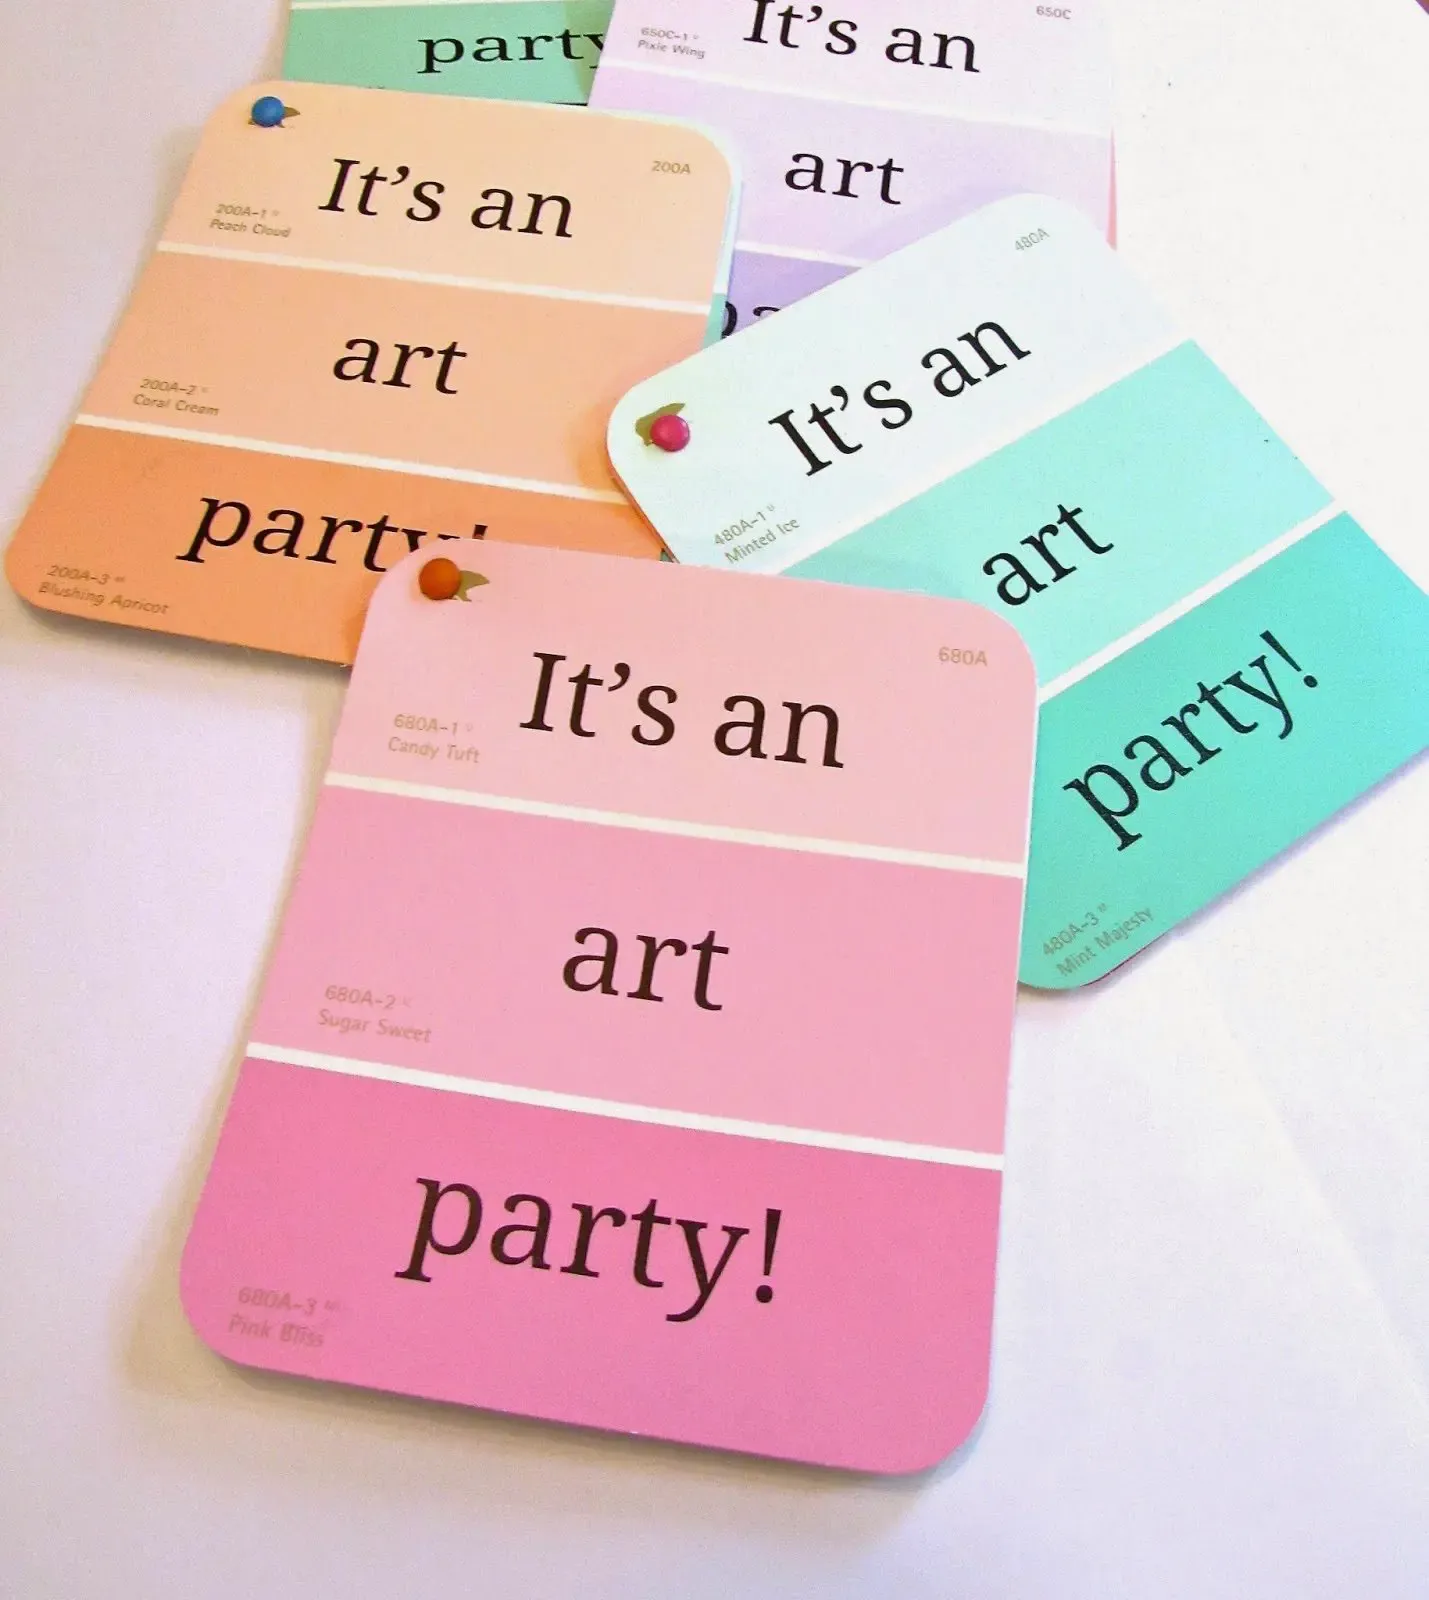
Paint Chip Art Party Invitation
I bet you’re sick of hearing about paint chip cards by now, right? Well, here’s one more use for them. I don’t think my printer would have worked for the “It’s an art party!” text on the card above, but there are plenty of other methods for lettering. You can use a small brad to attach 2 or 3 cards together at the top and add text to each card (i.e. who, what, when, where). These invitations are really quick and easy, and don’t cost much at all to make.
Image credit: leannmichelledesign.com
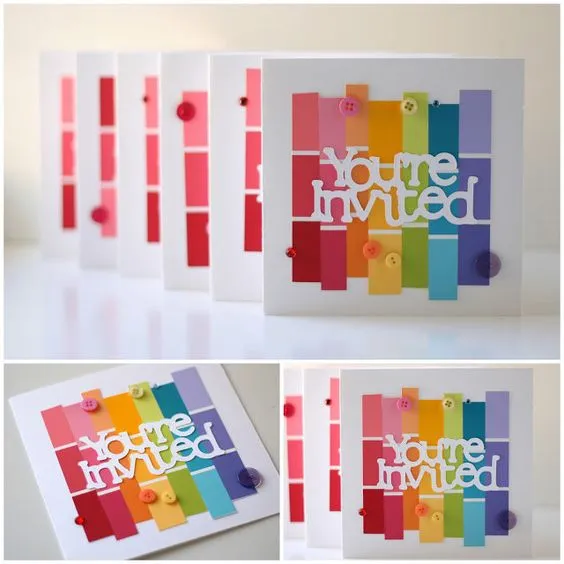
Image credit: brightnest.com
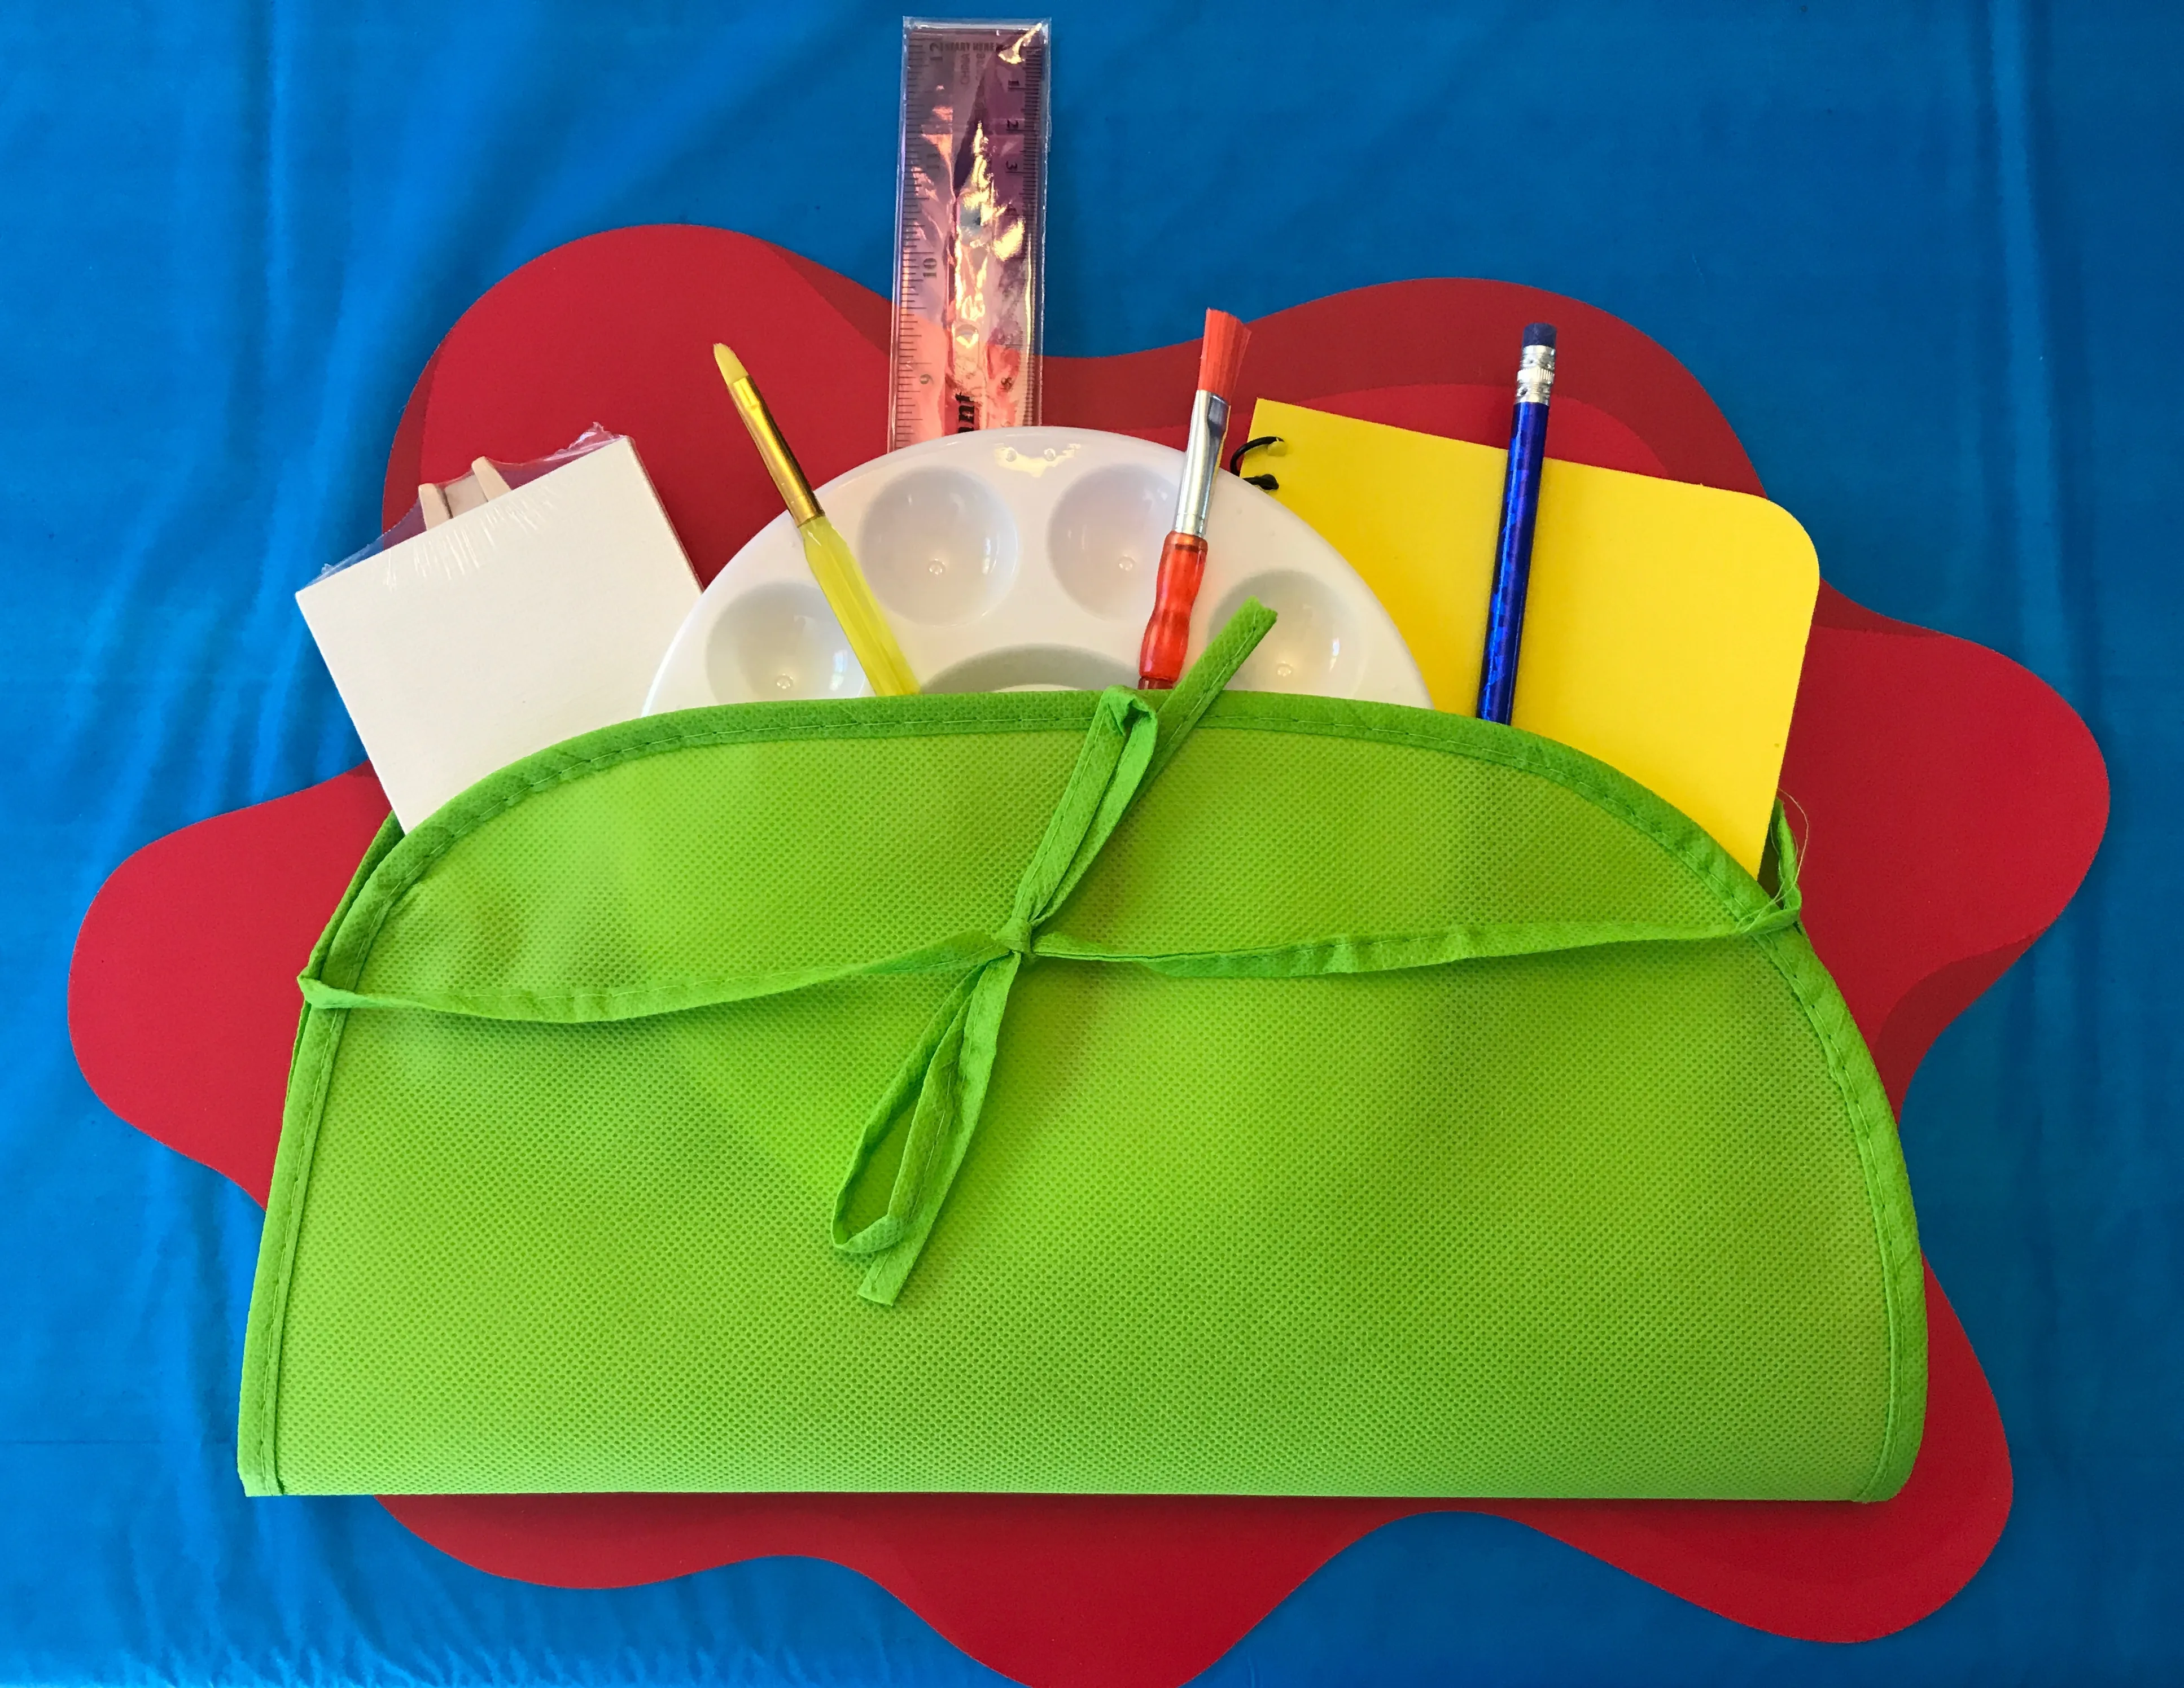
Artist Goodies
Along with their art projects, I sent our guests home with a ruler, paintbrushes, paint palette, a mini canvas and easel, notebook and pencil, and their artist aprons. These items were placed neatly at each artist’s work station (there was nothing “neat” about their work stations by the end of the party!). You can find Amazon links for the paint palettes, aprons, and mini easels/canvases above. All of these items were inexpensive. I got the rulers, pencils, notebooks, and paintbrushes at my local dollar store.
Image credit: DetailsPartyDesigns
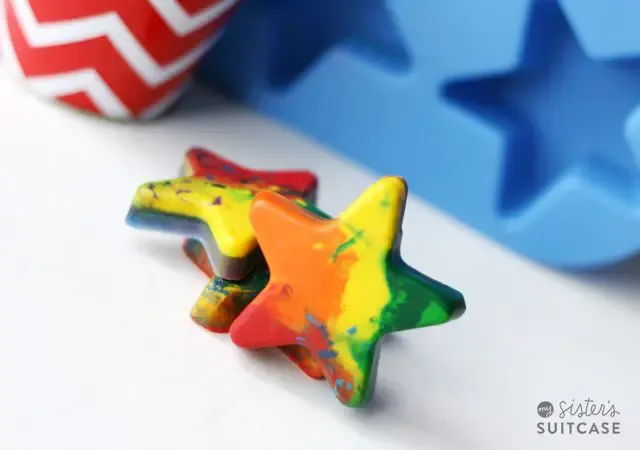
Homemade Crayons as Party Favors
These are super easy to make; in fact, it doesn’t take long to whip up a batch before your party and give them out as favors. Any mold will work, but the silicone ones make it easier to remove the crayons once they’ve cooled and hardened.
To make your own crayons, simply choose a mold and use an old knife to cut up various colors of crayons. You want the crayon chunks to be pretty small but roughly the same size, so they melt uniformly. Fill up your molds about halfway and then bake at 250 degrees F for 10-15 minutes. If the crayons seem to be melting really fast, lower your oven’s temperature. You want them to melt slower so they preserve whatever pattern you designed when you placed them in the molds.
Image credit: sisterssuitcaseblog.com
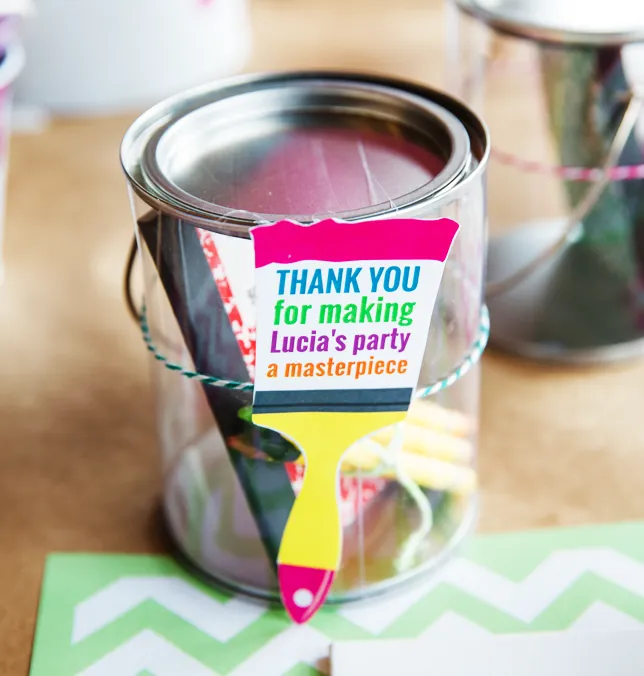
Clear Paint Can "Goody Bags"
It was my original intent to include these clear, quart-sized paint cans as favor “bags” for our party guests. However, I quickly realized that the “artist goodies” I was planning to give them wouldn’t fit in the cans anyway, so I dropped that idea. That doesn’t mean it won’t work for you! You can find the cans very reasonably priced on Amazon (link above.) Add homemade crayons, markers, pencils, paintbrushes, mini easels and canvases, watercolors, and any other artsy items that come to mind.
Image credit: thesitsgirls.com
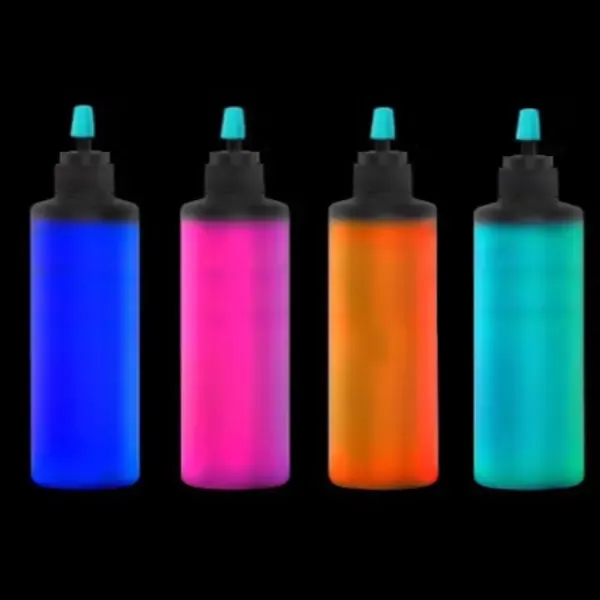
Homemade Glow-in-the-Dark Squirt Chalk
You can find the complete recipe for these glow-in-the-dark squirt chalk bottles via the link below. All you need are clean squirt bottles, corn starch, warm water, neon paint, and black light flashlights. Mix the corn starch, neon paint, and warm water, and then stir. Shake the bottles for a while so everything mixes well, and you’re ready to get squirtin’ and paintin’ (assuming you’re having an evening party). If your party isn’t at night, I suggest having your guests make these as party favors to take home with them later.
Image credit: growingajeweledrose.com
Check Out These Other Party Ideas!
Spider-Man Party
Minecraft Party
Batman Party
Join the Party!
Subscribe and you'll receive my quarterly newsletter, along with a free party planning e-book written by yours truly. Follow it and you won't miss a single detail! Oh, and don't worry; I'm not the spammy type...promise!
© 2022 DetailsPartyDesigns. All Rights Reserved.